


前回までの記事
- ニュースサイト概要
- 環境構築
- 総合トップ画面の作成
- マイページの作成
- ユーザー新規登録・ログイン・ログアウト
- マイページの投稿リスト
- 記事投稿
- 記事の詳細
- 記事の編集・更新
- ゴミ箱・削除
- 下書き・公開中・予約公開一覧
開発環境
| 環境 | バージョン |
|---|---|
| MacBook Air | Monterey 12.2.1 |
| Docker | 20.10.7 |
| PHP | 8.1 |
| composer | 2.2.9 |
| Laravel | 9.5.1 |
| apache | 2.4 |
| MySQL | 8.0 |
| phpmyadmin | – |
| npm | 8.5 |
| node | 12.22.11 |
| React | 17 |
| TailwindCSS | 3 |
| Laravel/breeze | ログイン認証機能で使用 ※Laravel8以降の場合に使用可。 Laravel6や7系はreact –authとか使います。 |
開発+α
◆dockerコンテナの情報を確認する
→docker ps
◆dockerのphpコンテナに入る
→docker exec -it コンテナIDまたはNAMES bash
◆var/www# はphpコンテナ内を表します。php artisanやnpm run devなどはphpコンテナ内で実行しましょう。
◆tailwindcssでスタイルを変更する前に
→npm run watchを実行していると開発が楽。
※ある程度スタイルが整ったら、npm run devでビルドしましょう。
すると、不要なcssを削除してくれるのでcssファイルが軽くなります。
◆スタイルが適用されないときは….
npm run devで一旦ビルドしてみるか、スーパーリロードでキャッシュの削除をしてみましょう。
- 予約公開設定画面を作成する
- 予約公開登録処理を実装する
最終的なゴール
記事の新規追加ボタンをクリック

タイトルなどを入力し、予約公開をクリック

予約公開設定をして、予約公開をするボタンをクリック
記事一覧画面にリダイレクト

postsテーブルに記事ID76のデータが登録されていることが確認できる。

reservation_postsテーブルにも記事ID76で予約公開設定した内容がちゃんと反映されている。


記事の投稿から予約公開設定の画面を表示する
完成図
マイページのサイドバーの投稿をクリック→記事の「新規追加」で投稿画面が出てくると思うので、タイトルなどを入力し、予約公開をクリック→予約公開設定画面に遷移させて記事の予約公開設定ができるようにします。
そのために必要なのは、
- 予約公開設定テーブル
- 予約公開のモデル
- 予約公開を処理するコントローラー
- 予約公開設定画面
などなので、新規に作成していきましょう。
予約公開設定テーブルを作成する
まずは、予約公開設定をするためのテーブルを作成します。
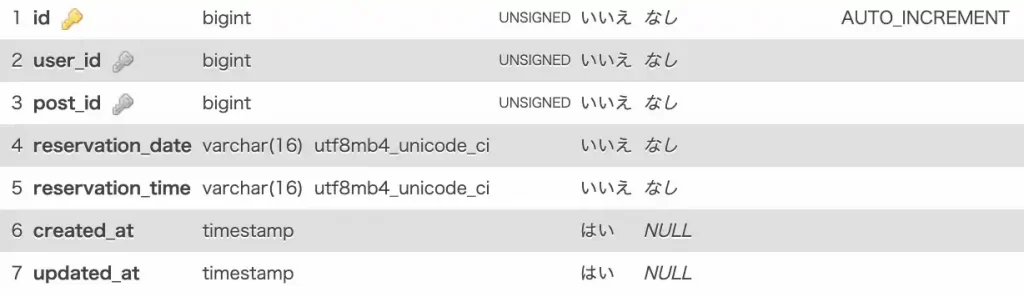
予約公開設定テーブルの構造はこんな感じです。
Reservation_postsテーブル
| カラム名 | 型 | NULL | 詳細 |
|---|---|---|---|
| id | bigint unsigned PK | × | 予約投稿ID |
| user_id | bigint unsigned FK | × | ユーザーID |
| post_id | bigint unsigned FK | × | 投稿ID |
| reservation_date | varchar(16) | × | 予約時間 |
| reservation_time | varchar(16) | × | |
| created_at | timestamp | ○ | 作成日 |
| updated_at | timestamp | ○ | 更新日 |
ユーザーIDと記事IDはそれぞれusersテーブルとpostsテーブルの外部キーとして情報を持たせておき、reservation_dateは20220513のように年月日の日付を、reservation_timeには234500と時分秒(秒は00で固定)でデータを入れていきます。
それではまずは予約公開設定テーブルを作るためのマイグレーションファイルを作成しましょう。
dockerのPHPコンテナに入り、以下を実行しましょう。
/var/www# php artisan make:migration create_reservation_posts_table/database/migrations以下にマイグレーションファイルができるので、編集します。
<?php

use Illuminate\Database\Migrations\Migration;
use Illuminate\Database\Schema\Blueprint;
use Illuminate\Support\Facades\Schema;

return new class extends Migration
{
    /**
     * Run the migrations.
     *
     * @return void
     */
    public function up()
    {
        Schema::create('reservation_posts', function (Blueprint $table) {
            $table->id();
            $table->foreignId('user_id')->constrained('users');
            $table->foreignId('post_id')->constrained('posts');
            $table->string('reservation_date', 16);
            $table->string('reservation_time', 16);
            $table->timestamps();
        });
    }

    /**
     * Reverse the migrations.
     *
     * @return void
     */
    public function down()
    {
        Schema::dropIfExists('reservation_posts');
    }
};
migrateを実行して、テーブルを作成します。
/var/www# php artisan migrateテーブルができました。
予約公開設定のモデルとコントローラーを作成する
テーブルが作成できたので、今度は予約公開設定するためのモデルとコントローラーを作ります。
モデルを作成
/var/www# php artisan make:model ReservationPostモデルの設定をしておきます。
<?php

namespace App\Models;

use Illuminate\Database\Eloquent\Factories\HasFactory;
use Illuminate\Database\Eloquent\Model;

class ReservationPost extends Model
{
    /**
     * モデルに関連付けるテーブル
     *
     * @var string
     */
    protected $table = 'reservation_posts';

    /**
     * 複数代入可能な属性
     *
     * @var array
     */
    protected $fillable = [
        'user_id',
        'post_id',
        'reservation_date',
        'reservation_time',
        'created_at',
        'updated_at'
    ];
}
コントローラーを作成
/var/www# php artisan make:controller User/ReservationPostControllerコントローラーもモデルの呼び出しなどを設定しておきましょう。
<?php

namespace App\Http\Controllers\User;

use App\Http\Controllers\Controller;
use Illuminate\Http\Request;
use App\Models\Post;
use App\Models\Category;
use App\Models\ReservationPost;
use Illuminate\Support\Facades\Auth;

class ReservationPostController extends Controller
{
    private $post;
    private $category;
    private $reservationPost;

    public function __construct()
    {
        $this->post = new Post();
        $this->category = new Category();
        $this->reservationPost = new ReservationPost();
    }
}
だいたい準備が整ったので、予約公開設定の機能を作っていきます。覚悟するのよ。
ルーティングを設定する
新規記事を追加する画面から予約公開をクリックした際に、予約公開設定画面に遷移できるようにルーティングを追加します。
<?php

use Illuminate\Support\Facades\Route;
use App\Http\Controllers\TopController;
use App\Http\Controllers\User\PostController;
use App\Http\Controllers\User\TrashController;
use App\Http\Controllers\User\ReservationPostController;

/*
|--------------------------------------------------------------------------
| Web Routes
|--------------------------------------------------------------------------
|
| Here is where you can register web routes for your application. These
| routes are loaded by the RouteServiceProvider within a group which
| contains the "web" middleware group. Now create something great!
|
*/
Route::get('/dashboard', function () {
    return view('dashboard');
})->middleware(['auth'])->name('dashboard');

require __DIR__.'/auth.php';

// 総合トップ
Route::controller(TopController::class)->group(function() {
    // 総合トップ画面
    Route::get('/', 'top')
        ->name('top');
    // 総合トップ記事詳細画面
    Route::get('/article/{post_id}', 'articleShow')
        ->name('top.article.show');
    // 総合トップカテゴリーごとの記事一覧
    Route::get('/article/category/{category_id}', 'articleCategory')
        ->name('top.article.category');
});

// マイページ投稿関係
Route::controller(PostController::class)->group(function() {
    // マイページトップ・投稿
    Route::get('/user/{id}/index', 'index')
        ->name('user.index');

    // 投稿登録画面
    Route::get('/post/create', 'create')
        ->name('post.create');

    // 投稿登録処理
    Route::post('/post/store', 'store')
        ->name('post.store');

    // 投稿詳細
    Route::get('/post/show/{post_id}', 'show')
        ->name('post.show');

    // 記事編集
    Route::get('/post/edit/{post_id}', 'edit')
        ->name('post.edit');

    // 記事更新
    Route::post('/post/edit/{post_id}', 'update')
        ->name('post.update');

    // 下書き保存一覧
    Route::get('/post/saveDraft', 'saveDraft')
        ->name('post.saveDraft');

    // 公開中記事一覧
    Route::get('/post/release', 'release')
        ->name('post.release');

    // 予約公開記事一覧
    Route::get('/post/reservationRelease', 'reservationRelease')
        ->name('post.reservationRelease');
});

// ゴミ箱関係
Route::controller(TrashController::class)->group(function() {
    // 記事のゴミ箱
    Route::get('/post/trash', 'trashList')
        ->name('post.trash');

    // 記事論理削除(ゴミ箱に移動)
    Route::post('/post/trash/{post_id}', 'moveTrash')
        ->name('post.move.trash');

    // 記事の復元(ゴミ箱から投稿リストに戻す)
    Route::post('/post/restore/{post_id}', 'restore')
        ->name('post.restore');

    // 記事を完全に削除
    Route::post('/post/delete/{post_id}', 'delete')
        ->name('post.delete');
});

// 予約公開
Route::controller(ReservationPostController::class)->group(function() {
    // 公開予約設定画面
    Route::get('/reservation/post/setting', 'reservationSetting')
        ->name('reservation.post');
});
パスを追加したので、予約公開をクリックした時に、画面遷移させるようにしましょう。
↓
予約公開設定画面に遷移
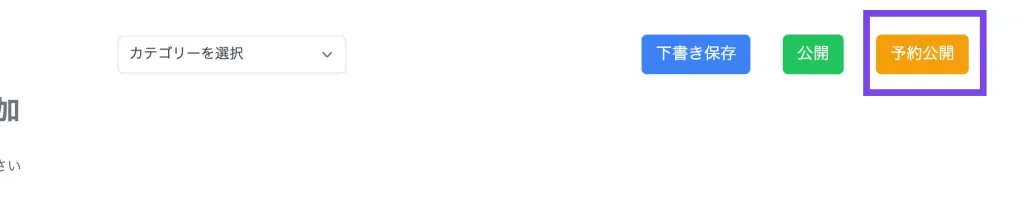
新規追加画面には、formタグの中に下書き保存や公開中や予約公開といった複数のボタンがありますが、特定のボタンに異なるアクションをつけたい場合は、formactionとformmethodを使うとできます。
37行目付近
<div>
  <button type="submit" name="save_draft" class="px-4 py-2 text-white text-lg transition-colors duration-200 transform bg-blue-500 rounded-md hover:bg-blue-400">下書き保存</button>
  <button type="submit" name="release" class="px-4 py-2 ml-8 text-white text-lg transition-colors duration-200 transform bg-green-500 rounded-md hover:bg-green-400">公開</button>
  <button formaction="{{ route('reservation.post') }}" formmethod="GET" name="reservation_release" class="px-4 py-2 ml-8 text-white text-lg transition-colors duration-200 transform bg-amber-500 rounded-md hover:bg-amber-400">予約公開</button>
</div>
DBとかにデータを入れたりするのではなく、単なる予約公開設定画面への遷移なので、メソッドはGETで大丈夫です。
ちなみにGETメソッドの場合、URLがhttp://localhost:××/reservation/post/setting?_token=××&category=3&reservation_release=&title=aaa&body=aaa
のようになります。
POSTメソッドの時はデータが送信されたときにリクエストデータを取得してtitleとかのデータを取っていましたが、GETの場合はURLから取得できます。
上記でPostコントローラーのstoreアクション内で予約公開ボタンが押された時の処理が不要になるので、削除します。
!!以下の処理は削除してください!!
// 予約公開クリック時の処理
case $request->has('reservation_release'):
  $this->post->insertPostToReservationRelease($user_id, $request);
  $request->session()->flash('reservationRelease', '記事を予約公開しました。');
break;
現状はコントローラーにreservationSettingを作っていないので、エラーでます。なのでreservationSettingをコントローラーに作ります。
コントローラーにreservationSettingアクションを追加する
予約設定画面を返すreservationSettingアクションをコントローラーに追加しましょう。
GETの場合も$requestを使ってリクエストデータを取得できます。試しにddなどでデバッグしてみてください。
<?php

namespace App\Http\Controllers\User;

use App\Http\Controllers\Controller;
use Illuminate\Http\Request;
use App\Models\Post;
use App\Models\Category;
use App\Models\ReservationPost;
use Illuminate\Support\Facades\Auth;

class ReservationPostController extends Controller
{
    private $post;
    private $category;
    private $reservationPost;

    public function __construct()
    {
        $this->post = new Post();
        $this->category = new Category();
        $this->reservationPost = new ReservationPost();
    }

    /**
     * 予約公開設定画面
     *
     * @param int $post_id 投稿ID
     */
    public function reservationSetting(Request $request)
    {
        // ログインユーザー情報を取得
        $user = Auth::user();
        // ログインユーザーIDを取得
        $user_id = $user->id;

        // 取得したリクエストデータを変数にセット
        $title = $request->title;
        $body  = $request->body;
        $category = $request->category;

        // 15分リスト
        $minuteList = ['00', '15', '30', '45'];

        // 予約設定画面を返す
        return view('user.list.reservationSetting', compact(
            'user_id',
            'title',
            'body',
            'category',
            'minuteList'
        ));
    }
}
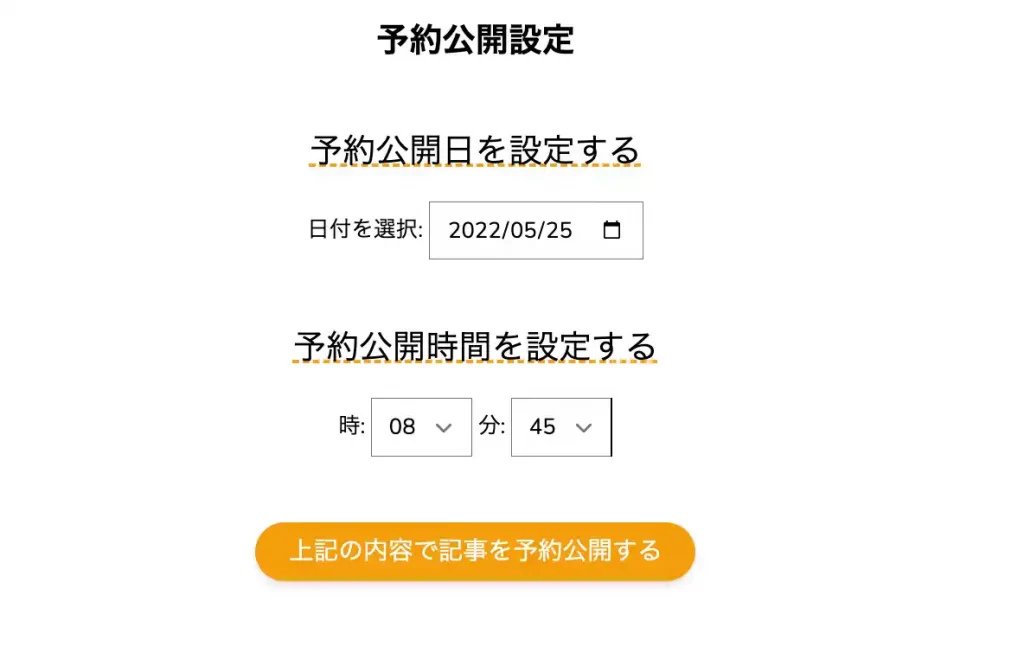
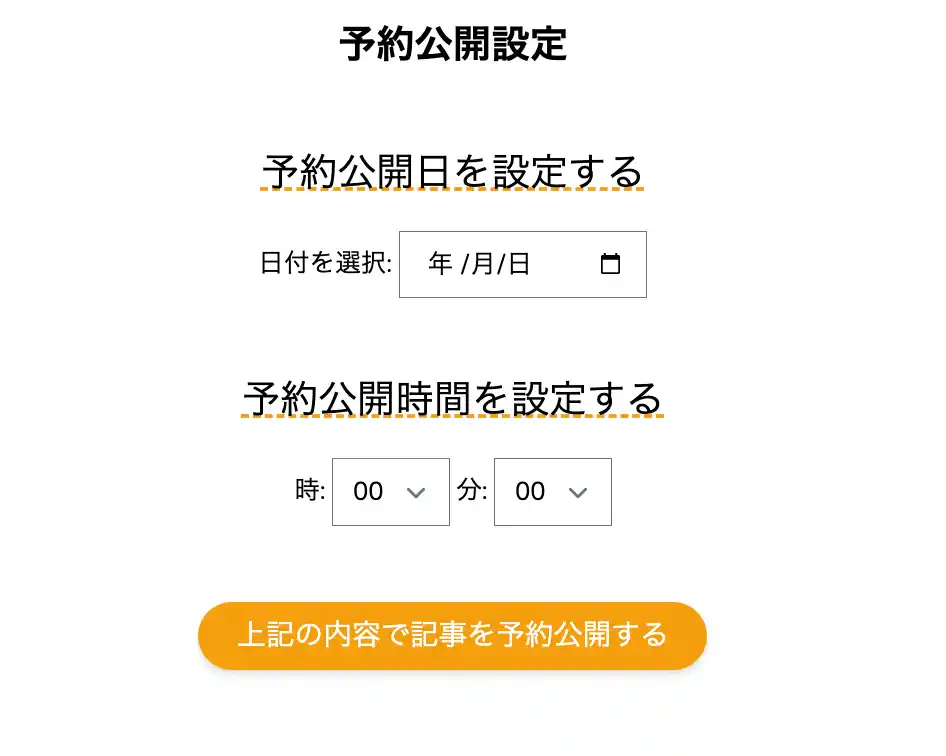
予約公開設定画面を作成する
完成図
日付はカレンダーになっていて、時は00-23まで分は、00,15,30,45と15分おきになっています。
予約公開設定画面を作成します。
form action=”” method=””は後で追加するので現状は空で大丈夫です。
$i < 10 ? ‘0’.$i: $iは三項演算子を使っています。
これは、$iが10より小さければ0をつけて、03とかにして、10より大きければ0はつけずに、$iの値のままにするって意味になります。なので、
if ($i < 10) {
‘0’.$i
} else {
$i
}
と同じ意味です。
また、submitの前にhiddenでtitleとか設定していますが、この後の処理としてボタンを押したらPOST送信させる→その際にhiddenで設定した値も送信するためです。
{{-- src/resources/views/layouts/common.blade.php継承 --}}
@extends('layouts.common')

@include('user.parts.sidebar_user')
@section('content')
<div class="p-5">
    <div class="font-bold text-2xl text-center">予約公開設定</div>
    <form action="" method="" class="pt-12 text-center">
    @csrf
        <div class="pb-5 text-2xl underline decoration-dashed decoration-amber-500">予約公開日を設定する</div>
        <label for="reservation_date">日付を選択:</label>
        <input type="date" name="reservation_date">
        <div class="pt-12 pb-5 text-2xl underline decoration-dashed decoration-amber-500">予約公開時間を設定する</div>
        <label for="reservation_hour">時:</label>
        <select name="reservation_hour">
            @for ($i=0; $i<=23; $i++)
                <option value="{{ $i < 10 ? '0'.$i: $i }}">{{ $i < 10 ? '0'.$i: $i }}</option>
            @endfor
        </select>
        <label for="reservation_minute">分:</label>
        <select name="reservation_minute">
            @foreach ($minuteList as $m)
                <option value="{{ $m }}">{{ $m }}</option>
            @endforeach
        </select>
        <input type="hidden" name="title" value="{{ $title }}">
        <input type="hidden" name="body" value="{{ $body }}">
        <input type="hidden" name="category" value="{{ $category }}">
        <div class="pt-12">
            <button type="submit" name="reservation" class="inline-block px-6 py-2.5 bg-amber-500 text-white font-medium text-lg leading-tight uppercase rounded-full shadow-md hover:bg-amber-600 hover:shadow-lg focus:bg-amber-600 focus:shadow-lg focus:outline-none focus:ring-0 active:bg-amber-700 active:shadow-lg transition duration-150 ease-in-out">
                上記の内容で記事を予約公開する
            </button>
        </div>
    </form>
</div>
@endsection
予約公開設定処理を実装する
ここまでで、予約公開設定画面まではできているので、今度は予約設定した内容をDBに登録していきましょう。
処理内容としては、
- 予約公開設定画面で予約公開する日付や時間を選択し予約公開するのボタンをクリック
- 新規追加画面で入力したタイトルなどの情報、publish_flg(=2)をpostsテーブルにDB登録
- 予約公開設定画面で選択した日付や時間はDB登録ように整形する
- 上記の内容で予約公開設定テーブルにDB登録
- 記事一覧画面にリダイレクト
完成図
予約公開設定したら、
DBに登録する
ルーティングを追加する
予約公開設定登録処理のためにルーティングにパスを追加します。
// 予約公開
Route::controller(ReservationPostController::class)->group(function() {
    // 公開予約設定画面
    Route::get('/reservation/post/setting', 'reservationSetting')
        ->name('reservation.post');
    // 公開予約設定処理
    Route::post('/reservation/post/store', 'reservationStore')
        ->name('reservation.post.store');
});
予約公開登録処理のルーティングを追加したので、ひとまず予約公開設定画面でformのアクションやメソッドを空欄にしていたところにパスなどを追加しましょう。
<form action="{{ route('reservation.post.store') }}" method="POST" class="pt-12 text-center">今はまだ予約公開設定画面のボタンをクリックしても、reservationStoreのアクションがないぞ!と怒られるので、コントローラーにこの後処理を追加していきます。
予約公開登録処理をコントローラーに追加する
ルーティングで予約公開登録処理は、reservationStoreとしているのでReservationPostコントローラーに処理を追加します。
<?php

namespace App\Http\Controllers\User;

use App\Http\Controllers\Controller;
use Illuminate\Http\Request;
use App\Models\Post;
use App\Models\Category;
use App\Models\ReservationPost;
use Illuminate\Support\Facades\Auth;

class ReservationPostController extends Controller
{
    private $post;
    private $category;
    private $reservationPost;

    public function __construct()
    {
        $this->post = new Post();
        $this->category = new Category();
        $this->reservationPost = new ReservationPost();
    }

    /**
     * 予約公開設定画面
     *
     * @param int $post_id 投稿ID
     */
    public function reservationSetting(Request $request)
    {
        // ログインユーザー情報を取得
        $user = Auth::user();
        // ログインユーザーIDを取得
        $user_id = $user->id;

        // 取得したリクエストデータを変数にセット
        $title = $request->title;
        $body  = $request->body;
        $category = $request->category;

        // 15分リスト
        $minuteList = ['00', '15', '30', '45'];

        // 予約設定画面を返す
        return view('user.list.reservationSetting', compact(
            'user_id',
            'title',
            'body',
            'category',
            'minuteList'
        ));
    }

    /**
     * 予約公開設定
     *
     * @param $request リクエストデータ
     */
    public function reservationStore(Request $request)
    {
        // ログインしているユーザー情報を取得
        $user = Auth::user();
        // ログインユーザー情報からユーザーIDを取得
        $user_id = $user->id;

        // 投稿データをpostsテーブルにinsert
        $post = $this->post->insertPostToReservationRelease($user_id, $request);

        // 画面で入力した予約設定_日付を取得
        $date = $request->reservation_date;
        // リクエストが2022-04-30とくるので、20220430に整形
        $reservation_date = str_replace('-', '', $date);
        // 画面で入力した予約時間_時を取得
        $hour = $request->reservation_hour;
        // 画面で入力した予約時間_分を取得
        $minute = $request->reservation_minute;
        // 予約時間_時と予約時間_分を合体し、末尾に00をつけてデータを整形。ex.173100
        $reservation_time = $hour.$minute.'00';
        // 予約公開設定内容をreservation_postsテーブルにinsert
        $reservationPost = $this->reservationPost->insertReservationPostData(
            $post,
            $reservation_date,
            $reservation_time
        );

        // セッションにフラッシュメッセージを保存
        $request->session()->flash('reservationRelease', '記事を予約公開しました。');

        // 記事一覧画面にリダイレクト
        return to_route('user.index', ['id' => $user_id]);
    }
}
$this->post->insertPostToReservationReleaseはPostモデルにすでにあると思うので、処理は問題ないかと思いますが、reservation_postsテーブルにDB登録する$this->reservationPost->insertReservationPostDataはまだ作っていないので、モデルに処理を追加します。
ちなみに、以下の部分ですが、
$reservationPost = $this->reservationPost->insertReservationPostData(
  $post,
  $reservation_date,
  $reservation_time
);
$postにはpostsテーブルに登録したデータが、$reseravtion_dateには予約公開する日付(形式は、2022年5月14日だったら20220514みたいな感じ)、$reservation_timeは予約公開設定する時間(形式は、23時54分だったら、235400みたいな感じ)です。
$post->id、$post->titleとかで投稿IDや登録したデータの記事のタイトルを取得できるって感じです。
モデルに予約公開登録処理を書く
ReservationPostモデルに予約公開登録処理であるinsertReservationPostDataを追加します。
<?php

namespace App\Models;

use Illuminate\Database\Eloquent\Factories\HasFactory;
use Illuminate\Database\Eloquent\Model;

class ReservationPost extends Model
{
    /**
     * モデルに関連付けるテーブル
     *
     * @var string
     */
    protected $table = 'reservation_posts';

    /**
     * 複数代入可能な属性
     *
     * @var array
     */
    protected $fillable = [
        'user_id',
        'post_id',
        'reservation_date',
        'reservation_time',
        'created_at',
        'updated_at'
    ];

    /**
     * 予約公開設定データをDBにinsert
     *
     * @param $post 投稿データ
     * @param $reservation_date 予約公開_日付
     * @param $reservation_time 予約公開_時間
     */
    public function insertReservationPostData($post, $reservation_date, $reservation_time)
    {
        return $this->create([
            'user_id' => $post->user_id,
            'post_id' => $post->id,
            'reservation_date' => $reservation_date,
            'reservation_time' => $reservation_time
        ]);
    }
}
これで予約公開登録処理ができたので、処理を確認してみましょう。
記事の新規追加ボタンをクリック
タイトルなどを入力し、予約公開をクリック
予約公開設定をして、予約公開をするボタンをクリック
記事一覧画面にリダイレクト
postsテーブルに記事ID76のデータが登録されていることが確認できる。
reservation_postsテーブルにも記事ID76で予約公開設定した内容がちゃんと反映されている。
はい、ここまでで予約公開の登録処理は完成です。
次は、予約公開設定した内容を変更したい!って場合もあるので編集できるようにします〜
>>>予約公開設定②に進む


コメント