


前回までの記事
開発環境
| 環境 | バージョン |
|---|---|
| MacBook Air | Monterey 12.2.1 |
| Docker | 20.10.7 |
| PHP | 8.1 |
| composer | 2.2.9 |
| Laravel | 9.5.1 |
| apache | 2.4 |
| MySQL | 8.0 |
| phpmyadmin | – |
| npm | 8.5 |
| node | 12.22.11 |
| React | 17 |
| TailwindCSS | 3 |
| Laravel/breeze | ログイン認証機能で使用 ※Laravel8以降の場合に使用可。 Laravel6や7系はreact –authとか使います。 |
開発+α
◆dockerコンテナの情報を確認する
→docker ps
◆dockerのphpコンテナに入る
→docker exec -it コンテナIDまたはNAMES bash
◆var/www# はphpコンテナ内を表します。php artisanやnpm run devなどはphpコンテナ内で実行しましょう。
◆tailwindcssでスタイルを変更する前に
→npm run watchを実行していると開発が楽。
※ある程度スタイルが整ったら、npm run devでビルドしましょう。
すると、不要なcssを削除してくれるのでcssファイルが軽くなります。
◆スタイルが適用されないときは….
npm run devで一旦ビルドしてみるか、スーパーリロードでキャッシュの削除をしてみましょう。
- categories・postsテーブルを作成する
- シーダーでテストデータを作る
- Postモデルを作成し、DBのロジックを書く
- コントローラーでPostモデルを呼び出して投稿データ表示
最終的なゴール
postsテーブルのDBデータを用いて、投稿リストを表示させること


categoriesとpostsのテーブルを作成する
テーブルを作成する順序は、categories→postsテーブルです。
※postsテーブルにcategory_idの外部キーがあるため、先にcategoriesテーブルを作らないとマイグレーションエラーになる。
categoriesのマイグレーションファイルをartisanコマンドで作成します。
/var/www# php artisan make:migration create_categories_table作成されたcategoriesマイグレーションファイルを編集し、migrateを実行しましょう。
<?php
use Illuminate\Database\Migrations\Migration;
use Illuminate\Database\Schema\Blueprint;
use Illuminate\Support\Facades\Schema;
return new class extends Migration
{
/**
* Run the migrations.
*
* @return void
*/
public function up()
{
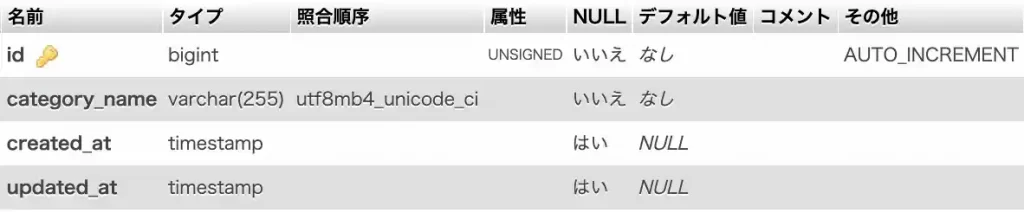
Schema::create('categories', function (Blueprint $table) {
$table->id();
$table->string('category_name', 255);
$table->timestamps();
});
}
/**
* Reverse the migrations.
*
* @return void
*/
public function down()
{
Schema::dropIfExists('categories');
}
};
/var/www# php artisan migratemigrateが成功したら、categoriesテーブルが作成されます。(phpmyadminでDBのテーブルを確認しています)
categoriesテーブルの次は、postsテーブルです。
artisanコマンドでpostsマイグレーションファイルを作成します。
/var/www# php artisan make:migration create_posts_tablepostsマイグレーションファイルを編集し、migrateを実行しましょう。
<?php

use Illuminate\Database\Migrations\Migration;
use Illuminate\Database\Schema\Blueprint;
use Illuminate\Support\Facades\Schema;

return new class extends Migration
{
    /**
     * Run the migrations.
     *
     * @return void
     */
    public function up()
    {
        Schema::create('posts', function (Blueprint $table) {
            $table->id();
            $table->foreignId('user_id')->constrained('users');
            $table->foreignId('category_id')->nullable()->constrained('categories');
            $table->string('title', 255);
            $table->text('body')->nullable();
            $table->smallInteger('publish_flg')->default(0);
            $table->integer('view_counter')->nullable()->default(0);
            $table->integer('favorite_counter')->nullable()->default(0);
            $table->boolean('delete_flg')->default(0);
            $table->timestamps();
        });
    }

    /**
     * Reverse the migrations.
     *
     * @return void
     */
    public function down()
    {
        Schema::dropIfExists('posts');
    }
};
/var/www# php artisan migratepostsテーブルが作成されます。

categoriesとpostsテーブルにテストデータとしてシーダーを実行する
categoriesとpostsテーブルができたので、初期テストデータとしてシーダーファイルを作成していきましょう。
外部キーも絡むので、少し厄介かもしれませんが実務では使える知識なので覚えておきましょう。
categoriesのシーダーファイルをartisanコマンドで作成します。
/var/www# php artisan make:seeder CategorySeedercategorySeederファイルができるので、編集しましょう。
<?php
namespace Database\Seeders;
use Illuminate\Database\Console\Seeds\WithoutModelEvents;
use Illuminate\Database\Seeder;
use Illuminate\Support\Facades\DB;
use Illuminate\Support\Facades\Schema;
use Illuminate\Support\Carbon;
class CategorySeeder extends Seeder
{
/**
* Run the database seeds.
*
* @return void
*/
public function run()
{
// categoriesテーブルを指定
$table = DB::table('categories');
// 一時的に外部キー制約を外す→truncateする前にこれを実行しないと、seeder実行が失敗するため。(具体的には、postsのcategory_id_foreignのエラーがでる)
Schema::disableForeignKeyConstraints();
// シーダー実行前にcategoriesテーブルの中身を空にする
$table->truncate();
// 現在の日時を取得
$now = Carbon::now();
// データ
$data = [
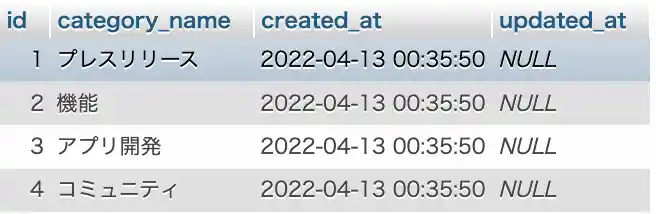
['category_name' => 'プレスリリース', 'created_at' => $now],
['category_name' => '機能', 'created_at' => $now],
['category_name' => 'アプリ開発', 'created_at' => $now],
['category_name' => 'コミュニティ', 'created_at' => $now],
];
// categoriesテーブルにデータをinsert
$table->insert($data);
// 外していた外部キー制約を戻す
Schema::enableForeignKeyConstraints();
}
}
DatabaseSeederに以下のようにseederファイルを呼び出すようにすると、db:seedコマンドでseederを一括実行できるので便利です。
<?php

namespace Database\Seeders;

use Illuminate\Database\Console\Seeds\WithoutModelEvents;
use Illuminate\Database\Seeder;

class DatabaseSeeder extends Seeder
{
    /**
     * Seed the application's database.
     *
     * @return void
     */
    public function run()
    {
        $this->call([
            CategorySeeder::class,
        ]);
    }
}
db:seedコマンドでシーダーを実行します。
/var/www# php artisan db:seed以下のように、categoriesテーブルにシーダーを実行したテストデータが入りましたね。
postsテーブルにもシーダーファイルを作成して、テストデータを入れていきましょう。
/var/www# php artisan make:seeder PostSeederPostSeederファイルが作成されるので、編集します。
<?php

namespace Database\Seeders;

use Illuminate\Database\Console\Seeds\WithoutModelEvents;
use Illuminate\Database\Seeder;
use Illuminate\Support\Facades\DB;
use Illuminate\Support\Facades\Schema;
use Illuminate\Support\Carbon;

class PostSeeder extends Seeder
{
    /**
     * Run the database seeds.
     *
     * @return void
     */
    public function run()
    {
        // postsテーブルを指定
        $table = DB::table('posts');

        // シーダー実行前にpostsテーブルの中身を空にする
        $table->truncate();

        // 現在の日時を取得
        $now = Carbon::now();

        // データ
        $data = [
            [
                'user_id'     => 1,
                'category_id' => 1,
                'title'       => 'Laravel9に新たな機能が登場!',
                'body'        => '記事内容記事内容記事内容',
                'publish_flg' => 0,
                'view_counter' => 10,
                'favorite_counter' => 3,
                'delete_flg'  => 0,
                'created_at'  => $now,
                'updated_at'  => $now
            ],
            [
                'user_id'     => 1,
                'category_id' => 2,
                'title'       => 'Laravel10はいつ頃実装されるのか?',
                'body'        => '記事内容記事内容記事内容',
                'publish_flg' => 1,
                'view_counter' => 20,
                'favorite_counter' => 5,
                'delete_flg'  => 0,
                'created_at'  => $now,
                'updated_at'  => $now
            ],

            [
                'user_id'     => 1,
                'category_id' => 3,
                'title'       => 'Laravelのアプリ開発はどれほど効率的なのか?',
                'body'        => '記事内容記事内容記事内容',
                'publish_flg' => 2,
                'view_counter' => 40,
                'favorite_counter' => 15,
                'delete_flg'  => 0,
                'created_at'  => $now,
                'updated_at'  => $now
            ],
            [
                'user_id'     => 1,
                'category_id' => 4,
                'title'       => 'Laravelのコミュニティを作成しました',
                'body'        => '記事内容記事内容記事内容',
                'publish_flg' => 0,
                'view_counter' => 30,
                'favorite_counter' => 10,
                'delete_flg'  => 0,
                'created_at'  => $now,
                'updated_at'  => $now
            ],
        ];

        // postsテーブルにデータをinsert
        $table->insert($data);
    }
}
DatabaseSeederにPostSeederを読み込みます。
<?php

namespace Database\Seeders;

use Illuminate\Database\Console\Seeds\WithoutModelEvents;
use Illuminate\Database\Seeder;

class DatabaseSeeder extends Seeder
{
    /**
     * Seed the application's database.
     *
     * @return void
     */
    public function run()
    {
        $this->call([
            CategorySeeder::class,
            PostSeeder::class,
        ]);
    }
}
db:seedコマンドを実行しましょう。
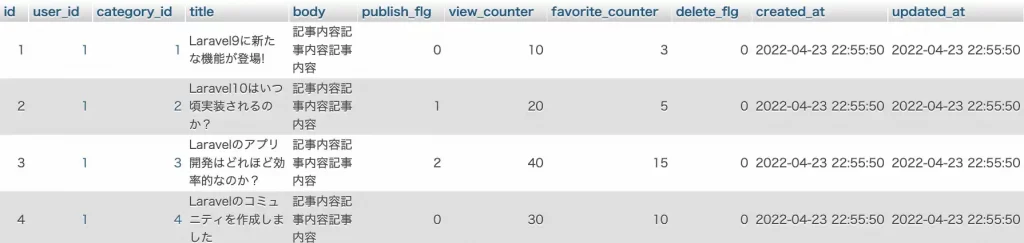
/var/www# php artisan db:seedこれで、categoryとpostのシーダーが実行されます。
categoryのデータは先ほどと同じなので、postsテーブルを見てみましょう。
Postモデルの作成
artisanコマンドでPostモデルを作成します。
/var/www# php artisan make:model Postsrc/app/Models/Post.phpにPostモデルが作成されるので、以下のようにまずは設定してください。
モデルに関連づけるテーブルの指定やfillableについては、Laravel8公式ドキュメントの複数代入の項目などが参考になります。
ざっくりとfillableについて説明すると、fillableを指定しておくことで、予期しないカラムの変更を防げます。
fillableの他にguardedがあります。(fillableとguardedを参照)
<?php

namespace App\Models;

use Illuminate\Database\Eloquent\Factories\HasFactory;
use Illuminate\Database\Eloquent\Model;

/**
 * 投稿モデル
 */
class Post extends Model
{
    /**
     * モデルに関連付けるテーブル
     *
     * @var string
     */
    protected $table = 'posts';

    /**
     * 複数代入可能な属性
     *
     * @var array
     */
    protected $fillable = [
        'user_id',
        'category_id',
        'title',
        'body',
        'publish_flg',
        'view_counter',
        'favorite_counter',
        'delete_flg',
        'created_at',
        'updated_at'
    ];
}
次に、DBのロジックをモデルに書いていきましょう。
<?php

namespace App\Models;

use Illuminate\Database\Eloquent\Factories\HasFactory;
use Illuminate\Database\Eloquent\Model;

/**
 * 投稿モデル
 */
class Post extends Model
{
    /**
     * モデルに関連付けるテーブル
     *
     * @var string
     */
    protected $table = 'posts';

    /**
     * 複数代入可能な属性
     *
     * @var array
     */
    protected $fillable = [
        'user_id',
        'category_id',
        'title',
        'body',
        'publish_flg',
        'view_counter',
        'favorite_counter',
        'delete_flg',
        'created_at',
        'updated_at'
    ];

    /**
     * ユーザーIDに紐づいた投稿リストを全て取得する
     *
     * @param int $user_id ユーザーID
     * @return Post
     */
    public function getAllPostsByUserId($user_id)
    {
        $result = $this->where('user_id', $user_id)->get();
        return $result;
    }
}
ここで、getAllPostsByUserId関数を作成しましたが、ログインしているユーザーIDに条件を絞って投稿リストを全件取得するものです。
この関数をPostControllerで呼び出すようにすることで、モデルにはDBロジックを書き、コントローラーでは処理だけ書けばいいのでコード量も減ります。
PostControllerでモデルのDBロジックを呼び出す
先ほど、PostモデルにDBロジックを書いたので、これをコントローラーで呼び出しましょう。
冒頭にPostモデルを読み込むため、use App\Models\Post;を追加します。
privateで変数を宣言することで、PostController内でのみアクセスできる変数となり、安全です。反対にpublicで宣言すると、他のコントローラーからもアクセスできる変数となります。
compact関数で、bladeファイルに変数を渡しています。※withとかあるけど、compactの方が短くていい。
<?php

namespace App\Http\Controllers\User;

use App\Http\Controllers\Controller;
use Illuminate\Http\Request;
use App\Models\Post;

class PostController extends Controller
{
    private $post;

    public function __construct()
    {
        $this->post = new Post();
    }

    /**
     * 投稿リスト
     *
     * @param int $id ユーザーID
     * @return Response src/resources/views/user/list/index.blade.phpを表示
     */
    public function index(int $id)
    {
        // ユーザーIDと一致する投稿データを取得
        $posts = $this->post->getAllPostsByUserId($id);
        return view('user.list.index', compact(
            'posts',
        ));
    }
}
$postsをdd関数とかでデバッグしてみると、データが4件取得できるので確認してみてください。
デバッグ①
// ユーザーIDと一致する投稿データを取得
$posts = $this->post->getAllPostsByUserId($id);
dd($posts);
return view('user.list.index', compact(
  'posts',
));
デバッグ②
// ユーザーIDと一致する投稿データを取得
$posts = $this->post->getAllPostsByUserId($id);
foreach ($posts as $post) {
    dd(
        $post->user_id,
        $post->category_id,
        $post->title,
        $post->body,
        $post->publish_flg,
        $post->view_counter,
        $post->delete_flg,
    );
}
return view('user.list.index', compact(
  'posts',
));
ただ、上記のデータだとデータ取得として完全ではないのですが分かりますか?
それは、category_idはあるけど、カテゴリー名を表示させるにはどうすればいいんだ!?ってことです。
このままでは、$post->titleでタイトル名は表示できるけど、$post->category_idだとカテゴリー名を表示させたいのに1とか表示されてしまいます。
なので、postsとcategoroiesをリレーションさせ、$post->category_nameでカテゴリー名にアクセスできるようにしましょう。
PostモデルとCategoryモデルをリレーションする
まずはリレーションするために、Categoryモデルを作成します。
/var/www# php artisan make:model Categorysrc/app/Models/Category.phpができるので、Categoryモデルに処理を書いていきましょう。
カテゴリーは複数の投稿を持ち、投稿は一つのカテゴリーに属します。
なので、Category:Postは1:多です。
リレーションに関しては、Laravelの公式ドキュメント-リレーションを参考にしましょう。
<?php

namespace App\Models;

use Illuminate\Database\Eloquent\Factories\HasFactory;
use Illuminate\Database\Eloquent\Model;
use App\Models\Post;

class Category extends Model
{
    /**
     * モデルに関連付けるテーブル
     *
     * @var string
     */
    protected $table = 'categories';

    /**
     * 複数代入可能な属性
     *
     * @var array
     */
    protected $fillable = [
        'category_name',
        'created_at',
        'updated_at'
    ];

    /**
     * Postモデルとリレーション
     */
    public function posts()
    {
        return $this->hasMany(Post::class);
    }
}
PostモデルにもCateogryモデルとのリレーションを書きます。
<?php

namespace App\Models;

use Illuminate\Database\Eloquent\Factories\HasFactory;
use Illuminate\Database\Eloquent\Model;
use App\Models\Category;

/**
 * 投稿モデル
 */
class Post extends Model
{
    /**
     * モデルに関連付けるテーブル
     *
     * @var string
     */
    protected $table = 'posts';

    /**
     * 複数代入可能な属性
     *
     * @var array
     */
    protected $fillable = [
        'user_id',
        'category_id',
        'title',
        'body',
        'publish_flg',
        'view_counter',
        'favorite_counter',
        'delete_flg',
        'created_at',
        'updated_at'
    ];

    /**
     * Categoryモデルとリレーション
     */
    public function category()
    {
        return $this->belongsTo(Category::class);
    }

    /**
     * ユーザーIDに紐づいた投稿リストを全て取得する
     *
     * @param int $user_id ユーザーID
     * @return Post
     */
    public function getAllPostsByUserId($user_id)
    {
        $result = $this->where('user_id', $user_id)->get();
        return $result;
    }
}
CategoryとPostのリレーションが組めたので、リレーション先のデータが表示できるようにしていきましょう。
やりたいこととしては、以下のようなイメージです。
posts.category_id→categories.category_idと一致するcategory_nameの取得
リレーションが組めていれば、上記を実現するために、withメソッドを使うとリレーション先の情報を取得できます。
    public function getAllPostsByUserId($user_id)
    {
        $result = $this->where('user_id', $user_id)->with('category')->get();
        return $result;
    }
}
コントローラーでデバッグして値を確認してみましょう。
// ユーザーIDと一致する投稿データを取得
$posts = $this->post->getAllPostsByUserId($id);
foreach ($posts as $post) {
   dd($post->category->category_name);
}
$post->category->category_nameとすることで、category_nameの値も取得できているのが確認できるでしょう。デバッグで確認したら、foreachの部分は不要なので削除します。
マイページ-投稿リスト画面でDBデータを表示させる
ここまでで、DBから値を取得してデータを表示する機能は揃っているので、あとは画面に値を当て込むだけなので、もう一息です。
レイアウトをいじっていくので、先にnpm run watchを実行しておきます。
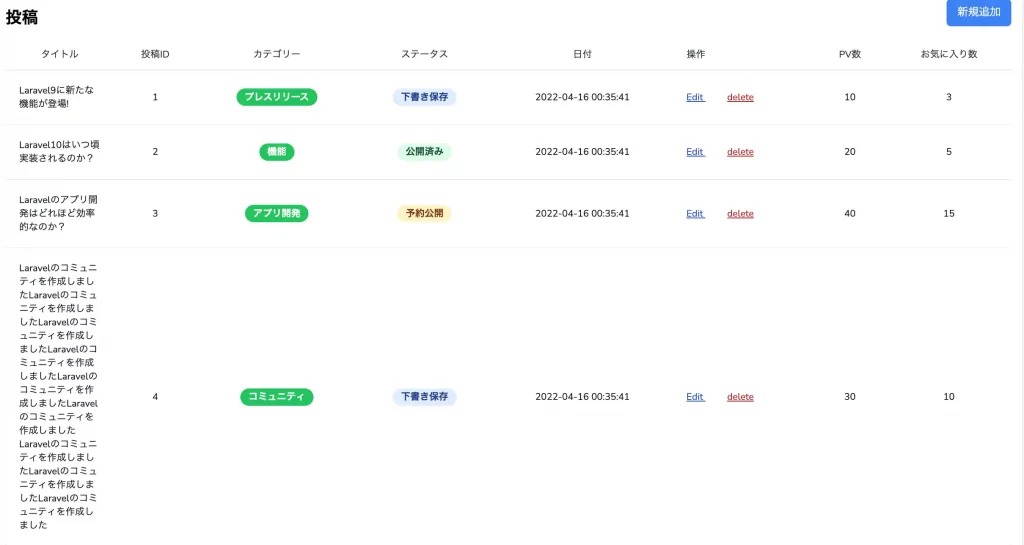
/var/www #npm run watch投稿リストのレイアウトを修正します。user > list > index.balde.php
タイトルのtbodyのtdクラスにw-40追加しているので、気いつけて!※くそ長いタイトルの場合の横幅制御になるんやで
あと、カテゴリー名のところもレイアウト変更してます。(こっちの方がしっくりきたから今さら変えたのでムキー!とならないように)
{{-- src/resources/views/layouts/common.blade.php継承 --}}
@extends('layouts.common')

@include('user.parts.sidebar_user')
@section('content')
<div class="h-screen overflow-y-scroll">
    <div class="px-4 sm:px-4">
        <div class="flex justify-between">
            <div class="text-2xl font-bold pt-7">投稿</div>
            <div class="pt-4">
                <button class="bg-blue-500 text-white px-4 py-2 rounded-md text-1xl font-medium hover:bg-blue-700 transition duration-300">新規追加</button>
            </div>
        </div>
        <div class="py-4">
            <div class="overflow-x-auto">
                <div class="inline-block min-w-full shadow rounded-lg overflow-hidden">
                    <table class="min-w-full leading-normal">
                        <thead>
                            <tr>
                                <th scope="col" class="px-5 py-3 bg-white  border-b border-gray-200 text-gray-800  text-center text-sm uppercase font-normal">
                                    タイトル
                                </th>
                                <th scope="col" class="px-5 py-3 bg-white  border-b border-gray-200 text-gray-800  text-center text-sm uppercase font-normal">
                                    投稿ID
                                </th>
                                <th scope="col" class="px-5 py-3 bg-white  border-b border-gray-200 text-gray-800  text-center text-sm uppercase font-normal">
                                    カテゴリー
                                </th>
                                <th scope="col" class="px-5 py-3 bg-white  border-b border-gray-200 text-gray-800  text-center text-sm uppercase font-normal">
                                    ステータス
                                </th>
                                <th scope="col" class="px-5 py-3 bg-white  border-b border-gray-200 text-gray-800  text-center text-sm uppercase font-normal">
                                    日付
                                </th>
                                <th scope="col" class="px-5 py-3 bg-white  border-b border-gray-200 text-gray-800  text-left text-sm uppercase font-normal">
                                    操作
                                </th>
                                <th scope="col" class="px-5 py-3 bg-white  border-b border-gray-200 text-gray-800  text-center text-sm uppercase font-normal">
                                    PV数
                                </th>
                                <th scope="col" class="px-5 py-3 bg-white  border-b border-gray-200 text-gray-800  text-center text-sm uppercase font-normal">
                                    お気に入り数
                                </th>
                            </tr>
                        </thead>
                        <tbody>
                            @foreach ($posts as $post)
                            <tr>
                                <td class="px-5 py-5 border-b border-gray-200 bg-white text-sm w-40">
                                    <p class="text-left text-gray-900 whitespace-no-wrap">
                                        {{ $post->title }}
                                    </p>
                                </td>
                                <td class="px-5 py-5 border-b border-gray-200 bg-white text-sm">
                                    <p class="text-center text-gray-900 whitespace-no-wrap">
                                        {{ $post->id }}
                                    </p>
                                </td>
                                <td class="px-5 py-5 border-b border-gray-200 bg-white text-sm text-center">
                                    <span class="relative inline-block px-3 py-1 font-semibold text-white leading-tight">
                                        <span aria-hidden="true" class="absolute inset-0 bg-green-500 rounded-full">
                                        </span>
                                        <span class="relative">
                                            @if (isset($post->category_id))
                                                {{ $post->category->category_name }}
                                            @else
                                                カテゴリーなし
                                            @endif
                                        </span>
                                    </span>
                                </td>
                                <td class="px-5 py-5 border-b border-gray-200 bg-white text-sm text-center">
                                    @if ($post->publish_flg === 0)
                                        <span class="relative inline-block px-3 py-1 font-semibold text-blue-900 leading-tight">
                                            <span aria-hidden="true" class="absolute inset-0 bg-blue-200 opacity-50 rounded-full">
                                            </span>
                                            <span class="relative">
                                                下書き保存
                                            </span>
                                        </span>
                                    @elseif ($post->publish_flg === 1)
                                        <span class="relative inline-block px-3 py-1 font-semibold text-green-900 leading-tight">
                                            <span aria-hidden="true" class="absolute inset-0 bg-green-200 opacity-50 rounded-full">
                                            </span>
                                            <span class="relative">公開済み</span>
                                        </span>
                                    @elseif ($post->publish_flg === 2)
                                        <span class="relative inline-block px-3 py-1 font-semibold text-amber-900 leading-tight">
                                            <span aria-hidden="true" class="absolute inset-0 bg-amber-200 opacity-50 rounded-full">
                                            </span>
                                            <span class="relative">予約公開</span>
                                        </span>
                                    @else
                                        <span class="relative inline-block px-3 py-1 font-semibold text-green-900 leading-tight">
                                            <span aria-hidden="true" class="absolute inset-0 bg-green-200 opacity-50 rounded-full">
                                            </span>
                                            <span class="relative">下書き保存</span>
                                        </span>
                                    @endif
                                </td>
                                <td class="px-5 py-5 border-b border-gray-200 bg-white text-sm">
                                    <p class="text-center text-gray-900 whitespace-no-wrap">
                                        {{ $post->created_at }}
                                    </p>
                                </td>
                                <td class="px-5 py-5 mr-5 border-b border-gray-200 bg-white text-sm">
                                    <a class="mr-3 text-blue-700 whitespace-no-wrap underline" href="#">
                                        Edit
                                    </a>
                                    <a class="ml-5 underline text-red-700 whitespace-no-wrap" href="#">
                                        delete
                                    </a>
                                </td>
                                <td class="px-5 py-5 border-b border-gray-200 bg-white text-sm">
                                    <p class="text-center text-gray-900 whitespace-no-wrap">
                                        {{ $post->view_counter }}
                                    </p>
                                </td>
                                <td class="px-5 py-5 border-b border-gray-200 bg-white text-sm">
                                    <p class="text-center text-gray-900 whitespace-no-wrap">
                                        {{ $post->favorite_counter }}
                                    </p>
                                </td>
                            </tr>
                            @endforeach
                        </tbody>
                    </table>
                </div>
            </div>
        </div>
    </div>
</div>
@endsection
以下のようなレイアウト画面の出来上がりです。
いい感じになってて草ァ!
これでマイページの投稿リストはDBデータ使って表示できたので、よしとしましょう。
最後に、マイページのサイドバー「投稿」クリック時に、上記の画面に遷移するようにします。
            <div>
                <a class="flex items-center px-4 py-2 mt-2 text-gray-600 transition-colors duration-200 transform hover:bg-sky-500 hover:text-white"
                href="{{ route('user.index', ['id' => Auth::user()->id]) }}">
                    <span class="text-left">
                        <svg xmlns="http://www.w3.org/2000/svg" class="h-5 w-5" viewBox="0 0 20 20" fill="currentColor">
                            <path fill-rule="evenodd" d="M18 13V5a2 2 0 00-2-2H4a2 2 0 00-2 2v8a2 2 0 002 2h3l3 3 3-3h3a2 2 0 002-2zM5 7a1 1 0 011-1h8a1 1 0 110 2H6a1 1 0 01-1-1zm1 3a1 1 0 100 2h3a1 1 0 100-2H6z" clip-rule="evenodd" />
                        </svg>
                    </span>
                    <span class="mx-2 text-md font-normal">
                        投稿
                    </span>
                </a>
            </div>
            <div>
これまた、遷移できるようになって草ァ!
次回の記事では、投稿の登録画面や登録処理などを解説していきます。
>>>記事の投稿へ進む


コメント