
前回までの記事
開発環境
| 環境 | バージョン |
|---|---|
| MacBook Air | Monterey 12.2.1 |
| Docker | 20.10.7 |
| PHP | 8.1 |
| composer | 2.2.9 |
| Laravel | 9.5.1 |
| apache | 2.4 |
| MySQL | 8.0 |
| phpmyadmin | – |
| npm | 8.5 |
| node | 12.22.11 |
| React | 17 |
| TailwindCSS | 3 |
| Laravel/breeze | ログイン認証機能で使用 ※Laravel8以降の場合に使用可。 Laravel6や7系はreact –authとか使います。 |
開発+α
◆dockerコンテナの情報を確認する
→docker ps
◆dockerのphpコンテナに入る
→docker exec -it コンテナIDまたはNAMES bash
◆var/www# はphpコンテナ内を表します。php artisanやnpm run devなどはphpコンテナ内で実行しましょう。
◆tailwindcssでスタイルを変更する前に
→npm run watchを実行していると開発が楽。
※ある程度スタイルが整ったら、npm run devでビルドしましょう。
すると、不要なcssを削除してくれるのでcssファイルが軽くなります。
- 継承する共通の親bladeファイル作成
- 総合トップ用のコントローラーを作成
- ヘッダー、フッター、サイドバーの共通レイアウト作成
- メイン記事のフロント部分を作成
最終的なゴール

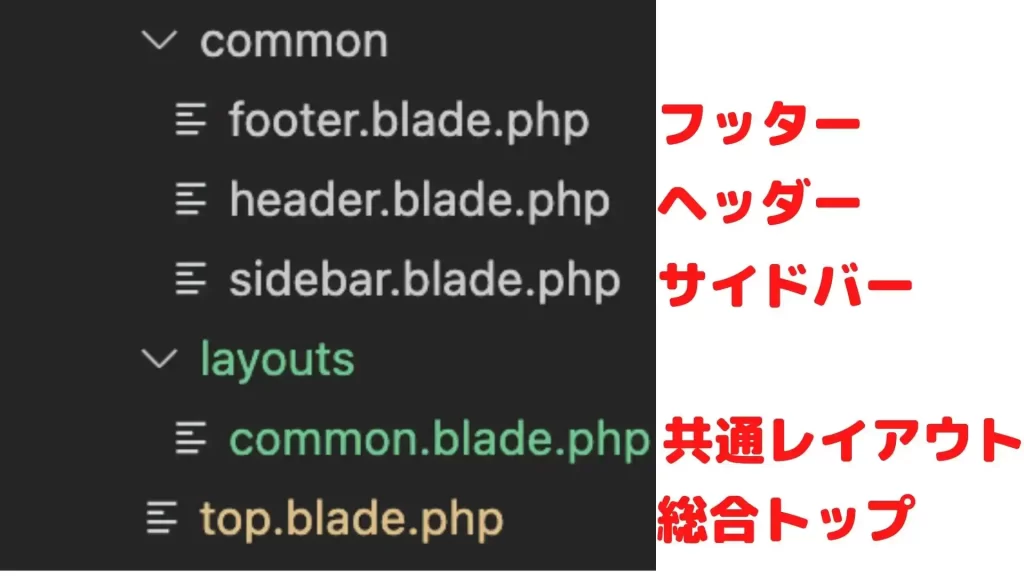
この記事で最終的にはresources > views下に以下のようなファイルを新規作成します。
※breezeをインストールした際の元々あるresources > views > auth配下にあるファイルやresources > views > layouts > app.blade.phpなどは省略しています。

継承する共通の親bladeファイル作成
継承する共通の親bladeファイルとは何か?なんですが、cssファイル・jsファイル・CSRFトークンなどを記載する共通レイアウトのことです。
レイアウト継承は@extendsを使います。
親ファイル(common.blade.php)
cssファイル
jsファイルなど
↓継承させる
子ファイル
@extends(‘common’)
…
レイアウト継承を活用すれば、1つ1つのbladeファイルにcssファイルの読み込みを書かなくて済みます。
まだレイアウト継承の知識があやふやな方は、Laravelレイアウト継承の@extends、@yield、@sectionあたりを参考にしてください。
それでは継承する共通の親bladeファイルを作成していきます。
スタイルを変更するので、事前にnpm run watchを実行しておきましょう。
src/resources/views/layouts/common.blade.phpのファイルを作成します。
<!doctype html>
<html lang="{{ str_replace('_', '-', app()->getLocale()) }}">
<head>
    <meta charset="utf-8">
    <meta name="viewport" content="width=device-width, initial-scale=1">

    {{-- CSRF Token --}}
    <meta name="csrf-token" content="{{ csrf_token() }}">

    {{-- App Name --}}
    <title>{{ config('app.name', 'Laratto') }}</title>

    {{-- Fonts --}}
    <link rel="dns-prefetch" href="//fonts.gstatic.com">
    <link href="https://fonts.googleapis.com/css?family=Nunito" rel="stylesheet">

    {{-- Font Awesome --}}
    <link rel="stylesheet" href="https://use.fontawesome.com/releases/v5.6.3/css/all.css">

    {{-- Styles --}}
    <link href="{{ asset('css/app.css') }}" rel="stylesheet">

    {{-- Scripts --}}
    <script src="{{ asset('js/app.js') }}" defer></script>
</head>
<body>
    <div>
        <main class="w-full">
            @yield('content')
        </main>
    </div>
</body>
</html>
継承する親レイアウトが作れました。
総合トップ用のコントローラーを作成
まずはニュースが一覧で表示される総合トップのフロント画面を作成していきましょう。
総合トップ用のコントローラーを作成します。
/var/www# php artisan make:controller TopController
Controller created successfully.
src/app/Http/Controllers/TopController.phpができるので、以下のように編集します。
<?php

namespace App\Http\Controllers;

use Illuminate\Http\Request;

class TopController extends Controller
{
    /**
     * 総合トップ画面
     */
    public function top()
    {
        return view('top');
    }
}
総合トップの画面を簡易的に作成する
続いて、top.blade.phpに総合トップの画面を作っていきます。
src/resources/views/top.blade.phpを作成しましょう。
{{-- layouts.common.blade.phpのレイアウト継承 --}}
@extends('layouts.common')

{{-- メイン部分作成 --}}
@section('content')
    <h1 class="text-2xl">トップ画面</h1>
@endsection
/にアクセスしたときに、総合トップ画面になるよう、ルーティングを設定します。
総合トップのルーティングパスを設定する
冒頭にuse App\Http\Controllers\TopController;を追加し、Route::getにパスを書くことを忘れずに。
<?php

use Illuminate\Support\Facades\Route;
use App\Http\Controllers\TopController; // 追加

/*
|--------------------------------------------------------------------------
| Web Routes
|--------------------------------------------------------------------------
|
| Here is where you can register web routes for your application. These
| routes are loaded by the RouteServiceProvider within a group which
| contains the "web" middleware group. Now create something great!
|
*/
-----削除---------
Route::get('/', function () {
    return view('welcome');
});
-----削除終わり-----
Route::get('/dashboard', function () {
    return view('dashboard');
})->middleware(['auth'])->name('dashboard');

require __DIR__.'/auth.php';

// 総合トップ
Route::get('/', [TopController::class, 'top'])
    ->name('top');
/にアクセスしてトップ画面と出ればOKです。(一回喜びのおたけびを上げると気分爽快です)
共通レイアウトのヘッダーを作成する
完成図

共通のコンポーネントであるヘッダーを作っていきます。
TailwindCSSには数多くのUIコンポーネントがあるので、そのコードを活用しましょう。
代表的なものでいくと…
などなどです。ざっと眺めるだけでも色々なレイアウトやコンポーネントがあるので楽しいですよ。
ヘッダーは、TailBlocksのHeader、Tailwind Searchs componentあたりを参考に少しアレンジします。
src/resources/views/common/header.blade.phpを作成し、ヘッダーを作りましょう。
@section('header')
<header class="text-gray-600 body-font">
    <div class="mx-auto flex flex-wrap p-5 flex-col md:flex-row items-center">
      <a class="flex title-font font-medium items-center text-gray-900 mb-4 md:mb-0">
        <svg xmlns="http://www.w3.org/2000/svg" fill="none" stroke="currentColor" stroke-linecap="round" stroke-linejoin="round" stroke-width="1" class="w-10 h-10 text-white p-1 bg-emerald-500 rounded-full" viewBox="0 0 22 22">
            <path stroke-linecap="round" stroke-linejoin="round" d="M11 17a1 1 0 001.447.894l4-2A1 1 0 0017 15V9.236a1 1 0 00-1.447-.894l-4 2a1 1 0 00-.553.894V17zM15.211 6.276a1 1 0 000-1.788l-4.764-2.382a1 1 0 00-.894 0L4.789 4.488a1 1 0 000 1.788l4.764 2.382a1 1 0 00.894 0l4.764-2.382zM4.447 8.342A1 1 0 003 9.236V15a1 1 0 00.553.894l4 2A1 1 0 009 17v-5.764a1 1 0 00-.553-.894l-4-2z" />
        </svg>
        <span class="ml-3 text-2xl">Laratto</span>
      </a>
      <div class="md:ml-auto md:mr-auto flex flex-wrap items-center text-base justify-center">
        <div class="mb-1 xl:w-96">
          <input
            type="search"
            class="form-control block w-full px-3 py-2 text-base font-normal text-gray-700 bg-white bg-clip-padding border border-solid border-gray-300 rounded transition ease-in-out m-0 focus:text-gray-700 focus:bg-white focus:border-blue-600 focus:outline-none"
            id="search"
            placeholder="ニュースを検索..."
          />
        </div>
      </div>
      <button class="inline-flex text-white items-center bg-emerald-500 border-0 py-1 px-3 mx-2 focus:outline-none hover:bg-emerald-400 rounded text-base mt-4 md:mt-0">
          新規登録
      </button>
      <button class="inline-flex text-white items-center bg-emerald-500 border-0 py-1 px-3 mx-2 focus:outline-none hover:bg-emerald-400 rounded text-base mt-4 md:mt-0">
          ログイン
      </button>
    </div>
</header>
@endsection
ヘッダーを作成したので、common.blade.phpにヘッダーを追加します。
....省略
</head>
<body>
    <div>
        @yield('header')
    </div>
    <div>
        <main class="w-full">
            @yield('content')
        </main>
    </div>
</body>
</html>
総合トップ画面で@includeを使ってヘッダーを呼び出します。
{{-- layouts.common.blade.phpのレイアウト継承 --}}
@extends('layouts.common')

{{-- ヘッダー呼び出し --}}
@include('common.header')
@section('content')
    <h1 class="text-2xl">トップ画面</h1>
@endsection
以下のようにヘッダーが表示されていればOKです。
ヘッダーができたので、フッターを作ります。(フッターもあるのかよ…そうあります!)
フッターを作成する
完成図

フッターはTailblocksのフッターを参考にしています。
src/resources/views/common/footer.blade.phpを作成してください。
@section('footer')
<footer class="text-gray-600 body-font">
  <div class="px-5 py-8 mx-auto flex items-center sm:flex-row flex-col">
    <a class="flex title-font font-medium items-center md:justify-start justify-center text-gray-900">
        <svg xmlns="http://www.w3.org/2000/svg" fill="none" stroke="currentColor" stroke-linecap="round" stroke-linejoin="round" stroke-width="1" class="w-10 h-10 text-white p-1 bg-emerald-500 rounded-full" viewBox="0 0 22 22">
            <path stroke-linecap="round" stroke-linejoin="round" d="M11 17a1 1 0 001.447.894l4-2A1 1 0 0017 15V9.236a1 1 0 00-1.447-.894l-4 2a1 1 0 00-.553.894V17zM15.211 6.276a1 1 0 000-1.788l-4.764-2.382a1 1 0 00-.894 0L4.789 4.488a1 1 0 000 1.788l4.764 2.382a1 1 0 00.894 0l4.764-2.382zM4.447 8.342A1 1 0 003 9.236V15a1 1 0 00.553.894l4 2A1 1 0 009 17v-5.764a1 1 0 00-.553-.894l-4-2z" />
        </svg>
        <span class="ml-3 text-2xl">Laratto</span>
    </a>
    <p class="text-sm text-gray-500 sm:ml-4 sm:pl-4 sm:border-l-2 sm:border-gray-200 sm:py-2 sm:mt-0 mt-4">© 2022 Laravelニュースサイト
    </p>
    <span class="inline-flex sm:ml-auto sm:mt-0 mt-4 justify-center sm:justify-start">
    <a class="text-gray-500">
        <svg fill="currentColor" stroke-linecap="round" stroke-linejoin="round" stroke-width="2" class="w-5 h-5" viewBox="0 0 24 24">
        <path d="M18 2h-3a5 5 0 00-5 5v3H7v4h3v8h4v-8h3l1-4h-4V7a1 1 0 011-1h3z"></path>
        </svg>
    </a>
    <a class="ml-3 text-gray-500">
        <svg fill="currentColor" stroke-linecap="round" stroke-linejoin="round" stroke-width="2" class="w-5 h-5" viewBox="0 0 24 24">
        <path d="M23 3a10.9 10.9 0 01-3.14 1.53 4.48 4.48 0 00-7.86 3v1A10.66 10.66 0 013 4s-4 9 5 13a11.64 11.64 0 01-7 2c9 5 20 0 20-11.5a4.5 4.5 0 00-.08-.83A7.72 7.72 0 0023 3z"></path>
        </svg>
    </a>
    <a class="ml-3 text-gray-500">
        <svg fill="none" stroke="currentColor" stroke-linecap="round" stroke-linejoin="round" stroke-width="2" class="w-5 h-5" viewBox="0 0 24 24">
        <rect width="20" height="20" x="2" y="2" rx="5" ry="5"></rect>
        <path d="M16 11.37A4 4 0 1112.63 8 4 4 0 0116 11.37zm1.5-4.87h.01"></path>
        </svg>
    </a>
    <a class="ml-3 text-gray-500">
        <svg fill="currentColor" stroke="currentColor" stroke-linecap="round" stroke-linejoin="round" stroke-width="0" class="w-5 h-5" viewBox="0 0 24 24">
        <path stroke="none" d="M16 8a6 6 0 016 6v7h-4v-7a2 2 0 00-2-2 2 2 0 00-2 2v7h-4v-7a6 6 0 016-6zM2 9h4v12H2z"></path>
        <circle cx="4" cy="4" r="2" stroke="none"></circle>
        </svg>
    </a>
    </span>
  </div>
</footer>
@endsection
src/resources/views/layouts/common.blade.phpにfooterを加えます。
...省略
</head>
<body>
    <div>
        @yield('header')
    </div>
    <div>
        <main class="w-full">
            @yield('content')
        </main>
    </div>
    <div>
        @yield('footer')
    </div>
</body>
</html>
総合トップのtop.blade.phpで@includeを使ってfooterを読ませます。
{{-- layouts.common.blade.phpのレイアウト継承 --}}
@extends('layouts.common')

{{-- ヘッダー呼び出し --}}
@include('common.header')
{{-- メイン部分作成 --}}
@section('content')
    <h1 class="text-2xl">トップ画面</h1>
@endsection
{{-- フッター呼び出し --}}
@include('common.footer')
以下のようにフッターも追加できていればOKです。
トップ画面
サイドバーを作成する
完成図
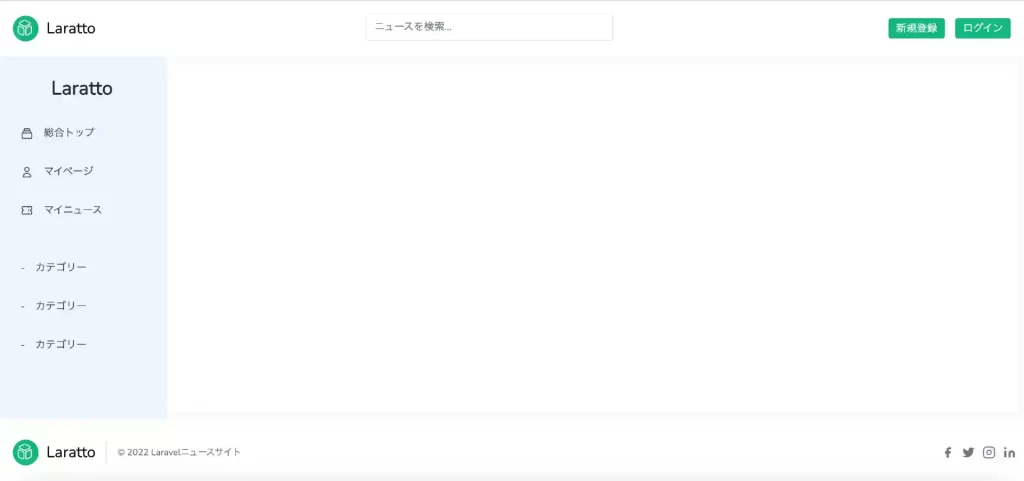
サイドバーは、Meraki UIのSidebarを参考にしてみました。
src/resources/views/common/sidebar.blade.phpを作成しましょう。
@section('sidebar')
<div class="flex flex-col w-64 h-full px-4 py-8 bg-blue-50 border-r">
    <h2 class="text-center text-3xl font-semibold text-gray-800">Laratto</h2>

    <div class="flex flex-col justify-between flex-1 mt-6">
        <nav>
            <a class="flex items-center px-4 py-2 mt-2 text-gray-600 transition-colors duration-200 transform rounded-md hover:bg-blue-300 hover:text-gray-700"
            href="#">
                <svg class="w-5 h-5" viewBox="0 0 24 24" fill="none" xmlns="http://www.w3.org/2000/svg">
                    <path d="M19 11H5M19 11C20.1046 11 21 11.8954 21 13V19C21 20.1046 20.1046 21 19 21H5C3.89543 21 3 20.1046 3 19V13C3 11.8954 3.89543 11 5 11M19 11V9C19 7.89543 18.1046 7 17 7M5 11V9C5 7.89543 5.89543 7 7 7M7 7V5C7 3.89543 7.89543 3 9 3H15C16.1046 3 17 3.89543 17 5V7M7 7H17" stroke="currentColor" stroke-width="2" stroke-linecap="round" stroke-linejoin="round" />
                </svg>
                <span class="mx-4 font-medium">総合トップ</span>
            </a>

            <a class="flex items-center px-4 py-2 mt-5 text-gray-600 transition-colors duration-200 transform rounded-md hover:bg-blue-300 hover:text-gray-700"
            href="#">
                <svg class="w-5 h-5" viewBox="0 0 24 24" fill="none" xmlns="http://www.w3.org/2000/svg">
                    <path d="M16 7C16 9.20914 14.2091 11 12 11C9.79086 11 8 9.20914 8 7C8 4.79086 9.79086 3 12 3C14.2091 3 16 4.79086 16 7Z" stroke="currentColor" stroke-width="2" stroke-linecap="round" stroke-linejoin="round" />
                    <path d="M12 14C8.13401 14 5 17.134 5 21H19C19 17.134 15.866 14 12 14Z" stroke="currentColor" stroke-width="2" stroke-linecap="round" stroke-linejoin="round" />
                </svg>
                <span class="mx-4 font-medium">マイページ</span>
            </a>

            <a class="flex items-center px-4 py-2 mt-5 text-gray-600 transition-colors duration-200 transform rounded-md hover:bg-blue-300 hover:text-gray-700"
            href="#">
                <svg class="w-5 h-5" viewBox="0 0 24 24" fill="none" xmlns="http://www.w3.org/2000/svg">
                    <path d="M15 5V7M15 11V13M15 17V19M5 5C3.89543 5 3 5.89543 3 7V10C4.10457 10 5 10.8954 5 12C5 13.1046 4.10457 14 3 14V17C3 18.1046 3.89543 19 5 19H19C20.1046 19 21 18.1046 21 17V14C19.8954 14 19 13.1046 19 12C19 10.8954 19.8954 10 21 10V7C21 5.89543 20.1046 5 19 5H5Z" stroke="currentColor" stroke-width="2" stroke-linecap="round" stroke-linejoin="round" />
                </svg>
                <span class="mx-4 font-medium">マイニュース</span>
            </a>

            <hr class="my-6 border-gray-200" />

            <a class="flex items-center px-4 py-2 mt-5 text-gray-600 transition-colors duration-200 transform rounded-md hover:bg-blue-300 hover:text-gray-700"
            href="#">
                <span>-</span>
                <span class="mx-4 font-medium">カテゴリー</span>
            </a>
            <a class="flex items-center px-4 py-2 mt-5 text-gray-600 transition-colors duration-200 transform rounded-md hover:bg-blue-300 hover:text-gray-700"
            href="#">
                <span>-</span>
                <span class="mx-4 font-medium">カテゴリー</span>
            </a>
            <a class="flex items-center px-4 py-2 mt-5 text-gray-600 transition-colors duration-200 transform rounded-md hover:bg-blue-300 hover:text-gray-700"
            href="#">
                <span>-</span>
                <span class="mx-4 font-medium">カテゴリー</span>
            </a>
        </nav>
    </div>
</div>
@endsection
common.blade.phpにサイドバーを追加します。※sidebarとcontentの親要素にflexを当て、sidebarとmainを横並びにすることも忘れずに。
...省略
</head>
<body>
    <div>
        @yield('header')
    </div>
    <div class="flex">
        <div class="w-1/6">
            @yield('sidebar')
        </div>
        <main class="w-full">
            @yield('content')
        </main>
    </div>
    <div>
        @yield('footer')
    </div>
</body>
</html>
ヘッダーとフッター同様にtop.blade.phpでサイドバーを@include使って読み込みます。
{{-- layouts.common.blade.phpのレイアウト継承 --}}
@extends('layouts.common')

{{-- ヘッダー呼び出し --}}
@include('common.header')
{{-- サイドバーの読み込み --}}
@include('common.sidebar')
{{-- メイン部分作成 --}}
@section('content')
    <h1 class="text-2xl">トップ画面</h1>
@endsection
{{-- フッター呼び出し --}}
@include('common.footer')
ヘッダー、サイドバー、フッターが完成しました。※サイドバーをホバーすると、以下のように少し濃い青色になります。
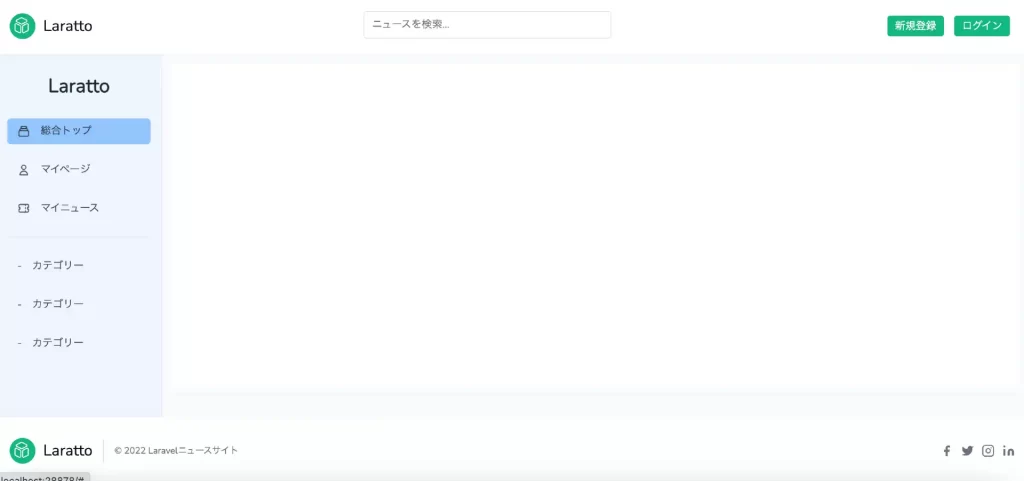
最後に、トップ画面と出ているメイン記事の部分を作っていきましょう。(そろそろ終わりが見えてきましたが油断は禁物)
メイン記事のフロント部分を作成する
完成図
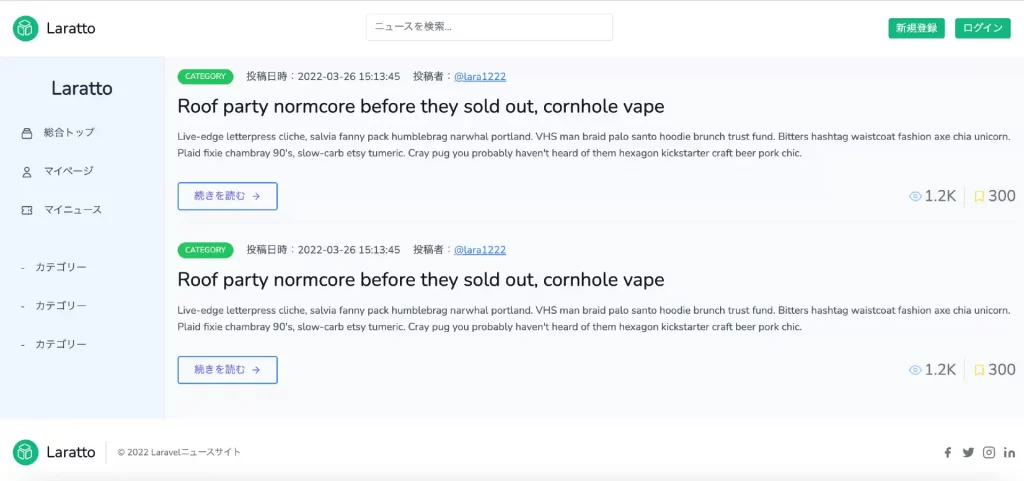
top.blade.phpにメイン記事部分を追加していきます。
メイン記事の部分は、TailblocksのBLOGの上から三番目を、ボタンはTailwind-kitのボタンcomponents参考にしました。
{{-- layouts.common.blade.phpのレイアウト継承 --}}
@extends('layouts.common')

{{-- ヘッダー呼び出し --}}
@include('common.header')
{{-- サイドバー呼び出し --}}
@include('common.sidebar')
{{-- メイン部分作成 --}}
@section('content')
<section class="h-full bg-gray-50 text-gray-600 body-font">
    <div class="px-3 py-3 mx-auto">
        <div class="flex flex-wrap">
            <div class="p-2 flex flex-col items-start">
                <div class="flex">
                    <span class="bg-green-500 rounded-full text-white px-3 py-1 text-xs uppercase font-medium">Category</span>
                    <span class="ml-5 text-gray-600">投稿日時:</span>
                    <span class="text-gray-600">2022-03-26 15:13:45</span>
                    <span class="ml-5 text-gray-600">投稿者:</span>
                    <span class="text-blue-500"><a class="underline" href="#">@lara1222</a></span>
                </div>
                <h2 class="sm:text-3xl text-2xl title-font font-medium text-gray-900 mt-4 mb-4">Roof party normcore before they sold out, cornhole vape</h2>
                <p class="leading-relaxed mb-8">Live-edge letterpress cliche, salvia fanny pack humblebrag narwhal portland. VHS man braid palo santo hoodie brunch trust fund. Bitters hashtag waistcoat fashion axe chia unicorn. Plaid fixie chambray 90's, slow-carb etsy tumeric. Cray pug you probably haven't heard of them hexagon kickstarter craft beer pork chic.</p>
                <div class="flex items-center flex-wrap pb-4 mb-4 border-b-2 border-gray-100 mt-auto w-full">
                <a class="px-6 py-2 inline-flex items-center text-indigo-500 transition ease-in duration-200 uppercase rounded cursor-pointer hover:bg-blue-500 hover:text-white border-2 border-blue-500 focus:outline-none">続きを読む
                    <svg class="w-4 h-4 ml-2" viewBox="0 0 24 24" stroke="currentColor" stroke-width="2" fill="none" stroke-linecap="round" stroke-linejoin="round">
                    <path d="M5 12h14"></path>
                    <path d="M12 5l7 7-7 7"></path>
                    </svg>
                </a>
                <span class="text-gray-500 mr-3 inline-flex items-center ml-auto leading-none text-2xl pr-3 py-1 border-r-2 border-gray-200">
                    <svg class="w-5 h-5 mr-1 text-blue-300" stroke="currentColor" stroke-width="2" fill="none" stroke-linecap="round" stroke-linejoin="round" viewBox="0 0 24 24">
                    <path d="M1 12s4-8 11-8 11 8 11 8-4 8-11 8-11-8-11-8z"></path>
                    <circle cx="12" cy="12" r="3"></circle>
                    </svg>1.2K
                </span>
                <span class="text-gray-500 inline-flex items-center leading-none text-2xl">
                    <svg xmlns="http://www.w3.org/2000/svg" class="w-5 h-5 mr-1 text-yellow-300" fill="none" viewBox="0 0 24 24" stroke="currentColor" stroke-width="2">
                    <path stroke-linecap="round" stroke-linejoin="round" d="M5 5a2 2 0 012-2h10a2 2 0 012 2v16l-7-3.5L5 21V5z" />
                    </svg>300
                </span>
                </div>
            </div>
        </div>
    </div>
</section>
@endsection
{{-- フッター呼び出し --}}
@include('common.footer')
以下のようにメイン記事もできましたね。
npm run watchを実行しながらtailwindcssでスタイル変更していると思うので、一通りスタイルができたらnpm run devを実行しておきましょう。
そうすると、ビルドするときにcss/app.cssで不要なスタイルを削除してくれるので、ファイル容量が軽くなります。
やっとできたー!ここで一旦布団にダイブすると気持ちいいです。
次回の記事では、マイページを作成していきます。
>>>マイページの作成へ進む


コメント