


前回までの記事
開発環境
| 環境 | バージョン |
|---|---|
| MacBook Air | Monterey 12.2.1 |
| Docker | 20.10.7 |
| PHP | 8.1 |
| composer | 2.2.9 |
| Laravel | 9.5.1 |
| apache | 2.4 |
| MySQL | 8.0 |
| phpmyadmin | – |
| npm | 8.5 |
| node | 12.22.11 |
| React | 17 |
| TailwindCSS | 3 |
| Laravel/breeze | ログイン認証機能で使用 ※Laravel8以降の場合に使用可。 Laravel6や7系はreact –authとか使います。 |
開発+α
◆dockerコンテナの情報を確認する
→docker ps
◆dockerのphpコンテナに入る
→docker exec -it コンテナIDまたはNAMES bash
◆var/www# はphpコンテナ内を表します。php artisanやnpm run devなどはphpコンテナ内で実行しましょう。
◆tailwindcssでスタイルを変更する前に
→npm run watchを実行していると開発が楽。
※ある程度スタイルが整ったら、npm run devでビルドしましょう。
すると、不要なcssを削除してくれるのでcssファイルが軽くなります。
◆スタイルが適用されないときは….
npm run devで一旦ビルドしてみるか、スーパーリロードでキャッシュの削除をしてみましょう。
- 記事投稿画面を作成する
- 記事投稿処理を実装する
- 投稿処理にバリデーションを適用する
- エラー時は直前の値を残すためにold関数を使う
最終的なゴール
記事投稿画面

投稿処理後、postsテーブルにデータが保存されて投稿リストに表示

エラー時


記事新規作成画面を簡易的に表示できるまで
詳細な画面は後回しでいいので、とりあえず記事作成画面のURLにアクセスして、簡易的に画面が表示できるところまでやってみましょう。
user > list >に記事投稿画面になるcreate.balde.phpを作成します。
{{-- src/resources/views/layouts/common.blade.php継承 --}}
@extends('layouts.common')

@include('user.parts.sidebar_user')
@section('content')
    <h1>記事新規投稿画面</h1>
@endsection
コントローラーに記事新規登録画面用のアクションを追加します。
<?php

namespace App\Http\Controllers\User;

use App\Http\Controllers\Controller;
use Illuminate\Http\Request;
use App\Models\Post;

class PostController extends Controller
{
    private $post;

    public function __construct()
    {
        $this->post = new Post();
    }

    /**
     * 投稿リスト
     *
     * @param int $id ユーザーID
     * @return Response src/resources/views/user/list/index.blade.phpを表示
     */
    public function index(int $id)
    {
        // ユーザーIDと一致する投稿データを取得
        $posts = $this->post->getAllPostsByUserId($id);
        return view('user.list.index', compact(
            'posts',
        ));
    }

    /**
     * 記事投稿画面
     */
    public function create()
    {
        return view('user.list.create');
    }
}
createアクションでは、user > list > createのビューを返すようにしたので、ルーティングを設定します。
<?php

use Illuminate\Support\Facades\Route;
use App\Http\Controllers\TopController;
use App\Http\Controllers\User\PostController;

/*
|--------------------------------------------------------------------------
| Web Routes
|--------------------------------------------------------------------------
|
| Here is where you can register web routes for your application. These
| routes are loaded by the RouteServiceProvider within a group which
| contains the "web" middleware group. Now create something great!
|
*/
Route::get('/dashboard', function () {
    return view('dashboard');
})->middleware(['auth'])->name('dashboard');

require __DIR__.'/auth.php';

// 総合トップ
Route::get('/', [TopController::class, 'top'])
    ->name('top');

// マイページ
Route::get('/user/{id}/index', [PostController::class, 'index'])
    ->name('user.index');

// 投稿
Route::get('/post/create', [PostController::class, 'create'])
    ->name('post.create');
これでとりあえずは、/post/createにアクセスすると、記事新規登録画面が返ってきます。(グッジョブ!)
記事新規登録画面を完成させる
完成図
記事新規登録画面を完成させる手順は、こんな感じ。
- Categoryモデルにカテゴリーを全て取得するDBロジックを書く(カテゴリープルダウンのため)
- コントローラーでそれを呼び出して、ビューに値を渡す
- レイアウトを作成する
Categoryモデルにカテゴリー全て取得するDBロジックを書く
<?php

namespace App\Models;

use Illuminate\Database\Eloquent\Factories\HasFactory;
use Illuminate\Database\Eloquent\Model;
use App\Models\Post;

class Category extends Model
{
    /**
     * モデルに関連付けるテーブル
     *
     * @var string
     */
    protected $table = 'categories';

    /**
     * 複数代入可能な属性
     *
     * @var array
     */
    protected $fillable = [
        'category_name',
        'created_at',
        'updated_at'
    ];

    /**
     * Postモデルとリレーション
     */
    public function posts()
    {
        return $this->hasMany(Post::class);
    }

    /**
     * カテゴリーを全て取得
     *
     * @return App\Model\Category $result カテゴリーモデル
     */
    public function getAllCategories()
    {
        $result = $this->get();
        return $result;
    }
}
コントローラーでCategoryのDBロジックを呼び出して値をビューに渡す
<?php

namespace App\Http\Controllers\User;

use App\Http\Controllers\Controller;
use Illuminate\Http\Request;
use App\Models\Post;
use App\Models\Category;

class PostController extends Controller
{
    private $post;
    private $category;

    public function __construct()
    {
        $this->post = new Post();
        $this->category = new Category();
    }

    /**
     * 投稿リスト
     *
     * @param int $id ユーザーID
     * @return Response src/resources/views/user/list/index.blade.phpを表示
     */
    public function index(int $id)
    {
        // ユーザーIDと一致する投稿データを取得
        $posts = $this->post->getAllPostsByUserId($id);
        return view('user.list.index', compact(
            'posts',
        ));
    }

    /**
     * 記事投稿画面
     */
    public function create()
    {
        $categories = $this->category->getAllCategories();
        return view('user.list.create', compact(
            'categories',
        ));
    }
}
値を確認するために、ddで$categoriesをデバッグしてみると、categoriesテーブルの値が全て取得できていることが確認できますよ〜(グレイト!)
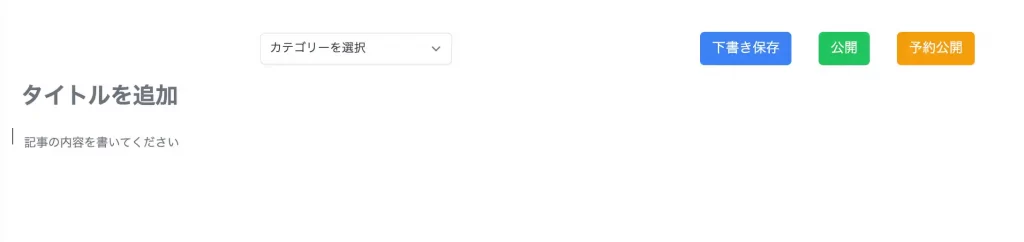
記事新規登録画面のレイアウトを作る
レイアウトを作成するので、事前にnpm run watchを実行し、ソースの変更を監視しながら書いていくと効率的です。
ある程度できたら、npm run devでビルドすれば、不要なcssを削除してくれます。
- formのアクションはまだ空でいいです(後で登録処理を作って追加するため)
{{-- src/resources/views/layouts/common.blade.php継承 --}}
@extends('layouts.common')

@include('user.parts.sidebar_user')
@section('content')
    <form action="" method="" class="p-5">
    @csrf
        <div class="flex mt-6 mr-12">
            <div class="m-auto">
                <select name="category" class="block w-64 text-gray-700 py-2 px-3 border border-gray-300 bg-white rounded-md shadow-sm focus:outline-none focus:ring-primary-500 focus:border-primary-500">
                    <option value="">カテゴリーを選択</option>
                    @foreach ($categories as $category)
                        <option value="{{ $category->id }}">{{ $category->category_name }}</option>
                    @endforeach
                </select>
            </div>
            <div>
                <button type="submit" name="save_draft" class="px-4 py-2 text-white text-lg transition-colors duration-200 transform bg-blue-500 rounded-md hover:bg-blue-400">下書き保存</button>
                <button type="submit" name="release" class="px-4 py-2 ml-8 text-white text-lg transition-colors duration-200 transform bg-green-500 rounded-md hover:bg-green-400">公開</button>
                <button type="submit" name="reservation_release" class="px-4 py-2 ml-8 text-white text-lg transition-colors duration-200 transform bg-amber-500 rounded-md hover:bg-amber-400">予約公開</button>
            </div>
        </div>
        <div class="w-full mt-4">
            <input type="text" name="title" class="block w-full text-3xl font-bold border-none outline-none" placeholder="タイトルを追加" />
        </div>
        <div class="w-full mt-4">
            <textarea name="body" class="block w-full h-40 px-4 py-2 border-none resize-none text-gray-700 bg-white border rounded-md focus:outline-none focus:ring" placeholder="記事の内容を書いてください"></textarea>
        </div>
    </form>
@endsection
これで記事新規登録画面のレイアウトは完成です。(スーパーグレイト!)
(ちなみに、タイトルや記事の内容にフォーカスすると、青枠線が出てしまうんですが、これいくら消す努力してもできなかったんで消すこと諦めたのは草ァ!)
次に、投稿リストの新規追加ボタン押した時に、記事新規登録画面に遷移するようにリンクを追加します。

{{-- src/resources/views/layouts/common.blade.php継承 --}}
@extends('layouts.common')

@include('user.parts.sidebar_user')
@section('content')
<div class="h-screen overflow-y-scroll">
    <div class="px-4 sm:px-4">
        <div class="flex justify-between">
            <div class="text-2xl font-bold pt-7">投稿</div>
            <div class="pt-4">
                <a href="{{ route('post.create') }}">
                    <button class="bg-blue-500 text-white px-4 py-2 rounded-md text-1xl font-medium hover:bg-blue-700 transition duration-300">
                        新規追加
                    </button>
                </a>
            </div>
        </div>
        <div class="py-4">
            <div class="overflow-x-auto">
                <div class="inline-block min-w-full shadow rounded-lg overflow-hidden">
                    <table class="min-w-full leading-normal">
                        <thead>
                            <tr>
                                <th scope="col" class="px-5 py-3 bg-white  border-b border-gray-200 text-gray-800  text-center text-sm uppercase font-normal">
                                    タイトル
                                </th>
                                <th scope="col" class="px-5 py-3 bg-white  border-b border-gray-200 text-gray-800  text-center text-sm uppercase font-normal">
                                    投稿ID
                                </th>
                                <th scope="col" class="px-5 py-3 bg-white  border-b border-gray-200 text-gray-800  text-center text-sm uppercase font-normal">
                                    カテゴリー
                                </th>
                                <th scope="col" class="px-5 py-3 bg-white  border-b border-gray-200 text-gray-800  text-center text-sm uppercase font-normal">
                                    ステータス
                                </th>
                                <th scope="col" class="px-5 py-3 bg-white  border-b border-gray-200 text-gray-800  text-center text-sm uppercase font-normal">
                                    日付
                                </th>
                                <th scope="col" class="px-5 py-3 bg-white  border-b border-gray-200 text-gray-800  text-left text-sm uppercase font-normal">
                                    操作
                                </th>
                                <th scope="col" class="px-5 py-3 bg-white  border-b border-gray-200 text-gray-800  text-center text-sm uppercase font-normal">
                                    PV数
                                </th>
                                <th scope="col" class="px-5 py-3 bg-white  border-b border-gray-200 text-gray-800  text-center text-sm uppercase font-normal">
                                    お気に入り数
                                </th>
                            </tr>
                        </thead>
                        <tbody>
                            @foreach ($posts as $post)
                            <tr>
                                <td class="px-5 py-5 border-b border-gray-200 bg-white text-sm w-40">
                                    <p class="text-left text-gray-900 whitespace-no-wrap">
                                        {{ $post->title }}
                                    </p>
                                </td>
                                <td class="px-5 py-5 border-b border-gray-200 bg-white text-sm">
                                    <p class="text-center text-gray-900 whitespace-no-wrap">
                                        {{ $post->id }}
                                    </p>
                                </td>
                                <td class="px-5 py-5 border-b border-gray-200 bg-white text-sm text-center">
                                    <span class="relative inline-block px-3 py-1 font-semibold text-white leading-tight">
                                        <span aria-hidden="true" class="absolute inset-0 bg-green-500 rounded-full">
                                        </span>
                                        <span class="relative">
                                            @if (isset($post->category_id))
                                                {{ $post->category->category_name }}
                                            @else
                                                カテゴリーなし
                                            @endif
                                        </span>
                                    </span>
                                </td>
                                <td class="px-5 py-5 border-b border-gray-200 bg-white text-sm text-center">
                                    @if ($post->publish_flg === 0)
                                        <span class="relative inline-block px-3 py-1 font-semibold text-blue-900 leading-tight">
                                            <span aria-hidden="true" class="absolute inset-0 bg-blue-200 opacity-50 rounded-full">
                                            </span>
                                            <span class="relative">
                                                下書き保存
                                            </span>
                                        </span>
                                    @elseif ($post->publish_flg === 1)
                                        <span class="relative inline-block px-3 py-1 font-semibold text-green-900 leading-tight">
                                            <span aria-hidden="true" class="absolute inset-0 bg-green-200 opacity-50 rounded-full">
                                            </span>
                                            <span class="relative">公開済み</span>
                                        </span>
                                    @elseif ($post->publish_flg === 2)
                                        <span class="relative inline-block px-3 py-1 font-semibold text-amber-900 leading-tight">
                                            <span aria-hidden="true" class="absolute inset-0 bg-amber-200 opacity-50 rounded-full">
                                            </span>
                                            <span class="relative">予約公開</span>
                                        </span>
                                    @else
                                        <span class="relative inline-block px-3 py-1 font-semibold text-green-900 leading-tight">
                                            <span aria-hidden="true" class="absolute inset-0 bg-green-200 opacity-50 rounded-full">
                                            </span>
                                            <span class="relative">下書き保存</span>
                                        </span>
                                    @endif
                                </td>
                                <td class="px-5 py-5 border-b border-gray-200 bg-white text-sm">
                                    <p class="text-center text-gray-900 whitespace-no-wrap">
                                        {{ $post->created_at }}
                                    </p>
                                </td>
                                <td class="px-5 py-5 mr-5 border-b border-gray-200 bg-white text-sm">
                                    <a class="mr-3 text-blue-700 whitespace-no-wrap underline" href="#">
                                        Edit
                                    </a>
                                    <a class="ml-5 underline text-red-700 whitespace-no-wrap" href="#">
                                        delete
                                    </a>
                                </td>
                                <td class="px-5 py-5 border-b border-gray-200 bg-white text-sm">
                                    <p class="text-center text-gray-900 whitespace-no-wrap">
                                        {{ $post->view_counter }}
                                    </p>
                                </td>
                                <td class="px-5 py-5 border-b border-gray-200 bg-white text-sm">
                                    <p class="text-center text-gray-900 whitespace-no-wrap">
                                        {{ $post->favorite_counter }}
                                    </p>
                                </td>
                            </tr>
                            @endforeach
                        </tbody>
                    </table>
                </div>
            </div>
        </div>
    </div>
</div>
@endsection
記事投稿処理を実装する①-簡易的に実装
記事の登録画面ができたので、実際にタイトルやカテゴリー、記事の内容を書いて下書き保存とか公開ボタンをクリックすると記事が登録できるような実装をしていきます。

↓例)タイトルなどを入力し、下書き保存をクリック
DBに保存、投稿一覧画面にリダイレクト、記事一覧で先ほど登録した記事が確認できること

まずは最小限の実装から進めた方が、ミスが少ないので、(←これ結構大事)
- ルーティングを設定する
- 「下書き保存」or「公開」or「予約投稿」をクリックしたら投稿リストにリダイレクトさせる
- DBに保存する処理は後回し
こんな感じでやっていきましょう。
ルーティングを設定する
// 投稿登録処理
Route::post('/post/store', [PostController::class, 'store'])
    ->name('post.store');
「下書き保存」or「公開」or「予約投稿」をクリックしたら投稿リストにリダイレクト
formアクションの実行先はpost.store、メソッドは”POST”と設定します。
{{-- src/resources/views/layouts/common.blade.php継承 --}}
@extends('layouts.common')

@include('user.parts.sidebar_user')
@section('content')
    <form action="{{ route('post.store') }}" method="POST" class="p-5">
    @csrf
        <div class="flex mt-6 mr-12">
            <div class="m-auto">
                <select name="category" class="block w-64 text-gray-700 py-2 px-3 border border-gray-300 bg-white rounded-md shadow-sm focus:outline-none focus:ring-primary-500 focus:border-primary-500">
                    <option value="">カテゴリーを選択</option>
                    @foreach ($categories as $category)
                        <option value="{{ $category->id }}">{{ $category->category_name }}</option>
                    @endforeach
                </select>
            </div>
            <div>
                <button type="submit" name="save_draft" class="px-4 py-2 text-white text-lg transition-colors duration-200 transform bg-blue-500 rounded-md hover:bg-blue-400">下書き保存</button>
                <button type="submit" name="release" class="px-4 py-2 ml-8 text-white text-lg transition-colors duration-200 transform bg-green-500 rounded-md hover:bg-green-400">公開</button>
                <button type="submit" name="reservation_release" class="px-4 py-2 ml-8 text-white text-lg transition-colors duration-200 transform bg-amber-500 rounded-md hover:bg-amber-400">予約公開</button>
            </div>
        </div>
        <div class="w-full mt-4">
            <input type="text" name="title" class="block w-full text-3xl font-bold border-none outline-none" placeholder="タイトルを追加" />
        </div>
        <div class="w-full mt-4">
            <textarea name="body" class="block w-full h-40 px-4 py-2 border-none resize-none text-gray-700 bg-white border rounded-md focus:outline-none focus:ring" placeholder="記事の内容を書いてください"></textarea>
        </div>
    </form>
@endsection
※この時点では、まだコントローラーにstoreアクションを書いていないので、下書き保存などのボタンをクリックすると、Postコントローラーにstoreアクションがないんじゃボケェ!と怒られるので、心臓が弱い方は要注意です。
PostControllerにstoreアクションを追加する
リダイレクトする際にto_routeを使っていますが、これはLaravel9から追加された内容になります。それ以前は、redirect()->route(”)使うなどがあります。
<?php

namespace App\Http\Controllers\User;

use App\Http\Controllers\Controller;
use Illuminate\Support\Facades\Auth;
use Illuminate\Http\Request;
use App\Models\Post;
use App\Models\Category;

class PostController extends Controller
{
    private $post;
    private $category;

    public function __construct()
    {
        $this->post = new Post();
        $this->category = new Category();
    }

    /**
     * 投稿リスト
     *
     * @param int $id ユーザーID
     * @return Response src/resources/views/user/list/index.blade.phpを表示
     */
    public function index(int $id)
    {
        // ユーザーIDと一致する投稿データを取得
        $posts = $this->post->getAllPostsByUserId($id);
        return view('user.list.index', compact(
            'posts',
        ));
    }

    /**
     * 記事投稿画面
     *
     * @return Response src/resources/views/user/list/create.blade.phpを表示
     */
    public function create()
    {
        // カテゴリーデータを全件取得
        $categories = $this->category->getAllCategories();
        return view('user.list.create', compact(
            'categories',
        ));
    }

    /**
     * 記事投稿処理
     *
     * @param string $request リクエストデータ
     * @return Response src/resources/views/user/list/index.blade.phpを表示
     */
    public function store(Request $request)
    {
        // ログインしているユーザー情報を取得
        $user = Auth::user();
        // ログインユーザー情報からユーザーIDを取得
        $user_id = $user->id;

        return to_route('user.index', ['id' => $user_id]);
    }
}
これでひとまずは、記事新規投稿画面で公開などのボタンをクリックすると、投稿リストにリダイレクトすることが確認できますよ〜
ただ、まだDB保存などはまだなので、この後は、下書き保存、公開、予約公開をクリックした時にDB保存するようにしていきます。
記事投稿処理を実装する②-DB登録処理
DB登録処理を書く前に、フォームに入力した値がどのようにわたってくるのかデバッグしてみましょう。
create.balde.phpを見てもらうと、
- タイトルのname属性はtitle <input type=”text” name=”title”
- 記事内容のname属性はbody <textarea name=”body”
- カテゴリーのname属性はcategory <select name=”category”
となっていますね。以下のようにコントローラーにデバッグ関数を書いて、
/**
* 記事投稿処理
*
* @param string $request リクエストデータ
* @return Response src/resources/views/user/list/index.blade.phpを表示
*/
public function store(Request $request)
{
// ログインしているユーザー情報を取得
$user = Auth::user();
// ログインユーザー情報からユーザーIDを取得
$user_id = $user->id;
dd(
$request->title,
$request->body,
$request->category,
);
return to_route('user.index', ['id' => $user_id]);
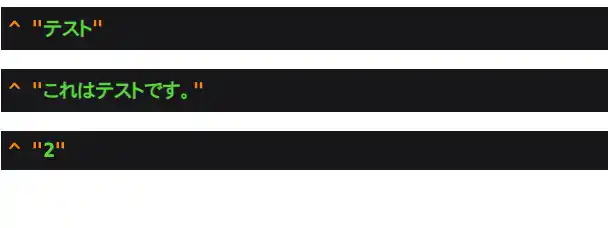
}適当にタイトルや記事内容、カテゴリーを選択して下書き保存か公開か予約公開かボタン押すと、
こんな感じでデバッグができるってわけ。楽勝ですよね〜
また、DBに登録する際のゴールとしては、
- 「下書き保存」クリック→publish_flgは0でpostsテーブルに登録
- 「公開」クリック→publish_flgは1でpostsテーブルに登録
- 「予約公開」クリック→publish_flgは2でpostsテーブルに登録
ってしたいわけです。
その時に問題になるのがフォームに複数の送信ボタンがある場合は、どうやって処理を見分けて実行させればいいんだ!?ってなります。
これは簡単。name属性で区別し、$request->has(”)でボタンを判断します。(Laravel9公式入力の存在判定)
ボタンのname属性(create.balde.php)
- 下書き保存のname属性はsave_draft <button type=”submit” name=”save_draft”
- 公開のname属性はrelease <button type=”submit” name=”release”
- 予約公開のname属性はreservation_release <button type=”submit” name=”reservation_release”
↓ボタンにname属性を追加
<button type="submit" name="save_draft" class="px-4 py-2 text-white text-lg transition-colors duration-200 transform bg-blue-500 rounded-md hover:bg-blue-400">下書き保存</button>
<button type="submit" name="release" class="px-4 py-2 ml-8 text-white text-lg transition-colors duration-200 transform bg-green-500 rounded-md hover:bg-green-400">公開</button>
<button type="submit" name="reservation_release" class="px-4 py-2 ml-8 text-white text-lg transition-colors duration-200 transform bg-amber-500 rounded-md hover:bg-amber-400">予約公開</button>
デバッグするなら以下のような感じ。
    /**
     * 記事投稿処理
     *
     * @param string $request リクエストデータ
     * @return Response src/resources/views/user/list/index.blade.phpを表示
     */
    public function store(Request $request)
    {
        // ログインしているユーザー情報を取得
        $user = Auth::user();
        // ログインユーザー情報からユーザーIDを取得
        $user_id = $user->id;

        switch (true) {
            case $request->has('save_draft'):
                dd('下書き保存のボタンクリックされてるで!');
                break;
            case $request->has('release'):
                dd('公開のボタンクリックされてるで!');
                break;
            case $request->has('reservation_release'):
                dd('予約公開のボタンクリックされてるで!');
                break;
            default:
                dd('それ以外は下書き保存の処理!');
                break;
        }

        return to_route('user.index', ['id' => $user_id]);
    }
これで「下書き保存」or「公開」or「予約公開」のボタンをクリックすると、それぞれの処理がくることが確認できます。
if文使ってもいいですが、個人的には書き方が汚くなるのでswitch文使ってます。
あとは、下書き保存、公開、予約公開の時のDBロジックをPostモデルに書いていって、それを呼び出せば完成します。(終わりが見えてきたのはいいこと)
Postモデルに登録処理のDBロジックを書く
<?php

namespace App\Models;

use Illuminate\Database\Eloquent\Factories\HasFactory;
use Illuminate\Database\Eloquent\Model;
use App\Models\Category;
use Illuminate\Support\Carbon;

/**
 * 投稿モデル
 */
class Post extends Model
{
    /**
     * モデルに関連付けるテーブル
     *
     * @var string
     */
    protected $table = 'posts';

    /**
     * 複数代入可能な属性
     *
     * @var array
     */
    protected $fillable = [
        'user_id',
        'category_id',
        'title',
        'body',
        'publish_flg',
        'view_counter',
        'favorite_counter',
        'delete_flg',
        'created_at',
        'updated_at'
    ];

    /**
     * Categoryモデルとリレーション
     */
    public function category()
    {
        return $this->belongsTo(Category::class);
    }

    /**
     * ユーザーIDに紐づいた投稿リストを全て取得する
     *
     * @param int $user_id ユーザーID
     * @return Post
     */
    public function getAllPostsByUserId($user_id)
    {
        $result = $this->where('user_id', $user_id)->with('category')->get();
        return $result;
    }

    /**
     * 下書き保存=>publish_flg=0
     * リクエストされたデータをpostsテーブルにinsertする
     *
     * @param int $user_id ログインユーザーID
     * @param array $request リクエストデータ
     * @return object $result App\Models\Post
     */
    public function insertPostToSaveDraft($user_id, $request)
    {
        $result = $this->create([
            'user_id'          => $user_id,
            'category_id'      => $request->category,
            'title'            => $request->title,
            'body'             => $request->body,
            'publish_flg'      => 0,
            'view_counter'     => 0,
            'favorite_counter' => 0,
            'delete_flg'       => 0,
       // created_atやupdated_atはmDB登録時に自動的に今日の日時で登録されるので、記載しない
        ]);
        return $result;
    }

    /**
     * 公開=>publish_flg=1
     * リクエストされたデータをpostsテーブルにinsertする
     *
     * @param int $user_id ログインユーザーID
     * @param array $request リクエストデータ
     * @return object $result App\Models\Post
     */
    public function insertPostToRelease($user_id, $request)
    {
        $result = $this->create([
            'user_id'          => $user_id,
            'category_id'      => $request->category,
            'title'            => $request->title,
            'body'             => $request->body,
            'publish_flg'      => 1,
            'view_counter'     => 0,
            'favorite_counter' => 0,
            'delete_flg'       => 0,
       // created_atやupdated_atはmDB登録時に自動的に今日の日時で登録されるので、記載しない
        ]);
        return $result;
    }

    /**
     * 予約公開=>publish_flg=2
     * リクエストされたデータをpostsテーブルにinsertする
     *
     * @param int $user_id ログインユーザーID
     * @param array $request リクエストデータ
     * @return object $result App\Models\Post
     */
    public function insertPostToReservationRelease($user_id, $request)
    {
        $result = $this->create([
            'user_id'          => $user_id,
            'category_id'      => $request->category,
            'title'            => $request->title,
            'body'             => $request->body,
            'publish_flg'      => 2,
            'view_counter'     => 0,
            'favorite_counter' => 0,
            'delete_flg'       => 0,
       // created_atやupdated_atはmDB登録時に自動的に今日の日時で登録されるので、記載しない
        ]);
        return $result;
    }
}
PostControllerでDBロジックを呼び出す
    /**
     * 記事投稿処理
     *
     * @param string $request リクエストデータ
     * @return Response src/resources/views/user/list/index.blade.phpを表示
     */
    public function store(Request $request)
    {
        // ログインしているユーザー情報を取得
        $user = Auth::user();
        // ログインユーザー情報からユーザーIDを取得
        $user_id = $user->id;

        switch (true) {
            // 下書き保存クリック時の処理
            case $request->has('save_draft'):
                $this->post->insertPostToSaveDraft($user_id, $request);
                break;
            // 公開クリック時の処理
            case $request->has('release'):
                $this->post->insertPostToRelease($user_id, $request);
                break;
            // 予約公開クリック時の処理
            case $request->has('reservation_release'):
                $this->post->insertPostToReservationRelease($user_id, $request);
                break;
            // 上記以外の処理
            default:
                $this->post->insertPostToSaveDraft($user_id, $request);
                break;
        }

        return to_route('user.index', ['id' => $user_id]);
    }
これで、下書き保存、公開、予約公開をクリックした時にそれぞれの処理が実装できました。(エレガント!)
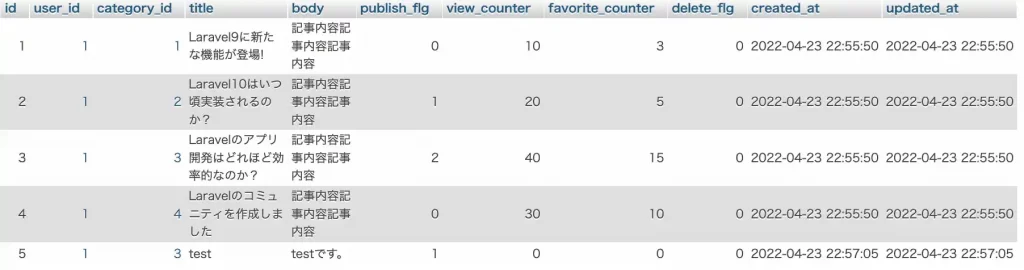
postsテーブルにも投稿ID5としてDBに登録できていることが確認できます。
登録処理のバリデーションを実装する
登録処理がある程度できたので、今度はバリデーションです。
ここから実装していくのは、
- バリデーションの実装のためにフォームリクエストを作成
- PostControllerで作成したフォームリクエストを適用する
- タイトルが未入力または255文字以上の場合、エラーメッセージを表示
- バリデーション時、直前の値をフォームに残すためにold関数を使用
それではやっていくで〜
フォームリクエストを作成
バリデーションを実装するために、フォームリクエストを作成すると便利です。
artisanコマンドを使って、フォームリクエストを作成します。
/var/www# php artisan make:request PostRequestsrc/app/Http/Requests/PostRequest.phpにファイルが作成されるので、編集しましょう。
<?php

namespace App\Http\Requests;

use Illuminate\Foundation\Http\FormRequest;

class PostRequest extends FormRequest
{
    /**
     * Determine if the user is authorized to make this request.
     *
     * @return bool
     */
    public function authorize()
    {
        return true;
    }

    /**
     * Get the validation rules that apply to the request.
     *
     * @return array
     */
    public function rules()
    {
        return [
            'title' => 'required|max:255',
        ];
    }

    /**
     * 定義済みバリデーションルールのエラーメッセージ取得
     *
     * @return array
     */
    public function messages()
    {
        return [
            'title.required' => 'タイトルは必須です',
            'title.max'      => 'タイトルは255文字以内で入力してください',
        ];
    }
}
PostControllerで作成したフォームリクエストを適用する
<?php

namespace App\Http\Controllers\User;

use App\Http\Controllers\Controller;
use Illuminate\Support\Facades\Auth;
use Illuminate\Http\Request;
use App\Models\Post;
use App\Models\Category;
use App\Http\Requests\PostRequest;

class PostController extends Controller
{
    private $post;
    private $category;

    public function __construct()
    {
        $this->post = new Post();
        $this->category = new Category();
    }

    /**
     * 投稿リスト
     *
     * @param int $id ユーザーID
     * @return Response src/resources/views/user/list/index.blade.phpを表示
     */
    public function index(int $id)
    {
        // ユーザーIDと一致する投稿データを取得
        $posts = $this->post->getAllPostsByUserId($id);
        return view('user.list.index', compact(
            'posts',
        ));
    }

    /**
     * 記事投稿画面
     *
     * @return Response src/resources/views/user/list/create.blade.phpを表示
     */
    public function create()
    {
        // カテゴリーデータを全件取得
        $categories = $this->category->getAllCategories();
        return view('user.list.create', compact(
            'categories',
        ));
    }

    /**
     * 記事投稿処理
     *
     * @param string $request リクエストデータ
     * @return Response src/resources/views/user/list/index.blade.phpを表示
     */
    public function store(PostRequest $request)
    {
        // ログインしているユーザー情報を取得
        $user = Auth::user();
        // ログインユーザー情報からユーザーIDを取得
        $user_id = $user->id;

        switch (true) {
            // 下書き保存クリック時の処理
            case $request->has('save_draft'):
                $this->post->insertPostToSaveDraft($user_id, $request);
                break;
            // 公開クリック時の処理
            case $request->has('release'):
                $this->post->insertPostToRelease($user_id, $request);
                break;
            // 予約公開クリック時の処理
            case $request->has('reservation_release'):
                $this->post->insertPostToReservationRelease($user_id, $request);
                break;
            // 上記以外の処理
            default:
                $this->post->insertPostToSaveDraft($user_id, $request);
                break;
        }

        return to_route('user.index', ['id' => $user_id]);
    }
}
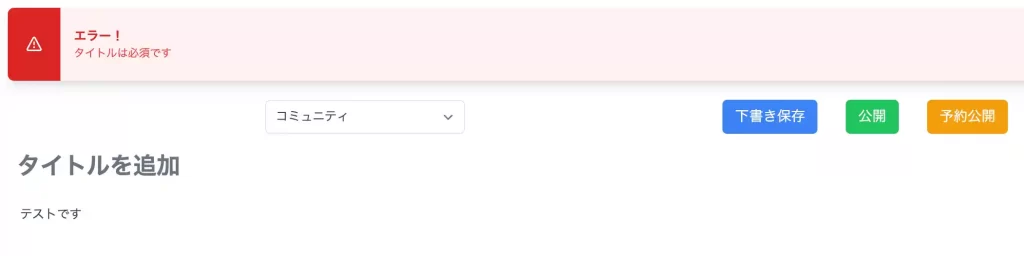
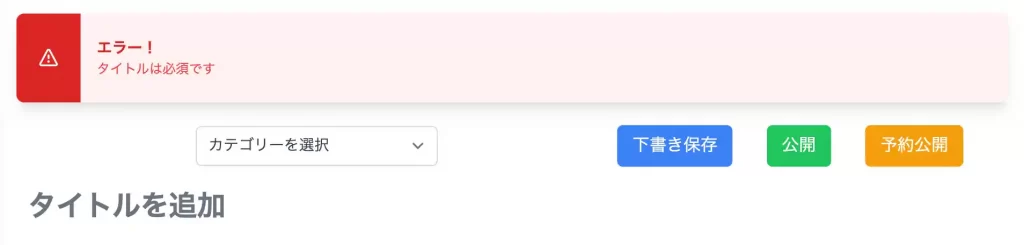
タイトルが未入力または255文字以上の場合、エラーメッセージを表示
{{-- src/resources/views/layouts/common.blade.php継承 --}}
@extends('layouts.common')

@include('user.parts.sidebar_user')
@section('content')
    <form action="{{ route('post.store') }}" method="POST" class="p-5">
    @csrf
        @if ($errors->any())
            <div class="flex shadow-lg rounded-sm">
                <div class="bg-red-600 py-4 px-6 rounded-l-lg flex items-center">
                    <svg xmlns="http://www.w3.org/2000/svg" viewBox="0 0 16 16" class="fill-current text-white" width="20" height="20">
                        <path fill-rule="evenodd" d="M8.22 1.754a.25.25 0 00-.44 0L1.698 13.132a.25.25 0 00.22.368h12.164a.25.25 0 00.22-.368L8.22 1.754zm-1.763-.707c.659-1.234 2.427-1.234 3.086 0l6.082 11.378A1.75 1.75 0 0114.082 15H1.918a1.75 1.75 0 01-1.543-2.575L6.457 1.047zM9 11a1 1 0 11-2 0 1 1 0 012 0zm-.25-5.25a.75.75 0 00-1.5 0v2.5a.75.75 0 001.5 0v-2.5z"></path>
                    </svg>
                </div>
                <div class="px-4 py-6 bg-red-50 rounded-r-lg justify-between items-center w-full border border-l-transparent border-red-50">
                    <div class="text-red-600 text-md font-bold">エラー!</div>
                    <ul>
                        @foreach ($errors->all() as $error)
                            <li  class="text-sm text-red-500">{{ $error }}</li>
                        @endforeach
                    </ul>
                </div>
            </div>
        @endif
        <div class="flex mt-6 mr-12">
            <div class="m-auto">
                <select name="category" class="block w-64 text-gray-700 py-2 px-3 border border-gray-300 bg-white rounded-md shadow-sm focus:outline-none focus:ring-primary-500 focus:border-primary-500">
                    <option value="">カテゴリーを選択</option>
                    @foreach ($categories as $category)
                        <option value="{{ $category->id }}">{{ $category->category_name }}</option>
                    @endforeach
                </select>
            </div>
            <div>
                <button type="submit" name="save_draft" class="px-4 py-2 text-white text-lg transition-colors duration-200 transform bg-blue-500 rounded-md hover:bg-blue-400">下書き保存</button>
                <button type="submit" name="release" class="px-4 py-2 ml-8 text-white text-lg transition-colors duration-200 transform bg-green-500 rounded-md hover:bg-green-400">公開</button>
                <button type="submit" name="reservation_release" class="px-4 py-2 ml-8 text-white text-lg transition-colors duration-200 transform bg-amber-500 rounded-md hover:bg-amber-400">予約公開</button>
            </div>
        </div>
        <div class="w-full mt-4">
            <input type="text" name="title" class="block w-full text-3xl font-bold border-none outline-none" placeholder="タイトルを追加" />
        </div>
        <div class="w-full mt-4">
            <textarea name="body" class="block w-full h-40 px-4 py-2 border-none resize-none text-gray-700 bg-white border rounded-md focus:outline-none focus:ring" placeholder="記事の内容を書いてください"></textarea>
        </div>
    </form>
@endsection
タイトルが未入力または255文字以上で下書き保存などをクリックすると、以下のようにバリデーションが適用されてエラーメッセージが表示されます。
old関数を使って、直前の値をフォームに残す
ここまでで、バリデーションができたのでもう少し。
現状では、バリデーションに引っかかった時、入力したタイトルや内容は残りません。なのでこれを残そうってわけです。
親切の塊ですね。
@selectedはLaravel9で新しく追加された内容です。textareの場合は、valueの書く位置がちょっと違う点に注意しましょう。
{{-- src/resources/views/layouts/common.blade.php継承 --}}
@extends('layouts.common')

@include('user.parts.sidebar_user')
@section('content')
    <form action="{{ route('post.store') }}" method="POST" class="p-5">
    @csrf
        @if ($errors->any())
            <div class="flex shadow-lg rounded-sm">
                <div class="bg-red-600 py-4 px-6 rounded-l-lg flex items-center">
                    <svg xmlns="http://www.w3.org/2000/svg" viewBox="0 0 16 16" class="fill-current text-white" width="20" height="20">
                        <path fill-rule="evenodd" d="M8.22 1.754a.25.25 0 00-.44 0L1.698 13.132a.25.25 0 00.22.368h12.164a.25.25 0 00.22-.368L8.22 1.754zm-1.763-.707c.659-1.234 2.427-1.234 3.086 0l6.082 11.378A1.75 1.75 0 0114.082 15H1.918a1.75 1.75 0 01-1.543-2.575L6.457 1.047zM9 11a1 1 0 11-2 0 1 1 0 012 0zm-.25-5.25a.75.75 0 00-1.5 0v2.5a.75.75 0 001.5 0v-2.5z"></path>
                    </svg>
                </div>
                <div class="px-4 py-6 bg-red-50 rounded-r-lg justify-between items-center w-full border border-l-transparent border-red-50">
                    <div class="text-red-600 text-md font-bold">エラー!</div>
                    <ul>
                        @foreach ($errors->all() as $error)
                            <li  class="text-sm text-red-500">{{ $error }}</li>
                        @endforeach
                    </ul>
                </div>
            </div>
        @endif
        <div class="flex mt-6 mr-12">
            <div class="m-auto">
                <select name="category" class="block w-64 text-gray-700 py-2 px-3 border border-gray-300 bg-white rounded-md shadow-sm focus:outline-none focus:ring-primary-500 focus:border-primary-500">
                    <option value="">カテゴリーを選択</option>
                    @foreach ($categories as $category)
                        <option value="{{ $category->id }}" @selected(old('category') == $category->id)>{{ $category->category_name }}</option>
                    @endforeach
                </select>
            </div>
            <div>
                <button type="submit" name="save_draft" class="px-4 py-2 text-white text-lg transition-colors duration-200 transform bg-blue-500 rounded-md hover:bg-blue-400">下書き保存</button>
                <button type="submit" name="release" class="px-4 py-2 ml-8 text-white text-lg transition-colors duration-200 transform bg-green-500 rounded-md hover:bg-green-400">公開</button>
                <button type="submit" name="reservation_release" class="px-4 py-2 ml-8 text-white text-lg transition-colors duration-200 transform bg-amber-500 rounded-md hover:bg-amber-400">予約公開</button>
            </div>
        </div>
        <div class="w-full mt-4">
            <input type="text" name="title" class="block w-full text-3xl font-bold border-none outline-none" placeholder="タイトルを追加" value="{{ old('title') }}"/>
        </div>
        <div class="w-full mt-4">
            <textarea name="body" class="block w-full h-40 px-4 py-2 border-none resize-none text-gray-700 bg-white border rounded-md focus:outline-none focus:ring" placeholder="記事の内容を書いてください">{{ old('body') }}</textarea>
        </div>
    </form>
@endsection
入力した値とプルダウンが直前の値になっていることが確認できましたね。(チョベリグ)
はい!これでこの章はおしまいです。
次回は、記事の詳細をやっていきます〜
>>>記事の詳細へ進む


コメント