

前回までの記事
開発環境
| 環境 | バージョン |
|---|---|
| MacBook Air | Monterey 12.2.1 |
| Docker | 20.10.7 |
| PHP | 8.1 |
| composer | 2.2.9 |
| Laravel | 9.5.1 |
| apache | 2.4 |
| MySQL | 8.0 |
| phpmyadmin | – |
| npm | 8.5 |
| node | 12.22.11 |
| React | 17 |
| TailwindCSS | 3 |
| Laravel/breeze | ログイン認証機能で使用 ※Laravel8以降の場合に使用可。 Laravel6や7系はreact –authとか使います。 |
開発+α
◆dockerコンテナの情報を確認する
→docker ps
◆dockerのphpコンテナに入る
→docker exec -it コンテナIDまたはNAMES bash
◆var/www# はphpコンテナ内を表します。php artisanやnpm run devなどはphpコンテナ内で実行しましょう。
◆tailwindcssでスタイルを変更する前に
→npm run watchを実行していると開発が楽。
※ある程度スタイルが整ったら、npm run devでビルドしましょう。
すると、不要なcssを削除してくれるのでcssファイルが軽くなります。
◆スタイルが適用されないときは….
npm run devで一旦ビルドしてみるか、スーパーリロードでキャッシュの削除をしてみましょう。
- 総合トップ画面から新規登録・ログイン画面に遷移できるようにする
- ユーザーの新規登録・ログインの画面
- ユーザーがログインしているかで表示画面を切り分け
- ユーザー新規登録・ログインのバリデーションを日本語用に変更
- ログアウト
- マイページに遷移できるようにする
最終的なゴール
ユーザーの新規登録
ログイン
総合トップ、マイページのログアウトクリック→ログアウトする


ユーザー新規登録・ログインへのパスはすでにroutes >auth.phpにある
この記事では、これからユーザーの新規登録やログイン画面に遷移するときに、route(‘register’)とか記載しています。
どこからその値がきているんだ!?と混乱するかもです。
実はこの値は、breezeをインストールした際に初期でroutes > auth.phpで追加されているものです。
新規登録画面には->name(‘register’);とあるので、bladeファイル側ではroute(‘register’)と呼び出すようにすれば、新規登録画面に遷移できます。
<?php

use App\Http\Controllers\Auth\AuthenticatedSessionController;
use App\Http\Controllers\Auth\ConfirmablePasswordController;
use App\Http\Controllers\Auth\EmailVerificationNotificationController;
use App\Http\Controllers\Auth\EmailVerificationPromptController;
use App\Http\Controllers\Auth\NewPasswordController;
use App\Http\Controllers\Auth\PasswordResetLinkController;
use App\Http\Controllers\Auth\RegisteredUserController;
use App\Http\Controllers\Auth\VerifyEmailController;
use Illuminate\Support\Facades\Route;

Route::middleware('guest')->group(function () {
    Route::get('register', [RegisteredUserController::class, 'create'])
                ->name('register');

    Route::post('register', [RegisteredUserController::class, 'store']);

    Route::get('login', [AuthenticatedSessionController::class, 'create'])
                ->name('login');

    Route::post('login', [AuthenticatedSessionController::class, 'store']);

    Route::get('forgot-password', [PasswordResetLinkController::class, 'create'])
                ->name('password.request');

    Route::post('forgot-password', [PasswordResetLinkController::class, 'store'])
                ->name('password.email');

    Route::get('reset-password/{token}', [NewPasswordController::class, 'create'])
                ->name('password.reset');

    Route::post('reset-password', [NewPasswordController::class, 'store'])
                ->name('password.update');
});

Route::middleware('auth')->group(function () {
    Route::get('verify-email', [EmailVerificationPromptController::class, '__invoke'])
                ->name('verification.notice');

    Route::get('verify-email/{id}/{hash}', [VerifyEmailController::class, '__invoke'])
                ->middleware(['signed', 'throttle:6,1'])
                ->name('verification.verify');

    Route::post('email/verification-notification', [EmailVerificationNotificationController::class, 'store'])
                ->middleware('throttle:6,1')
                ->name('verification.send');

    Route::get('confirm-password', [ConfirmablePasswordController::class, 'show'])
                ->name('password.confirm');

    Route::post('confirm-password', [ConfirmablePasswordController::class, 'store']);

    Route::post('logout', [AuthenticatedSessionController::class, 'destroy'])
                ->name('logout');
});
総合トップからユーザー新規登録画面に遷移する
header.blade.phpの新規登録をクリックしたときに、ユーザー新規登録画面に遷移するようにパスを設定します。
@section('header')
<header class="text-gray-600 body-font">
    <div class="mx-auto flex flex-wrap p-5 flex-col md:flex-row items-center">
      <a class="flex title-font font-medium items-center text-gray-900 mb-4 md:mb-0">
        <svg xmlns="http://www.w3.org/2000/svg" fill="none" stroke="currentColor" stroke-linecap="round" stroke-linejoin="round" stroke-width="1" class="w-10 h-10 text-white p-1 bg-emerald-500 rounded-full" viewBox="0 0 22 22">
            <path stroke-linecap="round" stroke-linejoin="round" d="M11 17a1 1 0 001.447.894l4-2A1 1 0 0017 15V9.236a1 1 0 00-1.447-.894l-4 2a1 1 0 00-.553.894V17zM15.211 6.276a1 1 0 000-1.788l-4.764-2.382a1 1 0 00-.894 0L4.789 4.488a1 1 0 000 1.788l4.764 2.382a1 1 0 00.894 0l4.764-2.382zM4.447 8.342A1 1 0 003 9.236V15a1 1 0 00.553.894l4 2A1 1 0 009 17v-5.764a1 1 0 00-.553-.894l-4-2z" />
        </svg>
        <span class="ml-3 text-2xl">Laratto</span>
      </a>
      <div class="md:ml-auto md:mr-auto flex flex-wrap items-center text-base justify-center">
        <div class="mb-1 xl:w-96">
          <input
            type="search"
            class="form-control block w-full px-3 py-2 text-base font-normal text-gray-700 bg-white bg-clip-padding border border-solid border-gray-300 rounded transition ease-in-out m-0 focus:text-gray-700 focus:bg-white focus:border-blue-600 focus:outline-none"
            id="search"
            placeholder="ニュースを検索..."
          />
        </div>
      </div>
      <button class="inline-flex text-white items-center bg-emerald-500 border-0 py-1 px-3 mx-2 focus:outline-none hover:bg-emerald-400 rounded text-base mt-4 md:mt-0">
        <a href="{{ route('register') }}">新規登録</a>
      </button>
      <button class="inline-flex text-white items-center bg-emerald-500 border-0 py-1 px-3 mx-2 focus:outline-none hover:bg-emerald-400 rounded text-base mt-4 md:mt-0">
          ログイン
      </button>
    </div>
</header>
@endsection
これで、新規登録をクリックした際に新規登録画面に遷移できます。

↓
このまま使うのもいいんですが、初期画面だとちょっと英語だったりと不便なので、画面を修正します。
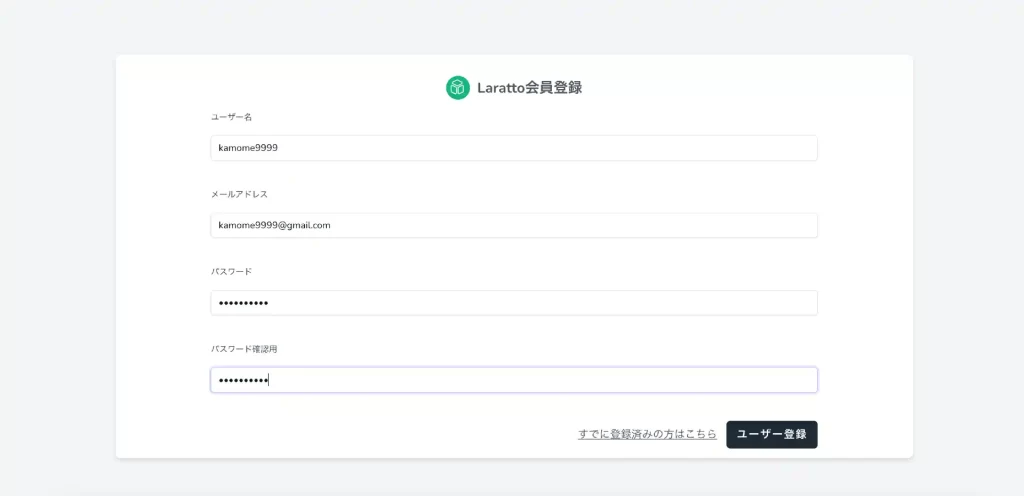
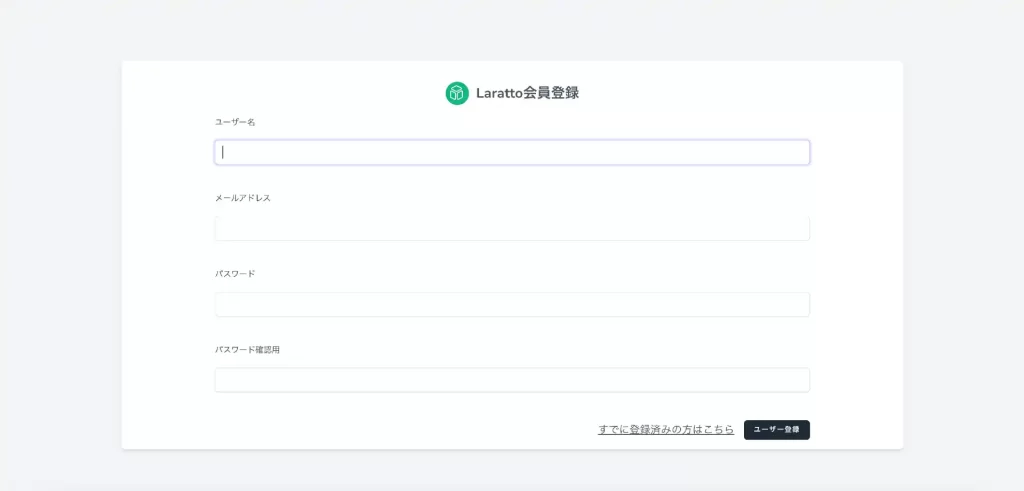
ユーザー新規登録画面を修正する
完成図
ユーザーの新規登録画面を修正は、src/resources/views/auth/register.blade.phpを変更しましょう。
初期状態のregister.blade.phpと変更した箇所は主に以下です。
- Laravelのロゴ削除し、フォーム内にLarattoのロゴを追加
- ラベルの英語名を日本語に変更
- フォーム幅の変更、paddinやmarginの変更
<x-guest-layout>
    <x-auth-card>

        <!-- Validation Errors -->
        <x-auth-validation-errors class="mb-4 text-center" :errors="$errors" />

        <form method="POST" action="{{ route('register') }}">
            @csrf

            <!-- logo -->
            <a class="flex items-center justify-center text-gray-600 font-bold p-5 mb-4 md:mb-0" href="{{ route('top') }}">
                <svg xmlns="http://www.w3.org/2000/svg" fill="none" stroke="currentColor" stroke-linecap="round" stroke-linejoin="round" stroke-width="1" class="w-10 h-10 text-white p-1 bg-emerald-500 rounded-full" viewBox="0 0 22 22">
                    <path stroke-linecap="round" stroke-linejoin="round" d="M11 17a1 1 0 001.447.894l4-2A1 1 0 0017 15V9.236a1 1 0 00-1.447-.894l-4 2a1 1 0 00-.553.894V17zM15.211 6.276a1 1 0 000-1.788l-4.764-2.382a1 1 0 00-.894 0L4.789 4.488a1 1 0 000 1.788l4.764 2.382a1 1 0 00.894 0l4.764-2.382zM4.447 8.342A1 1 0 003 9.236V15a1 1 0 00.553.894l4 2A1 1 0 009 17v-5.764a1 1 0 00-.553-.894l-4-2z" />
                </svg>
                <!-- title -->
                <span class="ml-3 text-2xl">Laratto会員登録</span>
            </a>

            <!-- Name -->
            <div>
                <x-label for="name" :value="__('ユーザー名')" />

                <x-input id="name" class="block mt-5 w-full" type="text" name="name" :value="old('name')" required autofocus />
            </div>

            <!-- Email Address -->
            <div class="mt-12">
                <x-label for="email" :value="__('メールアドレス')" />

                <x-input id="email" class="block mt-5 w-full" type="email" name="email" :value="old('email')" required />
            </div>

            <!-- Password -->
            <div class="mt-12">
                <x-label for="password" :value="__('パスワード')" />

                <x-input id="password" class="block mt-5 w-full"
                                type="password"
                                name="password"
                                required autocomplete="new-password" />
            </div>

            <!-- Confirm Password -->
            <div class="mt-12">
                <x-label for="password_confirmation" :value="__('パスワード確認用')" />

                <x-input id="password_confirmation" class="block mt-5 w-full"
                                type="password"
                                name="password_confirmation" required />
            </div>

            <div class="flex items-center justify-end mt-12">
                <a class="underline text-lg text-gray-600 hover:text-gray-900" href="{{ route('login') }}">
                    {{ __('すでに登録済みの方はこちら') }}
                </a>

                <x-button class="ml-4">
                    {{ __('ユーザー登録') }}
                </x-button>
            </div>
        </form>
    </x-auth-card>
</x-guest-layout>
register.blade.phpからLaravelのロゴ(x-slot name=”logo”)を削除したとことで、/registerにアクセスすると、今はUndefined variable $logoとエラーが出ます。
このエラーを解消するには、src/resources/views/components/auth-card.blade.phpで{{ $logo }}の箇所を削除する必要があります。
変更前
<div class="min-h-screen flex flex-col sm:justify-center items-center pt-6 sm:pt-0 bg-gray-100">
    <div>
        {{ $logo }}
    </div>

    <div class="w-full sm:max-w-md mt-6 px-6 py-4 bg-white shadow-md overflow-hidden sm:rounded-lg">
        {{ $slot }}
    </div>
</div>
変更後
- $logoを削除
- w-full変更、sm:max-w-md削除
- px値を変更
<div class="min-h-screen flex flex-col sm:justify-center items-center pt-6 sm:pt-0 bg-gray-100">

    <div class="w-3/4 mt-6 px-40 py-4 bg-white shadow-md overflow-hidden sm:rounded-lg">
        {{ $slot }}
    </div>
</div>
ボタンが小さいためここも少し修正します。
text-xs→text-lgに変更
<button {{ $attributes->merge(['type' => 'submit', 'class' => 'inline-flex items-center px-4 py-2 bg-gray-800 border border-transparent rounded-md font-semibold text-lg text-white uppercase tracking-widest hover:bg-gray-700 active:bg-gray-900 focus:outline-none focus:border-gray-900 focus:ring ring-gray-300 disabled:opacity-25 transition ease-in-out duration-150']) }}>
    {{ $slot }}
</button>
これでボタンも大きくなり、みやすくなりました。
新規登録した時のリダイレクト先を変更する
データを入力してユーザー登録をクリックするとusersテーブルにデータが登録され、ダッシュボードにリダイレクトするようになっています。
ユーザー登録成功
なので、登録したら/dashboardではなく総合トップにリダイレクトするように変更します。※こちらはLaravel9ニュースサイト②環境構築でも説明したので省きます。
リダイレクト先の変更は、src/app/Providers/RouteServiceProvider.phpを修正しましょう。
変更前
public const HOME = '/dashboard';変更後
public const HOME = '/';これで、ユーザー登録した時に/dashboardではなく/にリダイレクトできます。
ログアウトする際は、現状は/dashboard(ex.http://localhost:28878/dashboard)をURLで直接叩いて、ユーザー名のドロップダウンからログアウトする流れです。
次はログインを実装していくので、一旦ログアウトしておきましょう。※でないと、ログイン画面に遷移できない。
総合トップからログイン画面に遷移する
ユーザー登録の流れができたので、ログインも同じように実装していきます。
src/resources/views/common/header.blade.phpのログインにパス({{ route(‘login’) }})を追加しましょう。
...省略
<button class="inline-flex text-white items-center bg-emerald-500 border-0 py-1 px-3 mx-2 focus:outline-none hover:bg-emerald-400 rounded text-base mt-4 md:mt-0">
  <a href="{{ route('register') }}">新規登録</a>
</button>
<button class="inline-flex text-white items-center bg-emerald-500 border-0 py-1 px-3 mx-2 focus:outline-none hover:bg-emerald-400 rounded text-base mt-4 md:mt-0">
  <a href="{{ route('login') }}">ログイン</a>
</button>
...省略
総合トップヘッダーのログインをクリックすると、ログイン画面に遷移し初期状態は以下のような画面です。
こちらもユーザー新規登録画面のようにレイアウトを少しカスタマイズします。
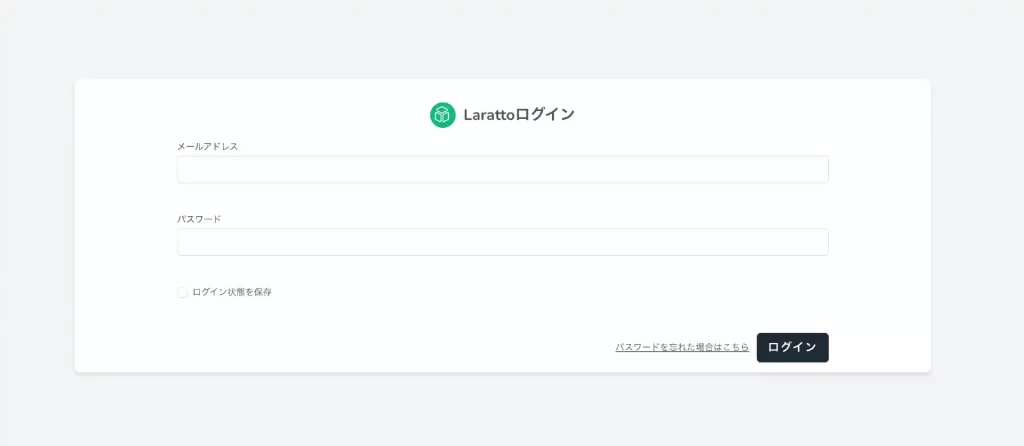
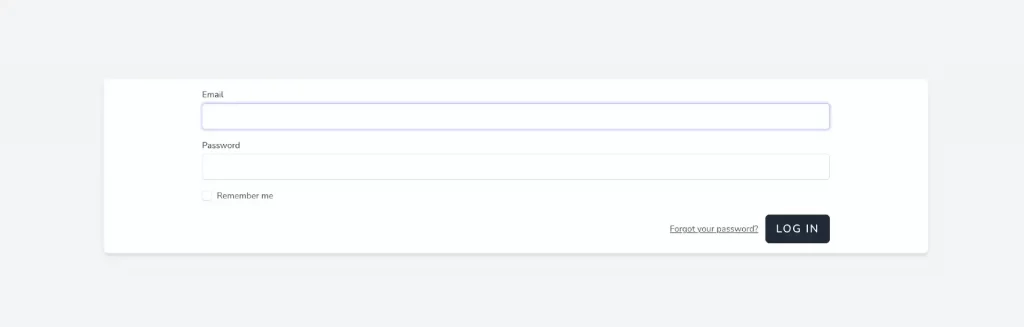
ログイン画面を修正する
完成図
ログイン画面を修正するには、src/resources/views/auth/login.blade.phpを編集します。
主な変更点
- Larattoロゴ、タイトルをフォーム内に追加
- ラベル名を日本語に修正
- marginの修正
<x-guest-layout>
    <x-auth-card>

        <!-- Session Status -->
        <x-auth-session-status class="mb-4" :status="session('status')" />

        <!-- Validation Errors -->
        <x-auth-validation-errors class="mb-4 text-center" :errors="$errors" />

        <form method="POST" action="{{ route('login') }}">
            @csrf

            <!-- logo -->
            <a class="flex items-center justify-center text-gray-600 font-bold p-5 mb-4 md:mb-0" href="{{ route('top') }}">
                <svg xmlns="http://www.w3.org/2000/svg" fill="none" stroke="currentColor" stroke-linecap="round" stroke-linejoin="round" stroke-width="1" class="w-10 h-10 text-white p-1 bg-emerald-500 rounded-full" viewBox="0 0 22 22">
                    <path stroke-linecap="round" stroke-linejoin="round" d="M11 17a1 1 0 001.447.894l4-2A1 1 0 0017 15V9.236a1 1 0 00-1.447-.894l-4 2a1 1 0 00-.553.894V17zM15.211 6.276a1 1 0 000-1.788l-4.764-2.382a1 1 0 00-.894 0L4.789 4.488a1 1 0 000 1.788l4.764 2.382a1 1 0 00.894 0l4.764-2.382zM4.447 8.342A1 1 0 003 9.236V15a1 1 0 00.553.894l4 2A1 1 0 009 17v-5.764a1 1 0 00-.553-.894l-4-2z" />
                </svg>
                <!-- title -->
                <span class="ml-3 text-2xl">Larattoログイン</span>
            </a>

            <!-- Email Address -->
            <div>
                <x-label for="email" :value="__('メールアドレス')" />

                <x-input id="email" class="block mt-1 w-full" type="email" name="email" :value="old('email')" required autofocus />
            </div>

            <!-- Password -->
            <div class="mt-12">
                <x-label for="password" :value="__('パスワード')" />

                <x-input id="password" class="block mt-1 w-full"
                                type="password"
                                name="password"
                                required autocomplete="current-password" />
            </div>

            <!-- Remember Me -->
            <div class="block mt-12">
                <label for="remember_me" class="inline-flex items-center">
                    <input id="remember_me" type="checkbox" class="rounded border-gray-300 text-indigo-600 shadow-sm focus:border-indigo-300 focus:ring focus:ring-indigo-200 focus:ring-opacity-50" name="remember">
                    <span class="ml-2 text-sm text-gray-600">{{ __('ログイン状態を保存') }}</span>
                </label>
            </div>

            <div class="flex items-center justify-end mt-12">
                @if (Route::has('password.request'))
                    <a class="underline text-sm text-gray-600 hover:text-gray-900" href="{{ route('password.request') }}">
                        {{ __('パスワードを忘れた場合はこちら') }}
                    </a>
                @endif

                <x-button class="ml-3">
                    {{ __('ログイン') }}
                </x-button>
            </div>
        </form>
    </x-auth-card>
</x-guest-layout>
これですでに登録したユーザー情報でログインできます。
認証済みかどうかで総合トップ画面の表示を切り分ける
完成図
ログインしていないゲストユーザーの場合

ログインユーザーの場合

src/resources/views/common/header.blade.phpを修正します。
@authを使って、ログインしている場合としていない場合で処理を分けましょう。
@auth
ログインしている時の処理
@else
ログインしていない時の処理
@endauth
となります。
@guest
ログインしていない場合のみ処理
@endguest
もあります。
@section('header')
<header class="text-gray-600 body-font">
    <div class="mx-auto flex flex-wrap p-5 flex-col md:flex-row items-center">
      <a class="flex title-font font-medium items-center text-gray-900 mb-4 md:mb-0">
        <svg xmlns="http://www.w3.org/2000/svg" fill="none" stroke="currentColor" stroke-linecap="round" stroke-linejoin="round" stroke-width="1" class="w-10 h-10 text-white p-1 bg-emerald-500 rounded-full" viewBox="0 0 22 22">
            <path stroke-linecap="round" stroke-linejoin="round" d="M11 17a1 1 0 001.447.894l4-2A1 1 0 0017 15V9.236a1 1 0 00-1.447-.894l-4 2a1 1 0 00-.553.894V17zM15.211 6.276a1 1 0 000-1.788l-4.764-2.382a1 1 0 00-.894 0L4.789 4.488a1 1 0 000 1.788l4.764 2.382a1 1 0 00.894 0l4.764-2.382zM4.447 8.342A1 1 0 003 9.236V15a1 1 0 00.553.894l4 2A1 1 0 009 17v-5.764a1 1 0 00-.553-.894l-4-2z" />
        </svg>
        <span class="ml-3 text-2xl">Laratto</span>
      </a>
      <div class="md:ml-auto md:mr-auto flex flex-wrap items-center text-base justify-center">
        <div class="mb-1 xl:w-96">
          <input
            type="search"
            class="form-control block w-full px-3 py-2 text-base font-normal text-gray-700 bg-white bg-clip-padding border border-solid border-gray-300 rounded transition ease-in-out m-0 focus:text-gray-700 focus:bg-white focus:border-blue-600 focus:outline-none"
            id="search"
            placeholder="ニュースを検索..."
          />
        </div>
      </div>
      {{-- 認証によって、ボタン表示の切り替え --}}
      @auth
      {{-- ユーザー新規登録・ログイン済みならマイページ、ログアウト表示 --}}
        <button class="inline-flex text-white items-center bg-emerald-500 border-0 py-1 px-3 mx-2 focus:outline-none hover:bg-emerald-400 rounded text-base mt-4 md:mt-0">
          <a href="">マイページ</a>
        </button>
        <button class="inline-flex text-white items-center bg-red-500 border-0 py-1 px-3 mx-2 focus:outline-none hover:bg-red-400 rounded text-base mt-4 md:mt-0">
          <a href="">ログアウト</a>
        </button>
      @else
      {{-- ユーザー新規登録・ログインしていない場合、新規登録・ログインボタン表示 --}}
        <button class="inline-flex text-white items-center bg-emerald-500 border-0 py-1 px-3 mx-2 focus:outline-none hover:bg-emerald-400 rounded text-base mt-4 md:mt-0">
          <a href="{{ route('register') }}">新規登録</a>
        </button>
        <button class="inline-flex text-white items-center bg-emerald-500 border-0 py-1 px-3 mx-2 focus:outline-none hover:bg-emerald-400 rounded text-base mt-4 md:mt-0">
          <a href="{{ route('login') }}">ログイン</a>
        </button>
      @endauth
    </div>
</header>
@endsection
サイドバーもログイン時とログインしていない時で表示を変えます。
完成図
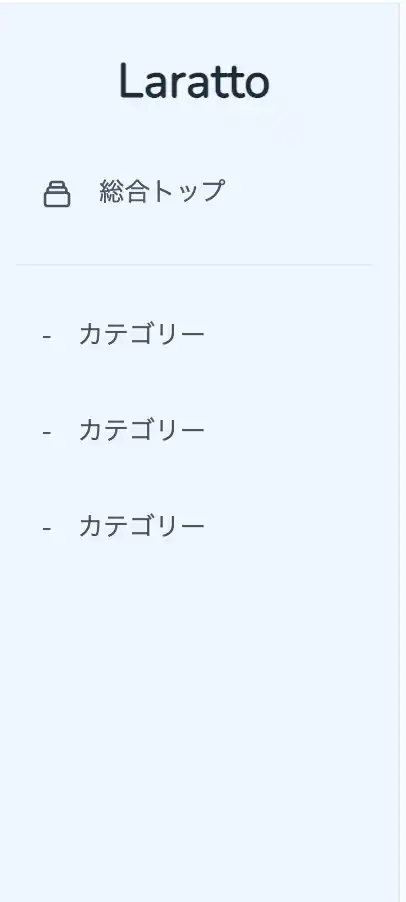
ログインしていないゲストユーザーの場合
ログインユーザーの場合
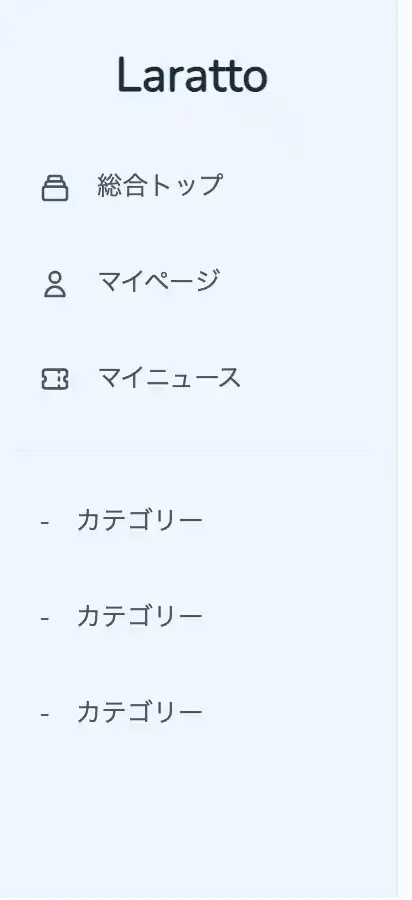
総合トップのサイドバー(src/resources/views/common/sidebar.blade.php)もログイン済みかで表示を変えます。
ログインしていないときはマイページとマイニュースは非表示、ログイン済みの場合はマイページとマイニュースを表示するようにしましょう。
以下のように@authと@endauthでくくるだけです。
...省略
@auth
    <a class="flex items-center px-4 py-2 mt-5 text-gray-600 transition-colors duration-200 transform rounded-md hover:bg-blue-300 hover:text-gray-700"
    href="#">
        <svg class="w-5 h-5" viewBox="0 0 24 24" fill="none" xmlns="http://www.w3.org/2000/svg">
            <path d="M16 7C16 9.20914 14.2091 11 12 11C9.79086 11 8 9.20914 8 7C8 4.79086 9.79086 3 12 3C14.2091 3 16 4.79086 16 7Z" stroke="currentColor" stroke-width="2" stroke-linecap="round" stroke-linejoin="round" />
            <path d="M12 14C8.13401 14 5 17.134 5 21H19C19 17.134 15.866 14 12 14Z" stroke="currentColor" stroke-width="2" stroke-linecap="round" stroke-linejoin="round" />
        </svg>
        <span class="mx-4 font-medium">マイページ</span>
    </a>

    <a class="flex items-center px-4 py-2 mt-5 text-gray-600 transition-colors duration-200 transform rounded-md hover:bg-blue-300 hover:text-gray-700"
    href="#">
        <svg class="w-5 h-5" viewBox="0 0 24 24" fill="none" xmlns="http://www.w3.org/2000/svg">
            <path d="M15 5V7M15 11V13M15 17V19M5 5C3.89543 5 3 5.89543 3 7V10C4.10457 10 5 10.8954 5 12C5 13.1046 4.10457 14 3 14V17C3 18.1046 3.89543 19 5 19H19C20.1046 19 21 18.1046 21 17V14C19.8954 14 19 13.1046 19 12C19 10.8954 19.8954 10 21 10V7C21 5.89543 20.1046 5 19 5H5Z" stroke="currentColor" stroke-width="2" stroke-linecap="round" stroke-linejoin="round" />
        </svg>
        <span class="mx-4 font-medium">マイニュース</span>
    </a>
@endauth
...省略
ログアウトを追加する
完成予定
総合トップヘッダーのログアウトクリック→ログアウトさせる。
ログアウトの場合は、POST処理になるのでformアクションを追加する必要があります。
routes > auth.phpを見てみると、以下のようにログアウトはPOST処理のみです。
    Route::post('logout', [AuthenticatedSessionController::class, 'destroy'])
                ->name('logout');
なので、
ヘッダー新規登録クリック→新規登録画面に遷移→登録処理→総合トップにリダイレクト
ではなく、
ヘッダーログアウトクリック→ログアウト処理→総合トップにリダイレクト
という流れです。
変更前
<button class="inline-flex text-white items-center bg-red-500 border-0 py-1 px-3 mx-2 focus:outline-none hover:bg-red-400 rounded text-base mt-4 md:mt-0">
  <a href="">ログアウト</a>
</button>
変更後
- formアクションの追加
- ボタン背景色とホバー色変更
<form action="{{ route('logout') }}" method="POST">
  @csrf
  <button class="inline-flex text-white items-center bg-red-500 border-0 py-1 px-3 mx-2 focus:outline-none hover:bg-red-400 rounded text-base mt-4 md:mt-0">
    ログアウト
  </button>
</form>
これでログアウトをクリックするとログアウトできて総合トップにリダイレクトされます。
※ログイン状態ではなくなるので、ヘッダーも新規登録・ログインになり、サイドバーもマイページとマイニュースは非表示になります。
マイページ画面にもログアウトがあるので、同様の処理を追加しましょう。
変更前
<span class="mx-2 text-md font-normal">
  ログアウト
</span>
変更後
<form action="{{ route('logout') }}" method="POST">
@csrf
  <button>
     <span class="mx-2 text-md font-normal">
       ログアウト
     </span>
  </button>
</form>
これで総合トップのログアウト同様に、マイページのログアウトも追加できました。(あ〜〜も〜〜↑ってなった人は正常)
新規登録・ログインのバリデーションメッセージを日本語にする
ここまででユーザーの新規登録・ログイン・ログアウトができたのですが、バリデーションエラーが起きた際に表記が英語になってしまっているので日本語に対応させます。

この問題を解決するには、以下の手順を踏みます。
①src/resources/views/components/auth-validation-errors.blade.phpを編集する
②lang > jaにバリデーション対応ファイルを作成する
auth-validation-errors.blade.phpを編集する
breezeをインストールした際に、すでにauth-validation-errors.blade.phpは追加されています。
以下のように変更します。
- Whoops!の部分を日本語に修正
- ulクラスのスタイルを修正
@props(['errors'])
@if ($errors->any())
<div {{ $attributes }}>
<div class="font-medium text-red-600">
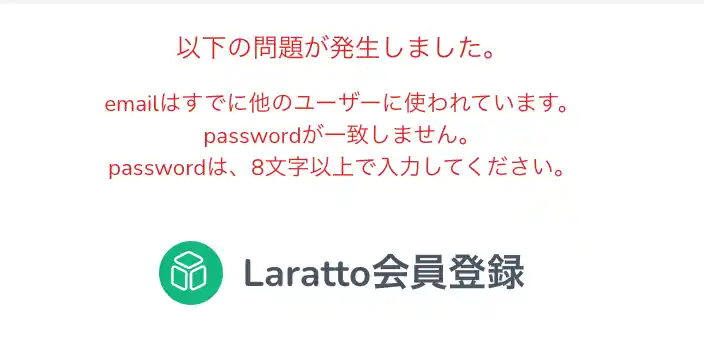
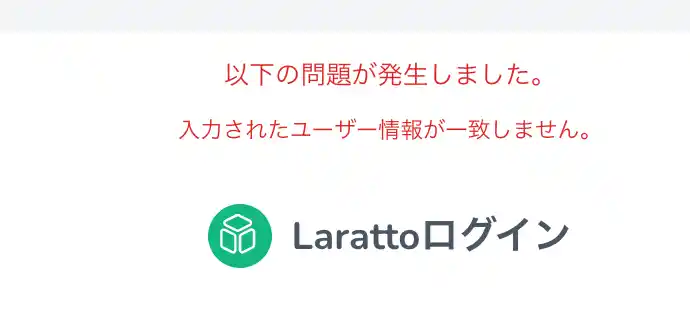
{{ __('以下の問題が発生しました。') }}
</div>
<ul class="mt-3 text-sm text-red-600">
@foreach ($errors->all() as $error)
<li>{{ $error }}</li>
@endforeach
</ul>
</div>
@endif
エラーメッセージを英語→日本語対応にする
日本語対応する前に、現在ではどのように英語のエラーメッセージが表示されているのかざっくりと説明します。
例えば、新規登録画面で、パスワードが一致しない場合のエラーメッセージはThe password confirmation does not match.と表示されます。
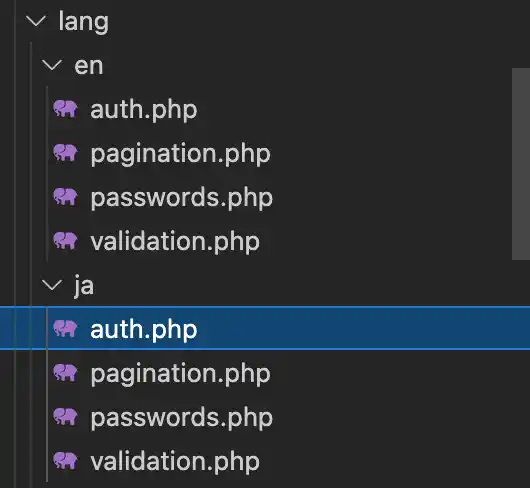
これは、Laravel9ではsrc/lang/en/validation.phpのconfirmにあります。※Laravel8以前では、resources > lang以下にあると思います。(Laravel8多言語化)
'confirmed' => 'The :attribute confirmation does not match.',また、src/lang/en/以下には、validation.phpの他にもauth.phpやpagination.phpやpasswords.phpがあると思います。
日本語対応するので、src/lang/ja/を新規で作成し、ファイルは同じように構成した上で英語ではなく日本語でエラーメッセージを記載していきます。
まずは、以下のようにenと同じようにjaを作成します。そして、ファイルの中身もenとjaを同じにします。(ex.en>auth.phpをja>auth.phpにコピペ。以下3つも同様)
最低限以下のようにエラーメッセージを日本語に修正します。
src/lang/ja/auth.php
<?php

return [

    /*
    |--------------------------------------------------------------------------
    | Authentication Language Lines
    |--------------------------------------------------------------------------
    |
    | The following language lines are used during authentication for various
    | messages that we need to display to the user. You are free to modify
    | these language lines according to your application's requirements.
    |
    */

    'failed' => '入力されたユーザー情報が一致しません。',
    'password' => 'The provided password is incorrect.',
    'throttle' => 'Too many login attempts. Please try again in :seconds seconds.',
];
src/lang/ja/validation.php
<?php

return [

    /*
    |--------------------------------------------------------------------------
    | Validation Language Lines
    |--------------------------------------------------------------------------
    |
    | The following language lines contain the default error messages used by
    | the validator class. Some of these rules have multiple versions such
    | as the size rules. Feel free to tweak each of these messages here.
    |
    */

....省略
    'confirmed' => ':attributeが一致しません。',
....省略
    'min' => [
        'array' => 'The :attribute must have at least :min items.',
        'file' => 'The :attribute must be at least :min kilobytes.',
        'numeric' => 'The :attribute must be at least :min.',
        'string' => ':attributeは、8文字以上で入力してください。',
    ],
....省略
    'required' => ':attributeは必須です。',
....省略
    'unique' => ':attributeはすでに他のユーザーに使われています。',
....省略
];

(ふえぇぇぇぇぇぇぇぇぇぇぇぇぇぇ)
マイページに遷移できるようにする
ログインしているユーザーの情報はAuth::user()で取得できます。
その前に、そもそもログインしているかどうかは、Auth::check()でチェックできますよ。
詳しくは、Laravel8公式認証済みユーザーの取得をご確認ください。
また、Authを使うので、コントローラー冒頭にuseを追加することをお忘れなく!!
<?php

namespace App\Http\Controllers;

use Illuminate\Http\Request;
use Illuminate\Support\Facades\Auth; // 追加

class TopController extends Controller
{
    /**
     * 総合トップ画面
     */
    public function top()
    {
        // ユーザーがログイン済み
        if (Auth::check()) {
            // 認証しているユーザーを取得
            $user = Auth::user();
            // 認証しているユーザーIDを取得
            $user_id = $user->id;
        } else {
            $user_id = null;
        }

        return view('top', compact('user_id'));
    }
}
ヘッダーのマイページにパスを追加
...省略
@auth
{{-- ユーザー新規登録・ログイン済みならマイページ、ログアウト表示 --}}
  <button class="inline-flex text-white items-center bg-emerald-500 border-0 py-1 px-3 mx-2 focus:outline-none hover:bg-emerald-400 rounded text-base mt-4 md:mt-0">
    <a href="{{ route('user.index', ['id' => $user_id]) }}">マイページ</a>
  </button>
...省略
サイドバーのマイページにパスを追加
@auth
  <a class="flex items-center px-4 py-2 mt-5 text-gray-600 transition-colors duration-200 transform rounded-md hover:bg-blue-300 hover:text-gray-700"
  href="{{ route('user.index', ['id' => $user_id]) }}">
    <svg class="w-5 h-5" viewBox="0 0 24 24" fill="none" xmlns="http://www.w3.org/2000/svg">
       <path d="M16 7C16 9.20914 14.2091 11 12 11C9.79086 11 8 9.20914 8 7C8 4.79086 9.79086 3 12 3C14.2091 3 16 4.79086 16 7Z" stroke="currentColor" stroke-width="2" stroke-linecap="round" stroke-linejoin="round" />
       <path d="M12 14C8.13401 14 5 17.134 5 21H19C19 17.134 15.866 14 12 14Z" stroke="currentColor" stroke-width="2" stroke-linecap="round" stroke-linejoin="round" />
    </svg>
    <span class="mx-4 font-medium">マイページ</span>
  </a>
マイページでログインユーザー名を表示する
最後に、マイページに遷移した際にログインユーザー名を表示するようにしましょう。
完成図
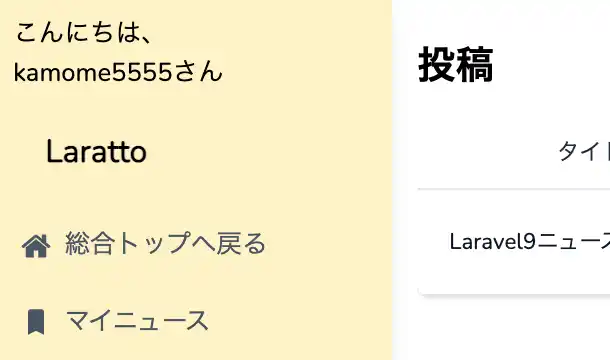
ログインユーザー名の表示は、簡単です。
先ほど、Auth::user()でログインユーザー情報を取得でき、Auth::user()->idでログインユーザーのIDが取得できました。
ログインユーザー名の場合は、Auth::user()->nameで取得できます。
@section('sidebar')
<div class="h-screen hidden lg:block shadow-lg relative w-50">
    <div class="bg-amber-100 h-full">
        <div class="pt-3 pl-3">こんにちは、<br>{{ Auth::user()->name }}さん</div> // 追加
        <div class="flex items-center justify-start pt-6 ml-8">
            <p class="font-bold text-xl">
                Laratto
            </p>
        </div>
...省略
お疲れ様でした。これで総合トップ画面のヘッダーマイページまたはサイドバーのマイページをクリックすると、マイページに遷移でき、さらにはマイページに遷移したらログインユーザー名が表示されました。
新規登録・ログイン・ログアウトは終わりです。
次回は、マイページの投稿リストを実装していきます。


コメント