


swiperを使ってスライドできるようにできたらいいなぁ….
こんな疑問を解決します。
横にスライドできるswiperを実装していきます。
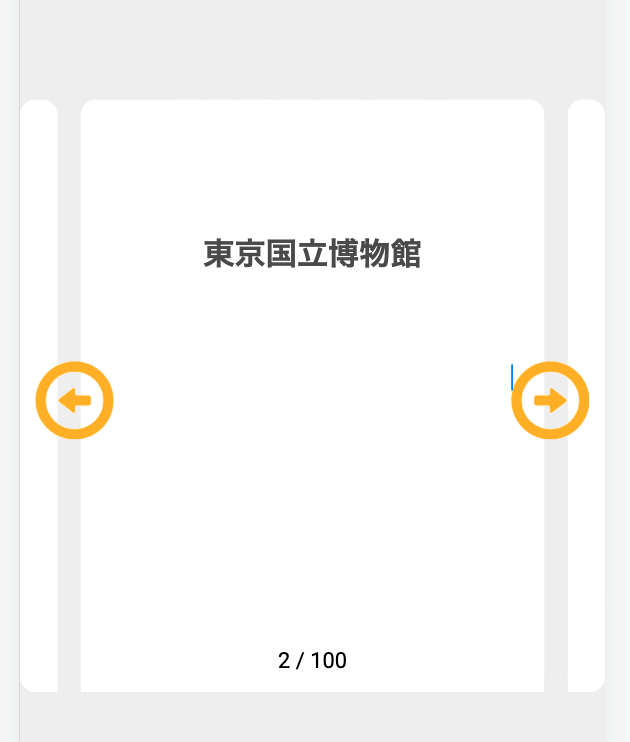
1枚目のスライドは、以下のようになります。※左矢印は非活性、右の矢印は活性化

矢印をクリックすると、次のスライドにいきます、※左と右の矢印は活性化
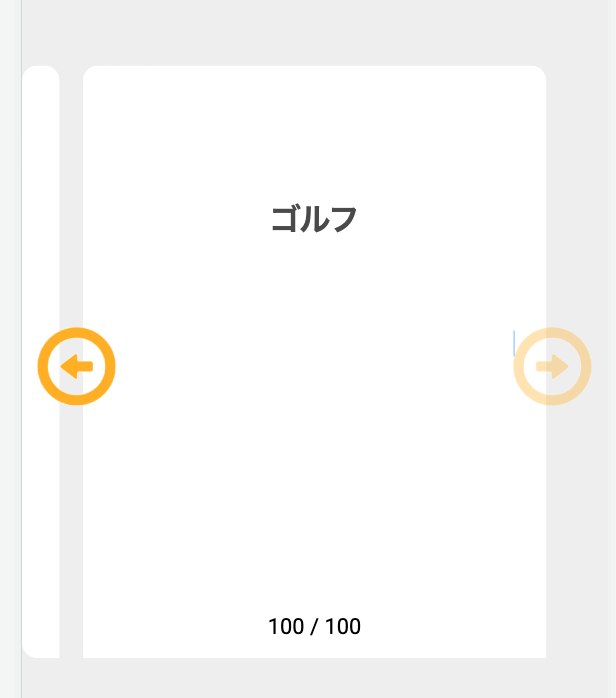
データ数が100ある場合は、100こ目のスライドは以下のようになります。※右矢印は非活性化


swiperを導入する
まずは、angularにswiperのモジュールをインストールする必要があります。
Angular Swiper components公式ドキュメント
公式ドキュメント通り、以下を実行します。
npm i swiper上記を実行すると、package.jsonに”swiper”: “^8.3.2″のようにインストールされます。
次に、app.module.tsにSwiperモジュールをimportします。
import { NgModule } from '@angular/core';
import { BrowserModule } from '@angular/platform-browser';

import { AppRoutingModule } from './app-routing.module';
import { AppComponent } from './app.component';
import { BrowserAnimationsModule } from '@angular/platform-browser/animations';

// Swiper
import { SwiperModule } from 'swiper/angular';

// Component
import { SwiperComponent } from 'src/app/component/parts/swiper/swiper.component';

@NgModule({
  declarations: [
    AppComponent,
    SwiperComponent,
  ],
  imports: [
    BrowserModule,
    AppRoutingModule,
    BrowserAnimationsModule,
    SwiperModule,
  ],
  providers: [],
  bootstrap: [AppComponent]
})
export class AppModule { }
このままswiperの実装に入ってもいいですが、自分的にはswiperを各画面で使いまわしたいので、swiperの処理のコンポーネントを作成することにしました。※作成したコンポーネントは、SwiperComponentです。
Angularにswiperを使ってスライド機能を実装する
swiperのコンポーネントを作成したので、使いまわせます。
例えば、topページであるtop.component.htmlでは以下のようにswiperのコンポーネントを呼び出すなどの使い方ができます。
<app-swiper [data]="data"></app-swiper>作成したswiperのコンポーネントにswiperに必要なimportなどをします。※ここではほぼ全ての機能をimportしていますが、状況にあわせて不要なimportは削除するのがいいでしょう。
import { Component,  OnInit, AfterViewInit, Input } from '@angular/core';
// import Swiper core and required components
import SwiperCore, {
  Navigation,
  Pagination,
  Scrollbar,
  A11y,
  Virtual,
  Zoom,
  Autoplay,
  Thumbs,
  Controller,
} from 'swiper';

// install Swiper components
SwiperCore.use([
  Navigation,
  Pagination,
  Scrollbar,
  A11y,
  Virtual,
  Zoom,
  Autoplay,
  Thumbs,
  Controller,
]);

SwiperCore.use([Virtual]);

@Component({
  selector: 'app-swiper',
  templateUrl: './swiper.component.html',
  styleUrls: ['./swiper.component.css']
})
export class SwiperComponent {
  @Input() data: any;

  constructor() { }

  ngOnInit(): void {
  }
}
htmlでは以下のように書きます。
[slidesPerView]…1画面に表示するスライド数。3とかにすると、1画面に3つスライドが表示されたりできるので、スライドの幅を調整できる。
[spaceBetween]…スライド間の幅を調整できる。100とかにすると、スライド間が割と離れる。
[pagination]….typeをfractionにすることで1/100のように現在のスライドが何枚目か表示できます。
[centeredSlides]…trueにすることでスライドが真ん中に配置されます。
[navigation]…trueにすることでナビゲーションができます。falseの場合は、ナビゲーションが表示されないので、矢印も無くなります。
<ng-container>
  <swiper
    [slidesPerView]="1.25"
    [spaceBetween]="15"
    [pagination]="{ type: 'fraction' }"
    [centeredSlides]="true"
    [navigation]="true"
    class="swiper"
  >
    <ng-template swiperSlide *ngFor="let d of data;">
      <div class="container">
        <div class="name">{{ d.name }}</div>
      </div>
    </ng-template>
  </swiper>
</ng-container>
cssです。
.swiper {
  height: 380px;
  border-radius: 10px;
}

.container {
  height: 100%;
  background-color: #FFFFFF;
  padding: 15px;
  border-radius: 10px;
}

::ng-deep .swiper-slide {
  border-radius: 10px;
}
style.cssに@import “~swiper/swiper-bundle”;を追記し、swiperに関連するcssを当てます。※style.cssに記載しないとcssがうまく当たらない場合もあります。
/* You can add global styles to this file, and also import other style files */
@import "~swiper/swiper-bundle";

body,
html {
  padding: 0;
  margin: 0;
  position: relative;
  height: 100%;
  background-color: #EEEEEE;
}

.swiper-container {
  width: 100%;
  height: 300px;
  margin: 50px auto;
}

.swiper-slide {
  background: #f1f1f1;
  color: #000;
  text-align: center;
}

.swiper-button-prev,
.swiper-button-next {
  height: 50px;
  width: 50px;
}

.swiper-button-prev:after,
.swiper-button-next:after {
  background-repeat: no-repeat;
  background-size: contain;
  content: "";
  height: 50px;
  margin: auto;
  width: 50px;
}

/* 前への矢印カスタマイズ */
.swiper-button-prev:after {
  background-image: url('src/assets/img/left-icon.png');
}
/* 次への矢印カスタマイズ */
.swiper-button-next:after {
  background-image: url('src/assets/img/right-icon.png');
}

.swiper-slide img {
  height: auto;
  width: 100%;
}
swiper-button-prev:afterとbeforeにはbackground-imageで画像を指定しているので、以下のファイルを作成し、画像を配置します。
必要に応じて透過pngに変換したりする必要があるので、各自で好きな画像を配置してください。今回使用した画像は以下です。
src/assets/img/left-icon.png
src/assets/img/right-icon.png


コメント