


Laravelでバリデーションを実装させたいけど、どうやればいいのかわからない….それに実務で使える方法が知りたい….
こんな疑問を解決します。
結論、Laravelでバリデーションを実装するなら、フォームリクエストを使います。
初心者向けの解説記事ではコントローラーにベタ書きでバリデーションを記述する方法もあります。
しかし、はっきり言って実務ではコントローラーの記述量が増えてわかりづらくなるだけです。
なので、この記事では実務でもしっかりと使えるバリデーションの実装方法を解説します。
- 実務で使えるLaravelのバリデーションの実装方法がわかる


Laravelでバリデーションを実装する手順
Laravelでフォームリクエストを用いてバリデーションを実装する方法が以下のステップでできます。
なぜフォームリクエストを作成してバリデーションを実装するのかというと、冒頭にも書いた通りコントローラーの記述量が多くなってみにくいからなんですね。
バリデーションの処理はコントローラーと別のファイルに記述することで、
- コントローラーがごちゃごちゃしない
- バリデーションのロジックを使いまわせる
- 結果的にコードの記述量が減って修正対応もしやすい
このようなメリットがあります。
実例を挙げれば、以下のようになります。
コントローラーに直接バリデーションを書く(推奨しない)
コントローラーにベタ書きで書く場合は以下のようになります。
※あくまでも一例です。
     /**
     * 登録処理
     */
    public function store(Request $request)
    {
        $validate = [
           'name' => 'requied|max:30',
           'category_id' => 'numeric|between:0,20,
        ];

        $this->validate($request, $validate);
        return redirect()->route('index');
    }

    /**
     * 更新処理
     */
    public function update(Request $request, $id)
    {
        $validate = [
           'name' => 'requied|max:30',
           'category_id' => 'numeric|between:0,20,
        ];

        $this->validate($request, $validate);
        return redirect()->route('index');
    }
登録処理にも更新処理にも同じような記述があるので、まとめた方がいいですよね。
フォームリクエストを作成する(推奨)
フォームリクエストを作成するとすっきりとします。
フォームリクエストを作成し、バリデーションロジックを書きます。
<?php

namespace App\Http\Requests;

use Illuminate\Foundation\Http\FormRequest;

class 〇〇Request extends FormRequest
{
    /**
     * Determine if the user is authorized to make this request.
     *
     * @return bool
     */
    public function authorize()
    {
        return true;
    }

    /**
     * Get the validation rules that apply to the request.
     *
     * @return array
     */
    public function rules()
    {
        return [
           バリデーションのロジックをかく
        ];
    }
}
そしてコントローラーでフォームリクエストを読み込むだけです。
use App\Http\Requests\〇〇Request;

class 〇〇Controller extends Controller
{
    /**
     * 登録処理
     */
    public function store(〇〇Request $request)
    {
        return redirect()->route('index');
    }

    /**
     * 更新処理
     */
    public function update(〇〇Request $request, $id)
    {

        return redirect()->route('.index');
    }
}
ファイルを分けるとかなりすっきりしましたね。
それでは、実際にフォームリクエストを作成してLaravelでバリデーションを実装する手順をみていきましょう。
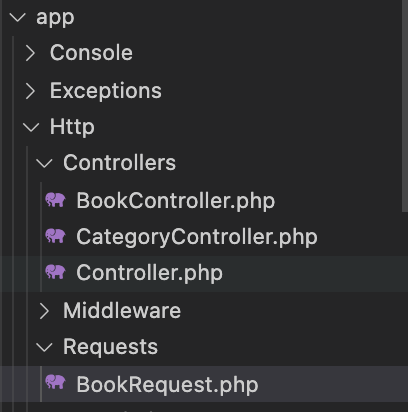
フォームリクエストを作成する
まずはバリデーションロジックを書くためのフォームリクエストを作成します。
php artisan make:request BookRequestapp>Http>Requestsファイル下にBookRequest.phpが作成されます。
さらに、authorizeをfalseからtrueに変更しましょう。
<?php

namespace App\Http\Requests;

use Illuminate\Foundation\Http\FormRequest;

class BookRequest extends FormRequest
{
    /**
     * Determine if the user is authorized to make this request.
     *
     * @return bool
     */
    public function authorize()
    {
        return true;
    }

    /**
     * Get the validation rules that apply to the request.
     *
     * @return array
     */
    public function rules()
    {
        return [
            //
        ];
    }
}
これで準備OKです。
バリデーションを記述する
フォームリクエストに実際にバリデーションを記述していきましょう。
今回は以下のような本の名称をテキストで入力する際のバリデーションを想定します。

ビューはこんな感じです。
      <div class="form-group">
        <label for="book_name">{{ __('本の名称') }}<span class="badge badge-danger ml-2">{{ __('必須') }}</span></label>
        <input type="text" class="form-control {{ $errors->has('book_name') ? 'is-invalid' : '' }}" name="book_name" id="book_name">
        @if ($errors->has('book_name'))
          <span class="invalid-feedback" role="alert">
            {{ $errors->first('book_name') }}
          </span>
        @endif
      </div>
作成したフォームリクエストの編集をしましょう。
<?php

namespace App\Http\Requests;

use Illuminate\Foundation\Http\FormRequest;

class BookRequest extends FormRequest
{
    /**
     * Determine if the user is authorized to make this request.
     *
     * @return bool
     */
    public function authorize()
    {
        return true;
    }

    /**
     * Get the validation rules that apply to the request.
     *
     * @return array
     */
    public function rules()
    {
        return [
            'ビューのnameの属性名' => 'バリデーションの種類',
        ];
    }
}
ビューのnameの属性名とは、ビューのフォームで以下のように書いていると思います。
<input type="text" name="book_name" value="〇〇">ここのname=””で指定した属性名を書くということです。
バリデーションの種類はたくさんありますが代表的なものでいくと、必須、文字列型、数値型、最大・最小文字数、ユニークなどがあります。
<?php

namespace App\Http\Requests;

use Illuminate\Foundation\Http\FormRequest;

class BookRequest extends FormRequest
{
    /**
     * Determine if the user is authorized to make this request.
     *
     * @return bool
     */
    public function authorize()
    {
        return true;
    }

    /**
     * Get the validation rules that apply to the request.
     *
     * @return array
     */
    public function rules()
    {
        return [
            'book_name' => 'required',
        ];
    }

    public function messages()
    {
        return [
            'book_name.required' => '本の名称は必ず入力してください。',
        ];
    }
}
これで、book_nameは必須というバリデーションが実装できます。
messegesを追加することで、エラーメッセージを指定できますよ。
上記の場合は、もし本の名称がからの場合に、「本の名称は必ず入力してください」とエラーメッセージが出ます。
コントローラーでフォームリクエストを読み込む
フォームリクエストにバリデーションロジックが記述できたらあとはコントローラーで読み込むだけです。
<?php

namespace App\Http\Controllers;

use Illuminate\Http\Request;
use App\Http\Requests\BookRequest;←追加

class BookController extends Controller
{
    /**
     * 登録処理
     */
    public function store(BookRequest $request)←追加
    {
        return redirect()->route('index');
    }

    /**
     * 更新処理
     */
    public function update(BookRequest $request)←追加
    {
        return redirect()->route('index');
    }
}
上記のようにBookRequestを冒頭とそれぞれバリデーションを適用させたい処理に記述すればOKです。
最初にバリデーションを行い、バリデーションが通過すれば登録処理や更新処理が走ります。
複数のバリデーションを適用させたいとき
複数のバリデーションを適用させたいときもやることはそこまで変わりません。
<?php

namespace App\Http\Requests;

use Illuminate\Foundation\Http\FormRequest;

class BookRequest extends FormRequest
{
    /**
     * Determine if the user is authorized to make this request.
     *
     * @return bool
     */
    public function authorize()
    {
        return true;
    }

    /**
     * Get the validation rules that apply to the request.
     *
     * @return array
     */
    public function rules()
    {
        return [
            'book_name'   => 'required|max:10',
            'book_number' => 'required|numeric|digits:2|between:1,90',
        ];
    }

    public function messages()
    {
        return [
            'book_name.required'   => '本の名称は必ず入力してください。',
            'book_name.max'        => '本の名称は10文字以内で入力してください。',
            'book_number.required' => '本のNo.は必ず入力してください',
            'book_number.numeric'  => '本のNo.は数値で入力してください。',
            'book_number.digits'   => '2桁以内で入力してください。',
            'book_number.between'  => '1〜90の間で入力してください',
        ];
    }
}
これでフォームリクエストを用いて複数のバリデーションは実装できます。
最後に+αでこんな書き方もあるよ〜といのも紹介しておきます。
【実務編】フォームリクエストをさらにすっきり書くなら
私が実務で実際にフォームリクエストを書いている方法はさらにシンプルです。
<?php

namespace App\Http\Requests;

use Illuminate\Foundation\Http\FormRequest;

class BookRequest extends FormRequest
{
    /**
     * Determine if the user is authorized to make this request.
     *
     * @return bool
     */
    public function authorize()
    {
        return true;
    }

    /**
     * Get the validation rules that apply to the request.
     *
     * @return array
     */
    public function rules()
    {
        $validate = [];

        $validate += [
            'book_name' => [
                'required',
                'max:10',
            ],
            'book_number' => [
                'required',
                'numeric',
                'digits:2',
                'between:1,90'
            ],
        ];

        return $validate;
    }
}
$validateの配列を作り、もしバリデーションに引っかかるものがあれば配列に追加していきます。
最終的に$validateが空で返されればバリデーションはないことになりますし、何かしらあればバリデーションに引っかかったことを意味します。
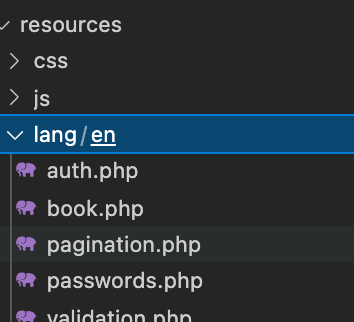
messagesメソッドが消えましたが、これはどこに行ったのかというとvalidation.phpに記述します。
<?php

return [

    /*
    |--------------------------------------------------------------------------
    | Validation Language Lines
    |--------------------------------------------------------------------------
    |
    | The following language lines contain the default error messages used by
    | the validator class. Some of these rules have multiple versions such
    | as the size rules. Feel free to tweak each of these messages here.
    |
    */


    'between' => [
        'numeric' => ':attributeは1〜90までの間で入力してください',// 修正!!!!!!!!!!!!
        'file' => 'The :attribute must be between :min and :max kilobytes.',
        'string' => 'The :attribute must be between :min and :max characters.',
        'array' => 'The :attribute must have between :min and :max items.',
    ],
    'digits' => ':attributeは:digits桁以内で入力してください', // ←修正!!!!!!!!!!!
    'digits_between' => 'The :attribute must be between :min and :max digits.',
    'exists' => '選択された:attribute は存在しません。',
    'max' => [
        'numeric' => 'The :attribute must not be greater than :max.',
        'file' => 'The :attribute must not be greater than :max kilobytes.',
        'string' => ':attributeは10文字以内で入力してください。',// 修正!!!!!!!!!!!!!!!!!!!!!
        'array' => 'The :attribute must not have more than :max items.',
    ],
    'mimes' => 'The :attribute must be a file of type: :values.',
    'mimetypes' => 'The :attribute must be a file of type: :values.',
    'min' => [
        'numeric' => 'The :attribute must be at least :min.',
        'file' => 'The :attribute must be at least :min kilobytes.',
        'string' => 'The :attribute must be at least :min characters.',
        'array' => 'The :attribute must have at least :min items.',
    ],
    'multiple_of' => 'The :attribute must be a multiple of :value.',
    'not_in' => 'The selected :attribute is invalid.',
    'not_regex' => 'The :attribute format is invalid.',
    'numeric' => ':attributeは数値で入力してください',// 修正!!!!!!!!!
    'password' => 'The password is incorrect.',
    'present' => 'The :attribute field must be present.',
    'regex' => 'The :attribute format is invalid.',
    'required' => ':attributeは必ず入力してください',// 修正!!!!!
    /*
    |--------------------------------------------------------------------------
    | Custom Validation Language Lines
    |--------------------------------------------------------------------------
    |
    | Here you may specify custom validation messages for attributes using the
    | convention "attribute.rule" to name the lines. This makes it quick to
    | specify a specific custom language line for a given attribute rule.
    |
    */

    'custom' => [
        'attribute-name' => [
            'rule-name' => 'custom-message',
        ],
    ],

    /*
    |--------------------------------------------------------------------------
    | Custom Validation Attributes
    |--------------------------------------------------------------------------
    |
    | The following language lines are used to swap our attribute placeholder
    | with something more reader friendly such as "E-Mail Address" instead
    | of "email". This simply helps us make our message more expressive.
    |
    */

    'attributes' => [
        'book_name'   => '本の名称',
        'category_id' => 'カテゴリーID',
        'user_id'     => 'ユーザーID',
        'book_number' => '本のNo.'
    ],

];
上記のようにattributesにnameの属性名を記述し、ぞれぞれのバリデーションメソッド(requiredやnumericなど)に表示させたいエラーメッセージを書きます。
これで同じようにバリデーションを実装できるのでおすすめです。
【まとめ】Laravel8でバリデーションを実装する手順
フォームリクエストを用いてバリデーションを実装する方法を解説してきました。
コントローラーとバリデーションロジックを切り分けることで、コントローラもすっきりしますし何よりも修正しやすいです。
実務になるとさらに複雑なバリデーションになるし、コード量もかなり増えるのでフォームリクエストで実装できるようにしましょう。
他にも実務に役立つLaravelを解説しているので参考にしてみてくださいね!!


コメント