


Laravelのマイグレーションって何だか苦手なんだよな。これを機にマイグレーションと仲良くなりたいけど、どうすれば….
こんな疑問を解決します。
私も実務で最初につまづいたのがマイグレーションでした。
マイグレーションは、データベースのテーブルを作成し、カラムを後から追加したりとLaravelでアプリを作成するなら必須で覚える項目です。
しかし、データベース周りになるので初心者のうちは苦手意識が強いでしょう。
この記事では、実務でも役立つLaravelのマイグレーションについてわかりやすく解説していきます。
最後まで参考にしてくれると嬉しいです!


Laravelのmigrationで役立つコマンド集
実行されているマイグレーションファイルを確認する。実行されていればYes、実行されていなければNoが表示される
php artisan migrate:statusマイグレーションの実行
php artisan migrate・ロールバック
php artisan migrate:rollback指定の位置までrollbackする
php artisan migrate:rollback --step=3全てのマイグレーションファイルをrollbackしてからmigrateをする
php artisan migrate:refresh・マイグレーションファイルの新規作成
php artisan make:migration create_テーブル名_table --create=テーブル名

例:
php artisan make:migration create_tests_table --create=tests
・既存テーブルにカラムを追加
$ php artisan make:migration add_カラム名toテーブル名 --table=テーブル名

例:
$ php artisan make:migration add_email_to_tests_table --table=tests
・既存テーブルのカラムを削除
$ php artisan make:migration drop_カラム名toテーブル名 --table=テーブル名

例:
$ php artisan make:migration drop_email_to_tests --table=tests
Laravelのmigrationテーブルの新規作成
テーブルを新規作成する際のマイグレーションファイルの作成は以下です。
※新しく企業テーブルを作る想定です
php artisan make:migration create_companies_table --create=companiesマイグレーションファイルが作成されます。
<?php

use Illuminate\Database\Migrations\Migration;
use Illuminate\Database\Schema\Blueprint;
use Illuminate\Support\Facades\Schema;

class CreateCompaniesTable extends Migration
{
    /**
     * Run the migrations.
     *
     * @return void
     */
    public function up()
    {
        Schema::create('companies', function (Blueprint $table) {
            $table->id();
            $table->string('company_name');
            $table->timestamps();
        });
    }

    /**
     * Reverse the migrations.
     *
     * @return void
     */
    public function down()
    {
        Schema::dropIfExists('companies');
    }
}
マイグレーションファイルを上記のように編集します。
※Laravel6の場合は、$table->id();ではなく$table->bigIncrements();になっていると思います。意味は同じです。
編集できたら以下を実行。
php artisan migrateデータベースに新しくcompaniesテーブルができます。
ちなみに、以下を実行することでphp artisan migrateをする前の状況にできます。
php artisan migrate:rollbackLaravelのmigrationテーブルにカラムを追加する
次に先ほど作成したcompaniesテーブルにカラムを追加します。
その場合はカラム追加用のマイグレーションファイルを作成し、追加したいカラムを記述していきます。
カラム追加のマイグレーションファイルを作成
php artisan make:migration add_なんでもいいがカラム名がわかりやすい_to_テーブル名_table --table=テーブル名emailとpasswordのカラムを追加するので以下のようにcolumnsとしました。
php artisan make:migration add_columns_to_companies_table --table=companiesマイグレーションファイルを編集
<?php

use Illuminate\Database\Migrations\Migration;
use Illuminate\Database\Schema\Blueprint;
use Illuminate\Support\Facades\Schema;

class AddColumnsToCompaniesTable extends Migration
{
    /**
     * Run the migrations.
     *
     * @return void
     */
    public function up()
    {
        Schema::table('companies', function (Blueprint $table) {
            $table->string('email', 255)->after('company_name');
            $table->string('password', 255)->after('email');
        });
    }

    /**
     * Reverse the migrations.
     *
     * @return void
     */
    public function down()
    {
        Schema::table('companies', function (Blueprint $table) {
            $table->dropColumn('email');
            $table->dropColumn('password');
        });
    }
}
up()に追加したいカラムを書きます。
->after(‘カラム名’)で’カラム名’の後に追加したいカラムを追加できます。今回の場合は、company_nameの後にemailカラムが追加されます。
そして、emailの後にpasswordカラムが追加されます。
down()にはrollbackした時の処理を必ず書きましょう。
$table->dropColumn(‘カラム名’)でrollbackしたときにカラムが削除されます。
マイグレーションファイルが編集できたら以下を実行。
php artisan migrateこれでcompaniesテーブルにemailとpasswordカラムが追加されました。
Laravelのmigrationでカラムを削除する
次に先ほどcompaniesテーブルに追加したemailとpasswordのカラムを削除します。
カラムを削除するには、カラム削除用のマイグレーションファイルを作成してください。
php artisan make:migration drop_カラム名(名前はわかればなんでもいい)_to_テーブル名_table --table=テーブル名 php artisan make:migration drop_columns_to_companies_table --table=companiesマイグレーションファイルを編集します。
<?php

use Illuminate\Database\Migrations\Migration;
use Illuminate\Database\Schema\Blueprint;
use Illuminate\Support\Facades\Schema;

class DropColumnsToCompaniesTable extends Migration
{
    /**
     * Run the migrations.
     *
     * @return void
     */
    public function up()
    {
        Schema::table('companies', function (Blueprint $table) {
            $table->dropColumn('email');
            $table->dropColumn('password');
        });
    }

    /**
     * Reverse the migrations.
     *
     * @return void
     */
    public function down()
    {
        Schema::table('companies', function (Blueprint $table) {
            $table->string('email', 255)->after('company_name');
            $table->string('password', 255)->after('email');
        });
    }
}
upには、カラムを削除する項目を書きます。
$table->dropColumn(‘カラム名’)でカラムを削除することができますよ!
downには、rollbackした時の処理を書きます。
ここで注目してほしいことは、カラムを追加するのとカラムを削除する操作は逆のことをしているだけですね!
つまり、カラム追加ではupにカラム追加するように書いていましたが、カラム削除のマイグレーションファイルではupにカラム削除を書いています。
php artisan migrateを実行すると、companiesテーブルからemailとpasswordのカラムが削除されます。
rollbackを実行すると、companiesテーブルにemailとpasswordのカラムが追加されることが確認できるでしょう。
Laravelのmigrationでテーブルを削除する
次に、そもそもcompaniesテーブルを作り直したいって時にテーブルごと削除する方法を解説します。
現在のcompaniesテーブルの構造は以下です。
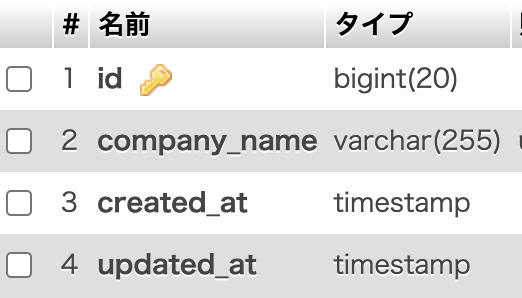
先ほどemailとpasswordを削除したので、最初にcreateで作成した状態になっています。
では、companiesテーブルごと削除する方法ですが、以下のようにマイグレーションファイルを作成します。
php artisan make:migration drop_テーブル名_table --table=テーブル名php artisan make:migration drop_companies_table --table=companiesマイグレーションファイルを編集します。
<?php

use Illuminate\Database\Migrations\Migration;
use Illuminate\Database\Schema\Blueprint;
use Illuminate\Support\Facades\Schema;

class DropCompaniesTable extends Migration
{
    /**
     * Run the migrations.
     *
     * @return void
     */
    public function up()
    {
        Schema::table('companies', function (Blueprint $table) {
            Schema::dropIfExists('companies');
        });
    }

    /**
     * Reverse the migrations.
     *
     * @return void
     */
    public function down()
    {
        Schema::create('companies', function (Blueprint $table) { ←注意!!!
            $table->id();
            $table->string('company_name');
            $table->timestamps();
        });
    }
}
テーブルごと削除したい場合は、upにSchema::dropIfExists(‘テーブル名’)と;書きます。
そしてdownメソッドの注意点ですが、マイグレーション作成時にはSchema::table(‘テーブル名’,となっているので、Schema::create(‘テーブル名’,に変更しましょう。
なぜなら、downはrollback時の処理なので、Schema::tableだとそもそもテーブルが存在していないエラーが発生するからです。
upでテーブルを削除する処理を書いているので、rollbackした時はテーブルを作成するべきですよね。
なので、downにはSchema::createと書きましょう。
php artisan migrateを実行すると、テーブルが削除され、php artisan migrate:rollbackをするとテーブルが作成されます。
Laravelのmigrationでカラムの型を変更する
カラムの型やこの後説明するカラムの名前を変更する場合は、まずcomposerをインストールする必要があります。
composer require doctrine/dbalcomposerのインストールに失敗する場合は、エラー文をググってみましょう。Laravelのバージョンであったり、私の場合はdockerで開発していたのでメモリー不足を解消することで無事にインストールできました。
composerがインストールできたら、カラムを変更するマイグレーションファイルを作成します。
※もしtimestampを変更する場合は、Laravel8公式ドキュメントのカラムの変更の項目を参照ください。
php artisan make:migration change_カラム名(名前は何でもいい)_to_テーブル名_table --table=テーブル名php artisan make:migration change_company_name_to_companies_table --table=companiesマイグレーションファイルを編集する
今回はcompany_nameを255字から50字に制限します。
<?php

use Illuminate\Database\Migrations\Migration;
use Illuminate\Database\Schema\Blueprint;
use Illuminate\Support\Facades\Schema;

class ChangeCompanyNameToCompaniesTable extends Migration
{
    /**
     * Run the migrations.
     *
     * @return void
     */
    public function up()
    {
        Schema::table('companies', function (Blueprint $table) {
            $table->string('company_name', 50)->change();
        });
    }

    /**
     * Reverse the migrations.
     *
     * @return void
     */
    public function down()
    {
        Schema::table('companies', function (Blueprint $table) {
            $table->string('company_name')->change();
        });
    }
}
upには変更したい内容を書きます。もしcompany_nameを文字列型ではなく数値型でNULLを許可に変更したい場合は、$table->integer(‘カラム名’)->nullable->change();と書けばOKです。
downには、戻したいカラムの型を書きます。
php artisan migrateこれでcompany_nameの型を変更できます。
Laravelのmigrationでカラムの名前を変更する
カラムの名前を変更する場合も、composer require doctrine/dbalをインストールしておく必要があります。
それではカラムの名前を変更します。
company_name→nameに変更する予定です。
php artisan make:migration rename_カラム名(何でもいい)_to_テーブル名_table --table=テーブル名php artisan make:migration rename_company_name_to_companies_table --table=companiesマイグレーションファイルを編集します。
<?php

use Illuminate\Database\Migrations\Migration;
use Illuminate\Database\Schema\Blueprint;
use Illuminate\Support\Facades\Schema;

class RenameCompanyNameToCompaniesTable extends Migration
{
    /**
     * Run the migrations.
     *
     * @return void
     */
    public function up()
    {
        Schema::table('companies', function (Blueprint $table) {
            $table->renameColumn('company_name', 'name');
        });
    }

    /**
     * Reverse the migrations.
     *
     * @return void
     */
    public function down()
    {
        Schema::table('companies', function (Blueprint $table) {
            $table->renameColumn('name', 'company_name');
        });
    }
}
upメソッドでカラム名を変更したい処理を書きます。
renameColumn(‘変更したいカラム’, ‘変更後のカラム名’)
downには、逆の処理を書きます。
php artisan migrateこれでカラム名を変更できます。
テーブル名を変更する
カラムではなく、テーブル名を変更したい場合は以下のようにSchema::renameでできます。
    public function up()
    {
        //会社テーブルの名前変更 名称をcompanies→storesに変更
        Schema::rename('companies', 'stores');
    }

    /**
     * Reverse the migrations.
     *
     * @return void
     */
    public function down()
    {
        // stores→companiesに変更
        Schema::rename('stores', 'companies');
    }
Laravelのmigrationで外部キー制約を追加する
次にcompaniesテーブルに外部キーを追加する場合を解説します。
使用するcompaniesテーブルは以下のような構造になっています。
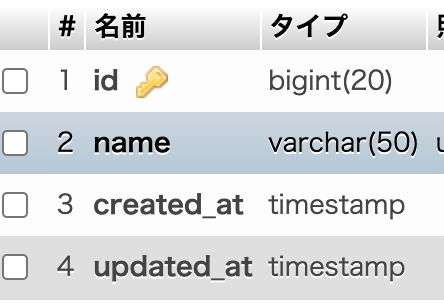
nameの後にcategory_idの外部キーを追加します。
※事前にcategoriesテーブルを作成しております。
外部キーを追加するのですが、テーブルにカラムを追加する操作と同じなので以下のようにaddファイルでOKです。
php artisan make:migration add_カラム名_to_companies_table --table=テーブル名php artisan make:migration add_foreign_key_category_id_to_companies_table --table=companiesマイグレーションを編集します。
<?php

use Illuminate\Database\Migrations\Migration;
use Illuminate\Database\Schema\Blueprint;
use Illuminate\Support\Facades\Schema;

class AddForeignKeyCategoryIdToCompaniesTable extends Migration
{
    /**
     * Run the migrations.
     *
     * @return void
     */
    public function up()
    {
        Schema::table('companies', function (Blueprint $table) {
            // category_idカラムの追加
            $table->bigInteger('category_id')->unsigned()->after('name');
            // 外部キー制約
            $table->foreign('category_id')->references('category_id')->on('categories');
        });
    }

    /**
     * Reverse the migrations.
     *
     * @return void
     */
    public function down()
    {
        Schema::table('companies', function (Blueprint $table) {
            // 外部キー制約の削除
            $table->dropForeign(['category_id']);
            // カラムの削除
            $table->dropColumn('category_id');
        });
    }
}
upに追加するカラムと外部キー制約を書き、downには外部キー制約を外してからカラムを削除するようにします。
もし、以下のように書くと「外部キー制約があるからカラムを削除できないよ!」とエラーが出ます。
以下の書き方はNGのパターン
<?php

    /**
     * Reverse the migrations.
     *
     * @return void
     */
    public function down()
    {
        Schema::table('companies', function (Blueprint $table) {
            // カラムの削除
            $table->dropColumn('category_id');
            // 外部キー制約の削除
            $table->dropForeign(['category_id']);
        });
    }
}
upメソッドの解説です。
            // category_idカラムの追加
            $table->bigInteger('category_id')->unsigned()->after('name');
            // 外部キー制約
            $table->foreign('category_id')->references('category_id')->on('categories');

// unsignedとは符号なしを意味する。つまり-の数値は入らないってこと。
bigInteger(‘category_id’)->unsigned()ですが、categoriesテーブルのcategory_idがbigIntegerのunsignedなので型を合わせる必要があります。
なぜなら以下のようにテーブルを作成したときは、bigInteger型のunsinedになるからです。
<?php

use Illuminate\Database\Migrations\Migration;
use Illuminate\Database\Schema\Blueprint;
use Illuminate\Support\Facades\Schema;

class CreateCompaniesTable extends Migration
{
    /**
     * Run the migrations.
     *
     * @return void
     */
    public function up()
    {
        Schema::create('categories', function (Blueprint $table) {
            $table->id('category_id');
            $table->string('category_name');
            $table->timestamps();
        });
    }

    /**
     * Reverse the migrations.
     *
     * @return void
     */
    public function down()
    {
        Schema::dropIfExists('categories');
    }
}
型が違うカラムを追加しようとするとエラー起きるので注意が必要です。
php artisan migrateを実行すると、companiesテーブルに外部キーのcategory_idが追加されます。
Laravelのmigrationで外部キー制約を削除する
次に外部キー制約の削除についてですが、外部キー制約の追加の逆をやればいいだけです。
まずは外部キー制約の削除するためにマイグレーションファイルを作成します。
php artisan make:migration drop_カラム名(ぶっちゃけ名前はなんでもいい)_to_テーブル名_table --table=テーブル名php artisan make:migration drop_category_id_foreign_key_to_companies_table --table=companiesマイグレーションファイルを編集する
<?php

use Illuminate\Database\Migrations\Migration;
use Illuminate\Database\Schema\Blueprint;
use Illuminate\Support\Facades\Schema;

class DropCategoryIdForeignKeyToCompaniesTable extends Migration
{
    /**
     * Run the migrations.
     *
     * @return void
     */
    public function up()
    {
        Schema::table('companies', function (Blueprint $table) {
            // 外部キー制約の削除
            $table->dropForeign(['category_id']);
            // カラムの削除
            $table->dropColumn('category_id');
        });
    }

    /**
     * Reverse the migrations.
     *
     * @return void
     */
    public function down()
    {
        Schema::table('companies', function (Blueprint $table) {
            // category_idカラムの追加
            $table->bigInteger('category_id')->unsigned()->after('name');
            // 外部キー制約
            $table->foreign('category_id')->references('category_id')->on('categories');
        });
    }
}
上述の外部キー制約の追加と逆の操作をしただけです。
php artisan migrateを実行すれば、外部キー制約とカラムが削除されます。
Laravelで特定のmigrationファイルを実行する
php artisan migrateをすると全てのマイグレーションファイルが実行されますが、特定のマイグレーションファイルだけ実行させたい場合もあるでしょう。
その場合は、以下のように–pathで指定します。
php artisan migrate --path=/database/migrations/マイグレーションファイル名

例:
php artisan migrate --path=/database/migrations/2021_07_30_103926_add_category_code_to_books_table.php
【まとめ】Laravelでmigrationに慣れる
より詳しくマイグレーションファイルの書き方や構造について知りたい方はLaravel公式ドキュメントも読んでおくといいでしょう。
マイグレーションは慣れるまで何度も自分の環境で試して身につけておく必要があります。
ぜひこの記事を参考にしてマイグレーションに慣れていきましょう!


コメント